
If your mornings feel like a tiny bit of chaos dressed up as a routine, you are totally my people! Seriously, getting a nutritious meal into everyone before the door slams shut sometimes requires an emergency plan. That’s why I started making these Sheet Pan Breakfast Burritos Freezer Friendly on Sunday—it’s been an absolute lifesaver. Forget rolling eight tiny, stubborn burritos one by one; this sheet pan method bakes everything into one giant, cheesy, savory casserole. Then, you just cut portions later! I swear this recipe has bought me back at least twenty minutes of sanity every single weekday morning this month. It’s my secret weapon for simple family meals that actually taste amazing, even straight from the freezer.
You absolutely have to check out how I prep for the entire week so I don’t have to stress about lunch either; you can find my tips for meal prep over here!
Why Sheet Pan Breakfast Burritos Freezer Friendly Saves Your Mornings
Look, the main reason I developed this recipe is because rolling individual breakfast burritos feels like a form of punishment when you have three kids who need to leave the house five minutes ago. This sheet pan method changes everything! You’re dumping ingredients, baking one big thing, and suddenly you have eight amazing, nutritious meals ready to go.
It truly transforms chaos into calm. Plus, cleanup is an absolute breeze compared to fiddling with tortillas and sticky fillings everywhere.
- It drastically cuts down the active cooking time needed throughout the week.
- You get that hearty, filling breakfast taste without the morning fuss.
- It perfectly supports making a big batch because it’s designed to be made ahead and stored easily.
- It’s proof that quick meals don’t have to sacrifice flavor or goodness.
Time-Saving Cooking Tips for Sheet Pan Breakfast Burritos Freezer Friendly
The real genius here is ditching the tortilla assembly line! Rolling burritos takes ages, and they often end up a little messy or unevenly filled. When you make these Sheet Pan Breakfast Burritos Freezer Friendly, you’re just layering ingredients in one dish. You bake it, let it set up, and cut it like a breakfast lasagna. Think about how much time you save not scrubbing melted cheese off every single tortilla wrapper! It’s genuinely the easiest time-saving cooking tip I’ve ever adopted for busy weekdays.
Essential Ingredients for Your Sheet Pan Breakfast Burritos Freezer Friendly
Okay, let’s talk about what goes into this magic casserole because using the right stuff is half the battle in achieving that amazing, solid texture that freezes so well. We’re keeping this simple—this is all about making simple, healthy meals using pantry staples. You’ll need quality ingredients, but nothing fancy or hard to find, which is key when you’re making something for the freezer!
Ingredient Clarity: Hash Browns and Protein Base
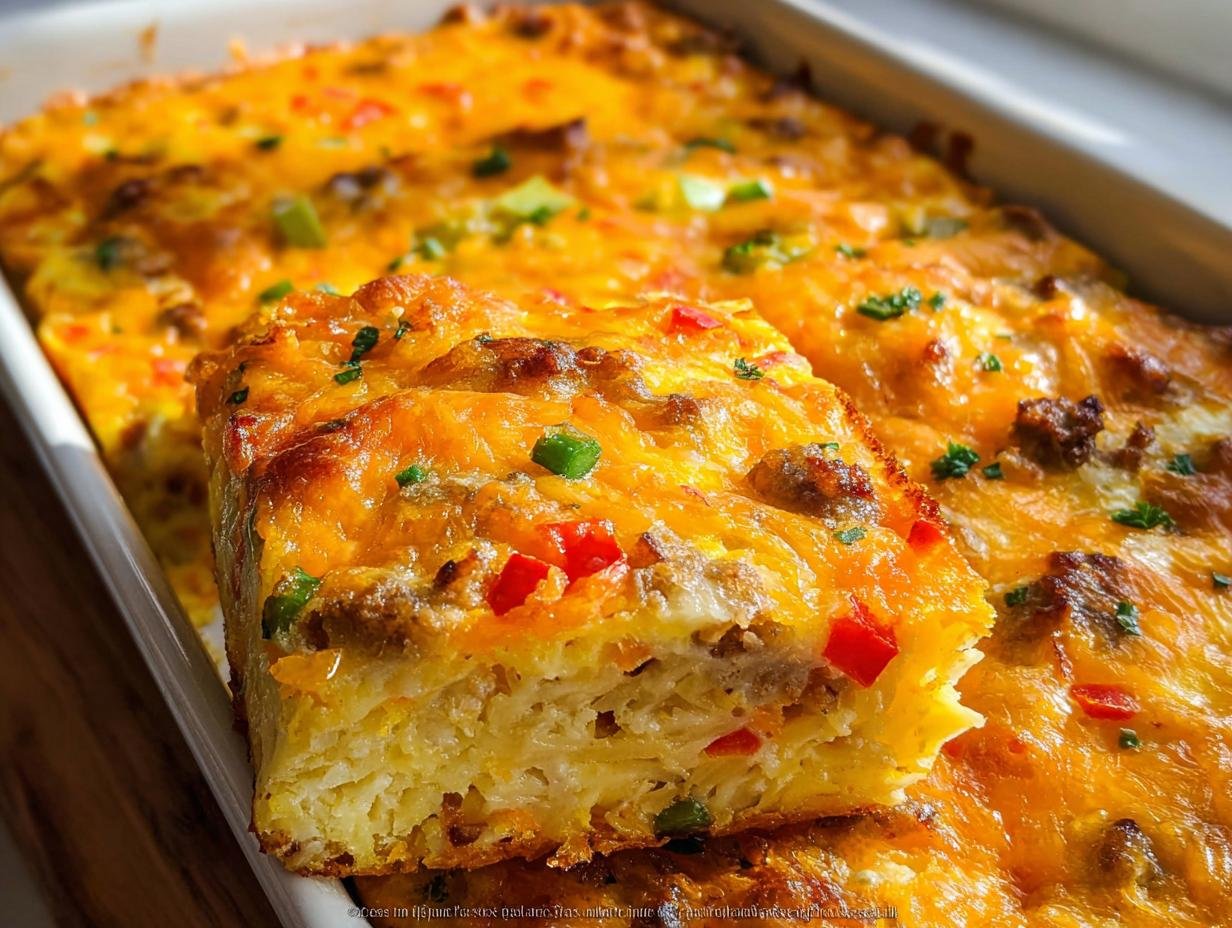
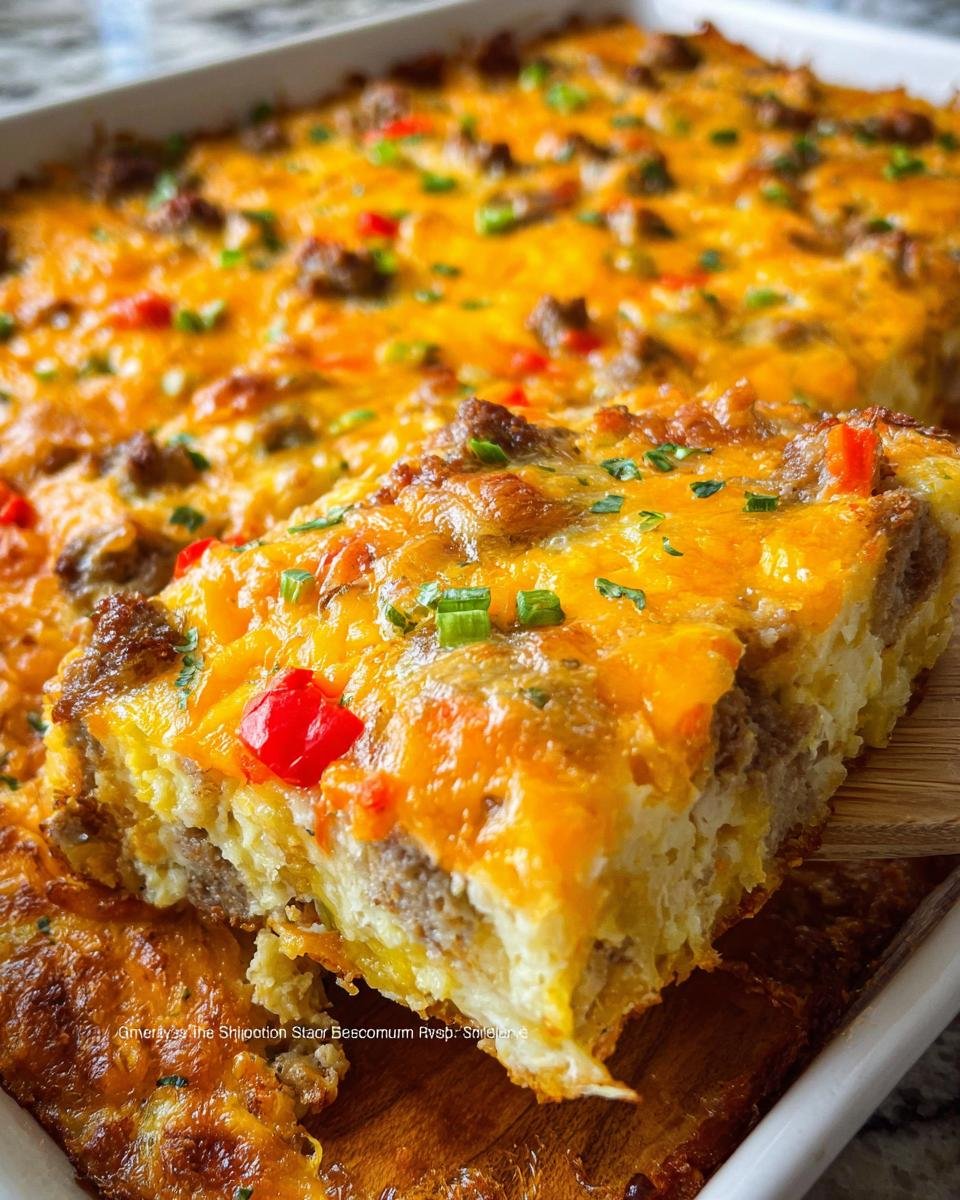
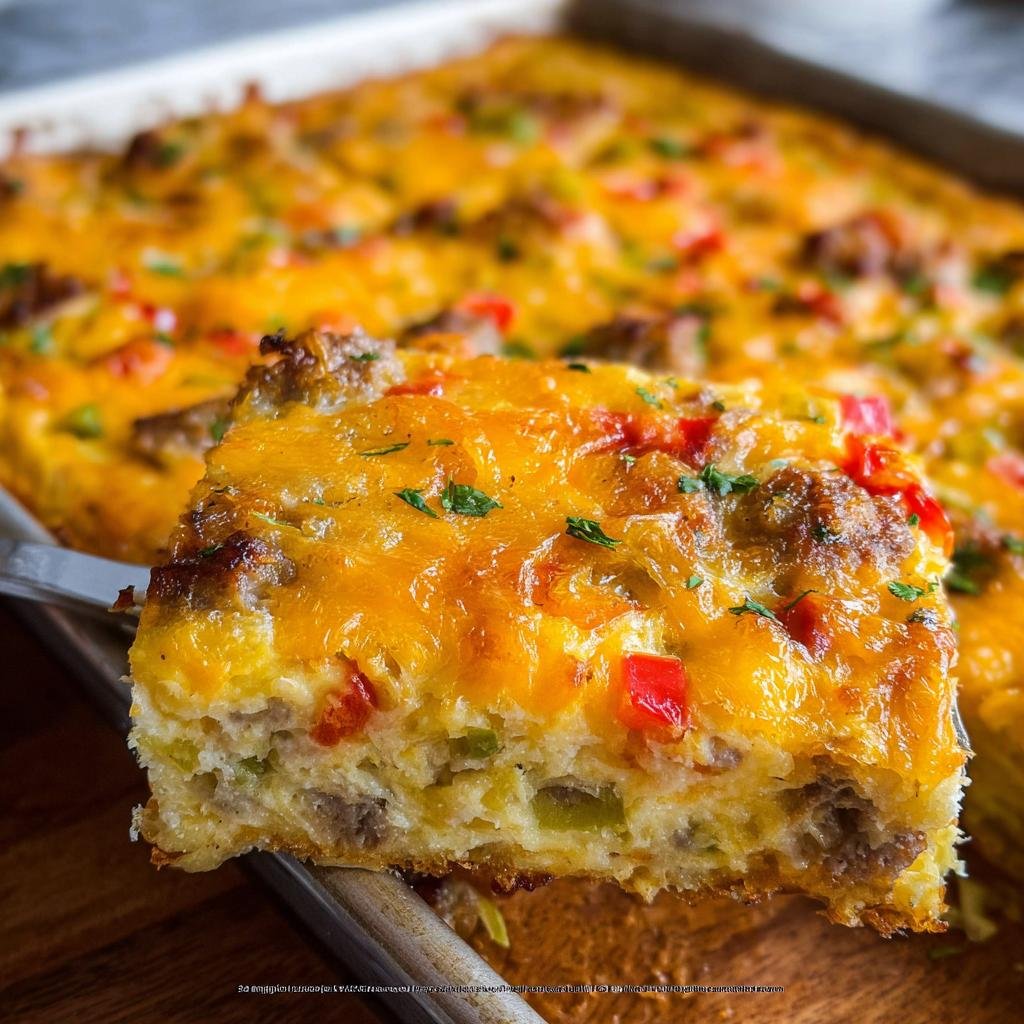
First up, the base has to be firm. Make sure you grab 20 ounces of hash browns, but listen closely: they MUST be thawed first! Seriously, soggy hash browns turn everything into mush, especially when you freeze and reheat. For the protein, we’re using a full pound of ground pork sausage, but you need to cook it, crumble it up perfectly, and make sure it is completely drained of all fat. Don’t skip the draining step, or you’ll end up with an oily layer floating on your eggs!
Then we toss in the veggies—finely diced onion and diced red and green bell peppers for color and crunch. For the cheese, we are reserving a bit! You need 2 cups total of shredded cheddar, but only mix 1 1/2 cups into the base layer. That last half cup is for sprinkling on top right before baking, which gives that beautiful browned crust.
The Egg Mixture for Sheet Pan Breakfast Burritos Freezer Friendly
The wet binder is what holds our whole thing together. You need 8 whole eggs. Instead of regular milk, we’re using a whole can of evaporated milk—that’s about 12 ounces—or if you don’t have that, use 1 and 1/3 cups of regular milk. Evaporated milk just gives it a richer, creamier mouthfeel, which is perfect for freezing.
Grab that whisk! You’ll mix the eggs and milk until they are really well combined. I mean, really whisk until it looks frothy. This is also where you add your zip: half a teaspoon of salt and pepper, and if you want a little something extra, a half teaspoon of Italian seasoning works wonders. It just gives those burritos a nice savory kick when reheating later!
Step-by-Step Instructions for Sheet Pan Breakfast Burritos Freezer Friendly
Now we get to the fun part—putting this whole beautiful mess together! Don’t stress about perfection here; it’s breakfast casserole, not delicate French pastry. We’re aiming for efficient, flavorful layering. If you have time to prep this the night before, even better, as that lets the flavors mingle beautifully before baking. These instructions are exactly how I make my go-to batch of Sheet Pan Breakfast Burritos Freezer Friendly portions.
Preparing the Pan and Mixing Dry Ingredients
First things first—get that oven heating up to 350°F if you’re baking it right away. Grab your 9×13 inch pan—a standard size works perfectly for this recipe. Give it a really generous spray with cooking spray or grease it well; nobody wants stuck edges!
In the prepared dish, we layer the base. Start with those thawed hash browns—spread them out evenly. Next, add your cooked and drained sausage, all of your diced onions and both colors of bell pepper. Now, sprinkle in 1 1/2 cups of that shredded cheddar cheese right over the top of this mix. Use a spatula to gently push everything together so it’s one sturdy, delicious layer hugging the bottom of the pan.
Creating the Custard and Assembly
While that base is chilling (or getting ready for the oven), let’s make the egg custard. Grab a large bowl—bigger is better for whisking! Crack in those 8 eggs, pour in the can of evaporated milk, and add your salt, pepper, and optional Italian seasoning. Whisk this vigorously! You really want those yolks and whites totally combined into a smooth, pale yellow liquid. That thorough whisking guarantees a nice, uniform texture in your final bake.
Next, pour that whole egg mixture right over your hash brown and sausage base. Gently nudge the pan so the egg works its way down into the gaps. Finally, take that remaining half cup of cheddar cheese and sprinkle it evenly right across the very top. It should look rustic and ready for the oven!

Baking Time and Temperature for Sheet Pan Breakfast Burritos Freezer Friendly
If you decided to make this ahead (way to go, planner!), cover the dish with foil and stick it in the fridge overnight. If you’re baking it now, ditch the foil for now. Pop the uncovered pan into your 350°F oven. It needs a good long bake time, usually between 55 to 65 minutes. You’ll know it’s done when the center is set and doesn’t jiggle anymore. Trust me, you want it fully cooked through so it freezes and reheats perfectly later!
If you covered it overnight, remember to pull the foil off before it goes in, just like we did above. Prepping this on the weekend makes reheating smooth sailing!
Expert Tips for Perfect Sheet Pan Breakfast Burritos Freezer Friendly Results
Even though this is a simple casserole, there are a couple of tricks I learned early on that keep this from becoming that dreaded soggy breakfast bake. The biggest potential pitfall is moisture control! Remember I told you to drain the sausage well? Do that, and then also try not to over-pack the hash browns when you spread them in the pan. You want a nice even layer, but don’t press them down like concrete.
When you’re checking for doneness, don’t just trust the jiggle test. I always stick a thin knife or a toothpick right in the center. If it comes out clean, you are golden. Watery spots mean it needs another ten minutes. Following these pointers ensures your Sheet Pan Breakfast Burritos Freezer Friendly portions will taste phenomenal when you reheat them weeks from now. For more great make-ahead ideas for your busy week, check out my guide on quick meal prep!
How to Store and Reheat Your Sheet Pan Breakfast Burritos Freezer Friendly Portions
This is the part where all your hard work really pays off! Once this massive breakfast bake comes out of the oven, you absolutely cannot wrap it while it’s hot. You have to let it cool down completely on the counter—this is key to avoiding that watery mess when you inevitably freeze it. Patience, my friend, patience!
Once it’s room temperature, grab a knife and cut the casserole into 8 nice, even portions. I like to wrap each individual square tightly first in a layer of parchment paper—this stops the foil or bag from sticking to the cheesy top. Then, wrap it again in aluminum foil or place it into a heavy-duty freezer bag. Label it with the date so you know when you made those awesome healthy bowls with protein and veggies!

Reheating is super simple. For the best texture, unwrap the portion and bake it covered in foil at 350°F for about 15 to 20 minutes until it’s hot all the way through. If you’re running mega late (we all have those mornings!), just pop a piece in the microwave for about 90 seconds, checking halfway through, of course. Either way, you get a surprisingly delicious, satisfying meal!
Making Sheet Pan Breakfast Burritos Freezer Friendly into Nutritious Dinner Ideas
You know, one of the best things about this recipe is how easily it crosses over from breakfast hero to dinner savior. Who decided eggs are only for the morning, anyway? I call this kind of meal “brinner”—breakfast for dinner—and it is the ultimate weeknight saver when you are totally out of ideas. Because these Sheet Pan Breakfast Burritos Freezer Friendly are already balanced with protein, carbs from the potatoes, and veggies from the peppers and onions, they are totally ready to anchor a nutritious dinner.
If you’re finding yourself needing an even bigger nutritional boost for an evening meal, I have a couple of tried-and-true suggestions that don’t mess up the freezing/reheating structure too badly. For instance, on your next batch, you can easily sneak in a can of rinsed black beans along with the hash browns. Black beans add great fiber and make the flavor profile feel even more hearty, completely appropriate for dinner!
Also, don’t forget about adding sautéed mushrooms in with your peppers—they soak up all that sausage flavor wonderfully. These additions turn a quick breakfast into one of those balanced meals that just feels satisfying after a long day. I often serve a square alongside a simple side salad to make the kids (and myself!) feel like we had a proper, grown-up dinner. These adaptations keep the ease of my favorite family dinner idea available anytime!
Equipment Checklist for Simple Family Meals
Before you even start cooking the sausage, it helps to have all your tools ready to go. This list is super short, which is why I love this recipe for those nights when I’m aiming for those quick 30-minute dinner recipes!
You mainly need three things, but having backups on hand is smart:
- A reliable 9×13 inch baking pan or a similar 3-quart deep dish.
- A large skillet for cooking that sausage and sautéing the peppers before everything goes into the pan.
- One big mixing bowl—the bigger, the better for whisking that egg custard without splashing everywhere!
Frequently Asked Questions About Sheet Pan Breakfast Burritos Freezer Friendly
I always get a few questions when people try this recipe for the first time, especially since it’s designed to be baked, chilled, and frozen! It’s a little different than making fresh burritos, but trust me, these points will make your batch even better. It’s all about setting yourself up for the easiest week possible!
Can I substitute the ground pork sausage in this Sheet Pan Breakfast Burritos Freezer Friendly recipe?
Oh, absolutely! Pork sausage is traditional and gives you great flavor, but you can definitely swap it out based on what you have or what you prefer. If you want something leaner, use ground turkey sausage—it works just as well. I’ve even used crumbled bacon in a pinch for a savory punch! For a vegetarian option, you can sauté some seasoned lentils or plant-based crumbles in the skillet instead of the meat.
What is the best way to wrap individual portions for the freezer?
This is a crucial step for keeping that texture perfect! Once the casserole is totally cool, cut your squares. I always recommend the double-wrap method. Wrap each portion first in a small square of parchment paper—it keeps the sticky cheese away from the next layer. Then, wrap that parchment-wrapped square tightly in aluminum foil or put a few together into a quality, air-tight freezer bag. That tight seal prevents freezer burn.
Estimated Nutritional Snapshot for Sheet Pan Breakfast Burritos Freezer Friendly
Since this recipe makes 8 generous portions, the nutrition profile is pretty solid for a filling meal any time of day. Remember, these numbers are estimates based on the ingredients I listed, so if you add extra cheese or use turkey sausage, things will shift slightly. But overall, this recipe definitely fits my goal of making high-protein meals without too much added fuss.
When you divide everything by 8 servings, you are generally looking at:
- Calories: Around 450
- Protein: A hefty 30 grams!
- Fat: About 28 grams
- Carbohydrates: Roughly 20 grams

Frequently Asked Questions About Sheet Pan Breakfast Burritos Freezer Friendly
I always get a few questions when people try this recipe for the first time, especially since it’s designed to be baked, chilled, and frozen! It’s a little different than making fresh burritos, but trust me, these points will make your batch even better. It’s all about setting yourself up for the easiest week possible! If you’re looking for other super fast solutions for those crazy nights, check out my tips on quick 30-minute healthy dinner recipes!
Can I substitute the ground pork sausage in this Sheet Pan Breakfast Burritos Freezer Friendly recipe?
Oh, absolutely! Pork sausage is traditional and gives you great flavor, but you can definitely swap it out based on what you have or what you prefer. If you want something leaner, use ground turkey sausage—it works just as well. I’ve even used crumbled bacon in a pinch for a savory punch! For a vegetarian option, you can sauté some seasoned lentils or plant-based crumbles in the skillet instead of the meat.
What is the best way to wrap individual portions for the freezer?
This is a crucial step for keeping that texture perfect! Once the casserole is totally cool, cut your squares. I always recommend the double-wrap method. Wrap each portion first in a small square of parchment paper—it keeps the sticky cheese away from the next layer. Then, wrap that parchment-wrapped square tightly in aluminum foil or put a few together into a quality, air-tight freezer bag. That tight seal prevents freezer burn.
Estimated Nutritional Snapshot for Sheet Pan Breakfast Burritos Freezer Friendly
Because this recipe makes a whole 9×13 pan, you’re going to get several hearty servings, and for me, that portion size is perfect for keeping me feeling full! Remember, these numbers are estimates—they change a bit depending on the exact brand of sausage or cheese you use, but this gives you a great idea of what you’re getting. I always aim for high-protein meals, and this casserole delivers!
Per serving (1 of 8), you’re looking at roughly:
- Calories: About 450
- Protein: A fantastic 30 grams
- Fat: Around 28 grams
- Carbohydrates: Roughly 20 grams
It’s a fantastic way to kickstart the day or serve up as a delicious dinner!
Sheet Pan Breakfast Burritos Freezer Friendly
Ingredients
Equipment
Method
- Preheat the oven to 350°F if you plan to bake immediately. Grease a 9×13 inch pan or a 3qt baking dish, or spray it with cooking spray.
- Heat a large skillet over medium high heat. Brown the sausage, breaking it up with a spoon, until no pink remains. Drain the fat.
- In the prepared dish, add the hashbrowns, cooked sausage, onions, bell peppers, and 1 1/2 cups of cheese. Gently mix the ingredients together and spread them evenly in the pan.
- In a large bowl, add the eggs, evaporated milk, salt & pepper, and Italian seasoning. Whisk until well combined.
- Pour the egg mixture over the hashbrown mixture and sprinkle the remaining cheese over the top.
- Cover the dish with foil and refrigerate overnight if you plan to make it ahead, or bake immediately.
- Bake uncovered for 55 to 65 minutes or until the casserole is cooked through.