
Remember the sheer, unadulterated joy of a birthday cake that screamed ‘celebration’? That perfect moment when the light hits the frosting and all those hidden colors inside burst out? I live for that feeling! That’s exactly what we’re capturing here with what I happily call the ultimate Rainbow Funfetti Birthday Cake. Growing up, I always believed that birthdays weren’t just celebrations—they were moments you could taste. The first time I made a Rainbow Funfetti Birthday Cake, the kitchen smelled like pure happiness, and the burst of colors in every slice felt like opening a present. That memory stayed with me, and now each time I photograph this cake, I’m reminded of that same youthful joy and the magic that simple colors can bring to a special day. We are making a three-layer beauty that is just as delicious as it is dazzling!

Since this cake needs plenty of prep time, you might want to check out my recipe for a delicious apple cake with cream cheese frosting while you wait for your ingredients to come to temperature. This apple cake is one of my favorites for fall gatherings!
Why This Rainbow Funfetti Birthday Cake is Your New Celebration Standard
I get it, sometimes you want a showstopper cake but you don’t want to stress yourself out in the kitchen. That’s why I perfected this recipe so that it delivers that awe-factor without needing a culinary degree! This isn’t just any cake; it’s built on reliable techniques that work every single time, making your upcoming party a certain success.
Seriously, this is the recipe you save for every big moment. You’ll find all the details below, but here’s what makes this my go-to for a fun celebration:
- It’s genuinely beginner friendly, even though it looks like something you’d order from a fancy bakery!
- The texture is incredibly soft and moist—no dry crumbs here, I promise.
- It’s constructed to be a sturdy layer cake, perfect for stacking and transporting to any party!
If you have leftovers, which is rare, they pair wonderfully with my caramel apple cheesecake bars for dessert the next day—you can grab that recipe here: Caramel Apple Cheesecake Bars.
Perfect for Beginner Friendly Baking
Don’t let the three layers scare you off! I wrote these instructions to hold your hand through every step. We use simple creaming methods and room-temperature ingredients, which are easy to manage. This specific Rainbow Funfetti Birthday Cake is totally forgiving, setting you up for success right out of the gate.
Stunning Layer Cake Presentation
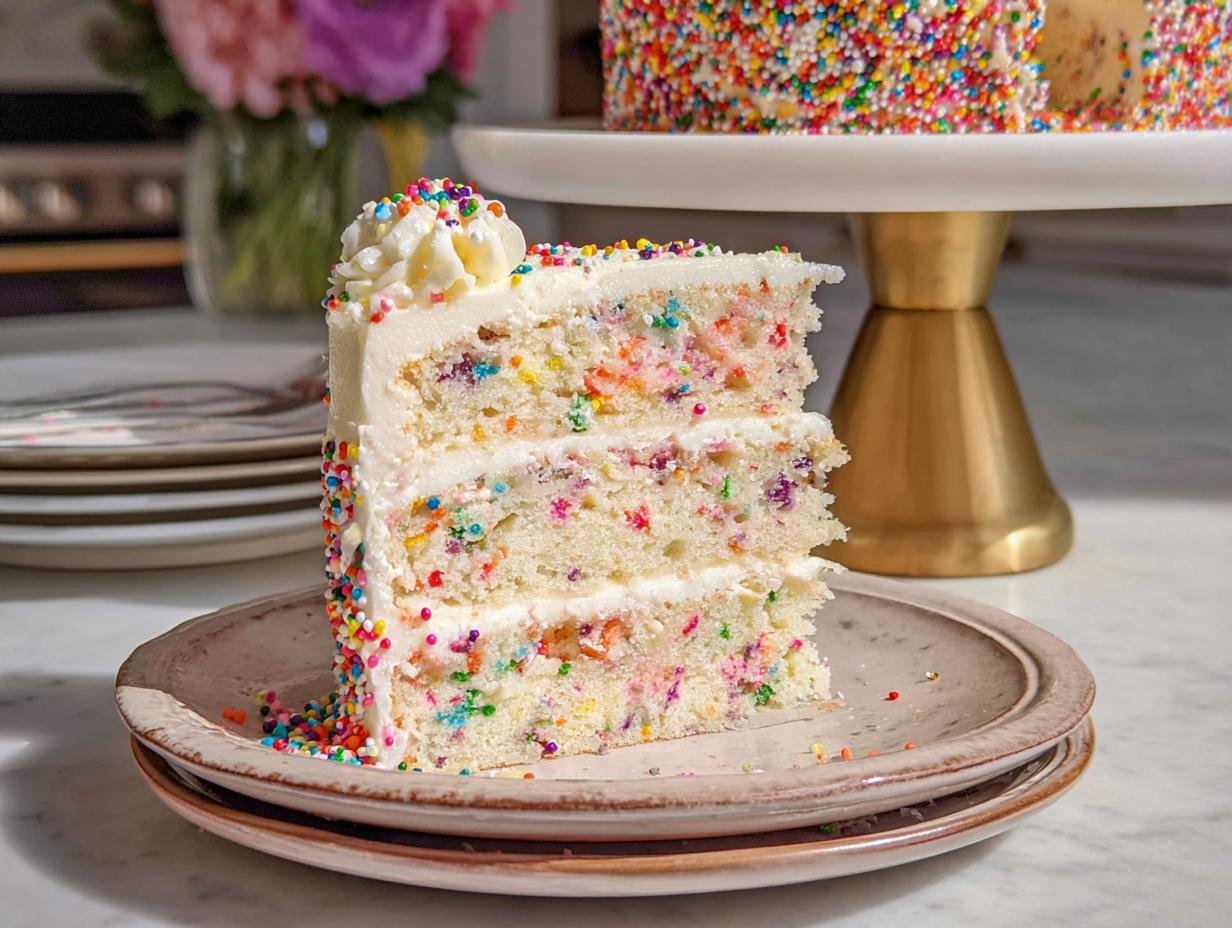
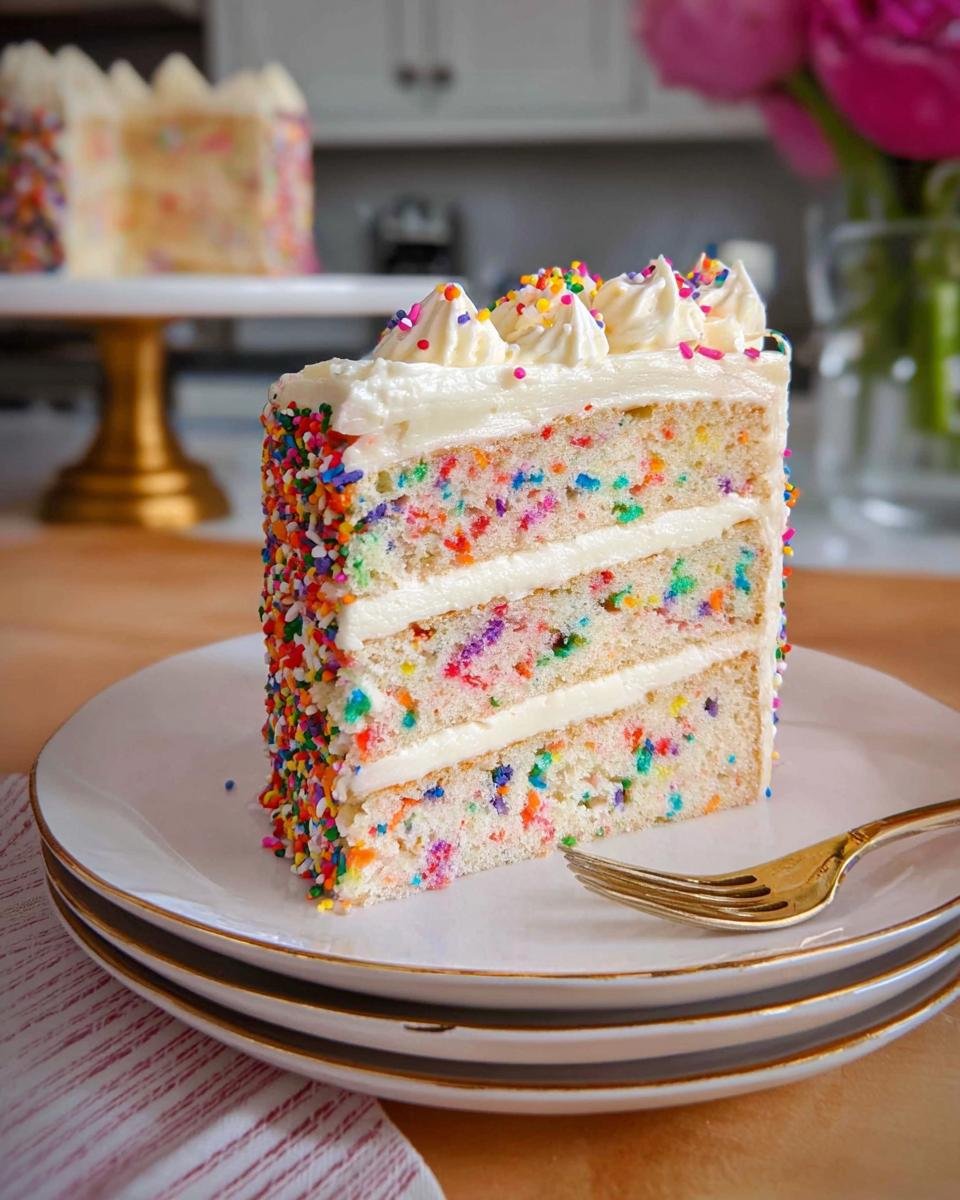
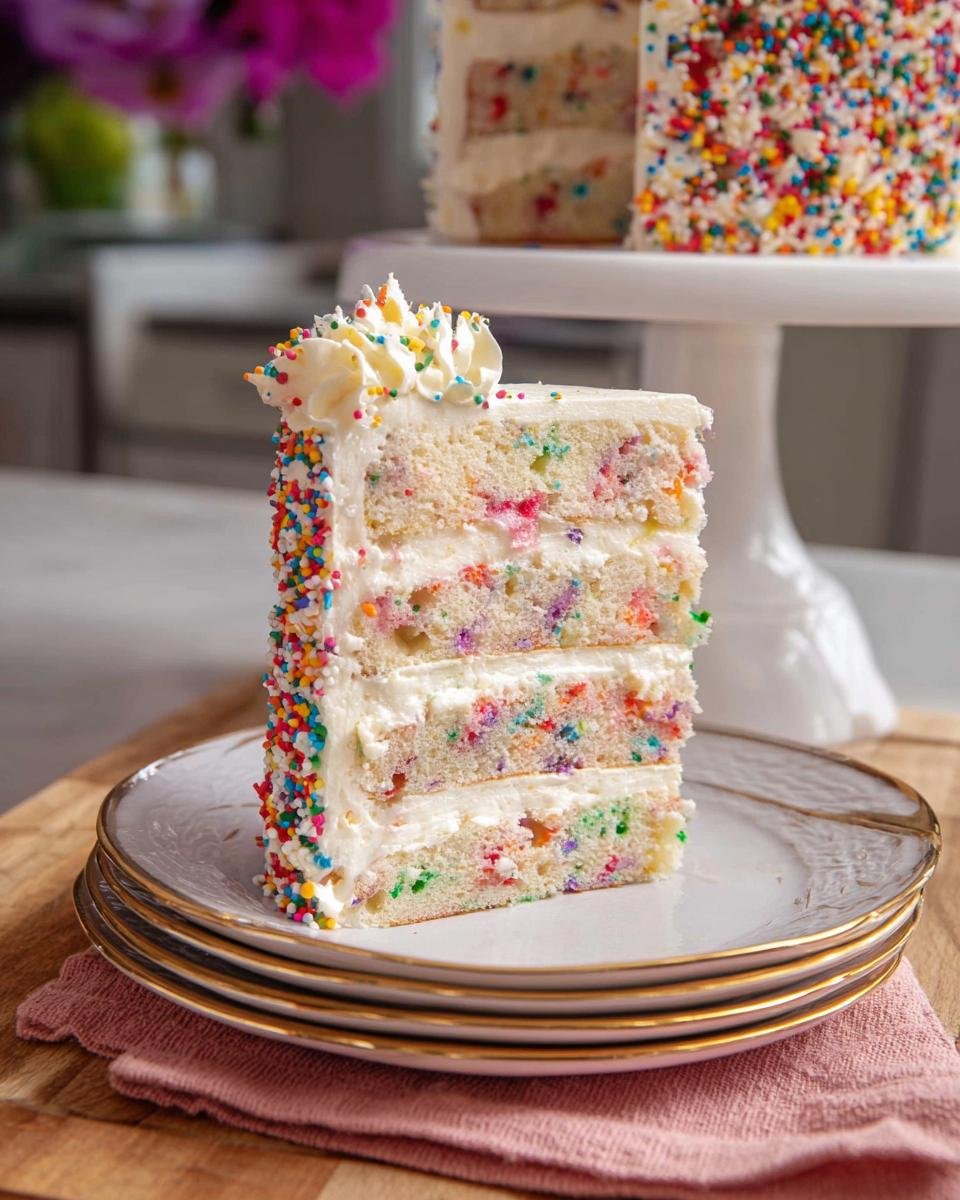
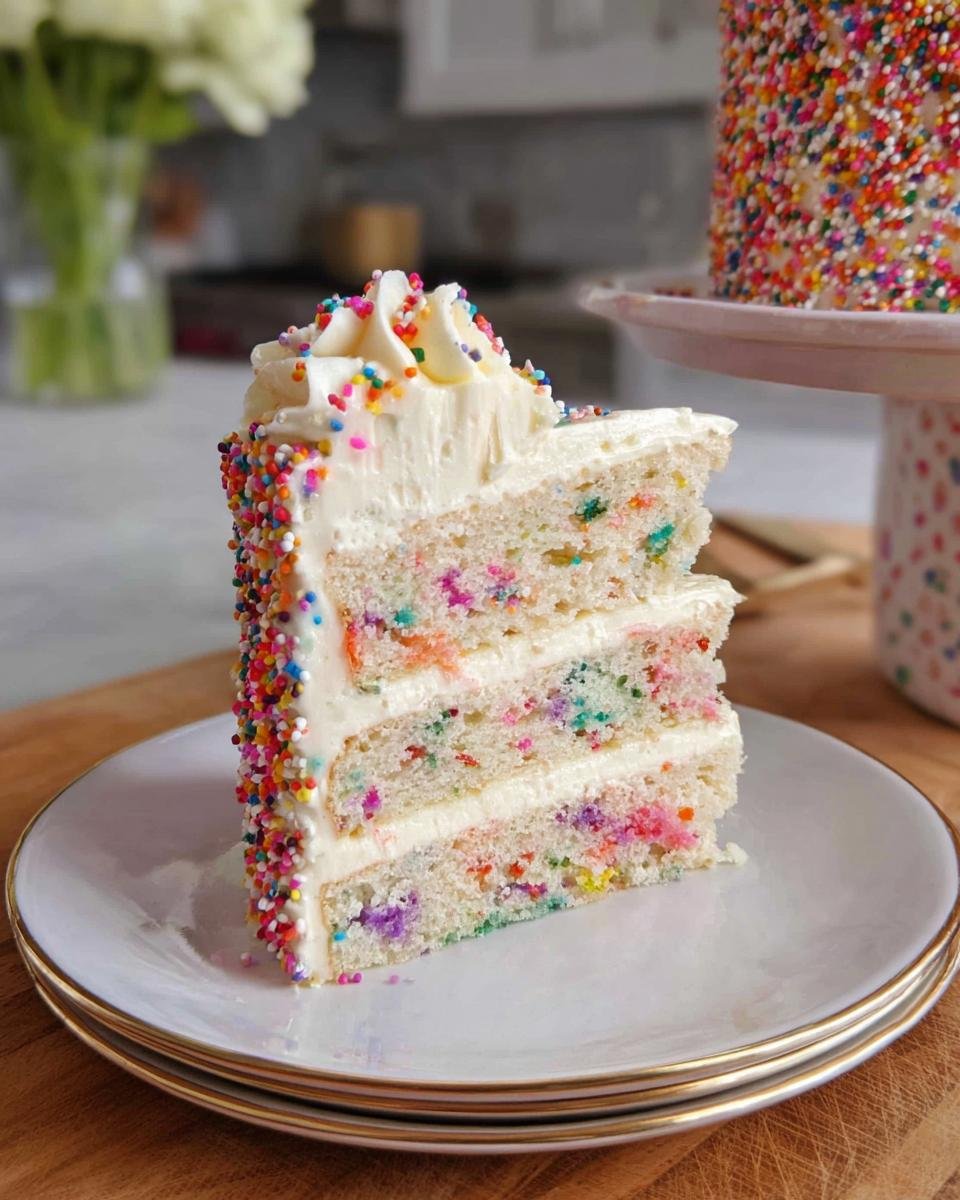
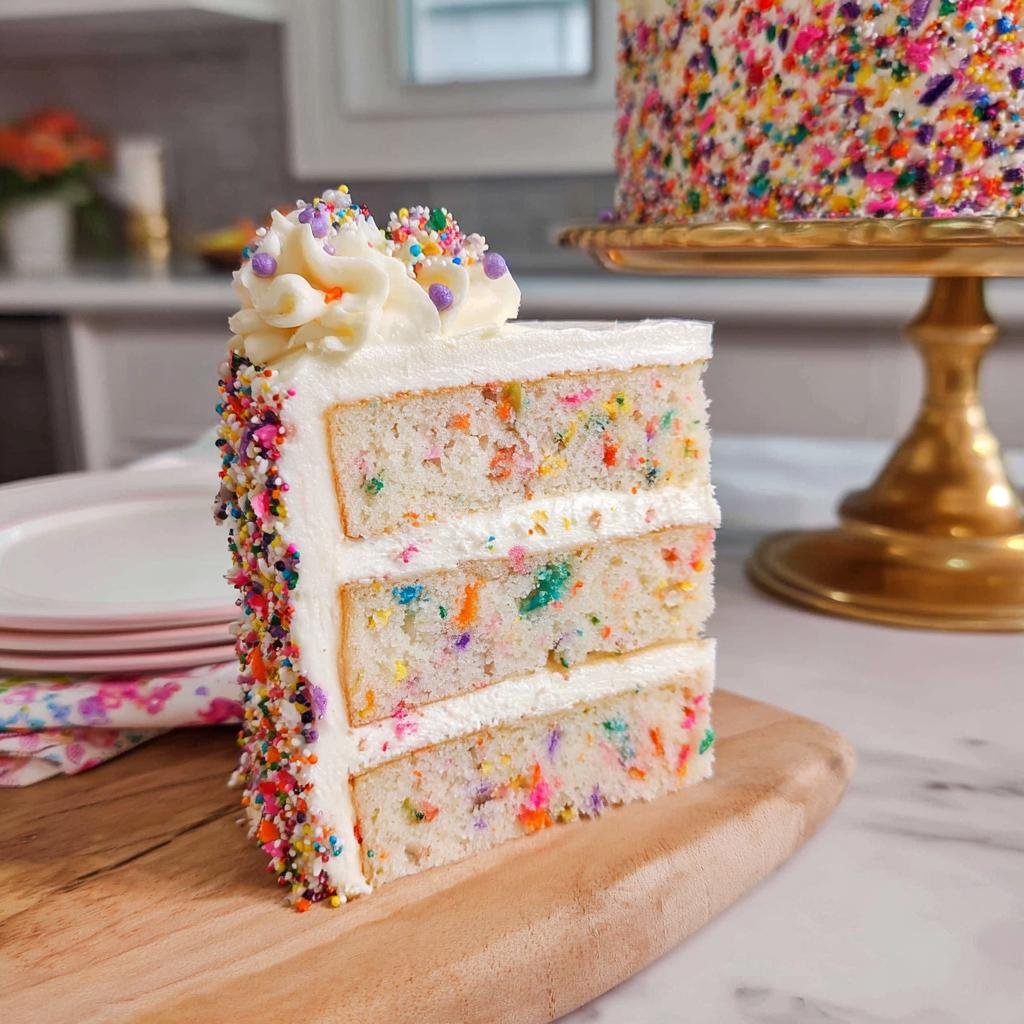
There is just nothing like slicing into a beautiful layer cake! The three layers provide incredible height and stability, making it an instant centerpiece. Plus, when you cut that first slice and the rainbow speckles shine through? That’s the magic we’re going for—it makes every party memorable.
Essential Ingredients for Your Rainbow Funfetti Birthday Cake
Okay, step two is making sure you have the right tools and ingredients ready to roll. Trust me, the quality and temperature of these things really impact how this cake turns out. If you’re missing the buttermilk, don’t panic! You can always whip up a quick substitute by mixing whole milk with a tablespoon of lemon juice or vinegar and letting it sit for a few minutes before adding it to your batter. It works like a charm every time.
Before you start mixing, make sure everything that needs to be room temperature—like your butter and buttermilk—is actually ready to go. It makes such a difference for that smooth, creamy texture we are aiming for in this layer cake.
For the Cake Base
For the cake itself, you’ll need a good amount of all-purpose flour, alongside baking powder and salt for the structure. We use a mix of granulated sugar, softened unsalted butter, and vegetable oil to guarantee that amazing moist crumb. Don’t forget the vanilla extract! We need seven large egg whites, all at room temperature, and about one and a third cups of that room-temperature buttermilk. And now for the fun part: you’ll need two-thirds of a cup of those colorful rainbow jimmies to swirl right into the batter before baking. If you want to check out my recipe for oatmeal apple cake while you wait for your butter to soften, here’s the link: Oatmeal Apple Cake.
For the Fluffy Frosting
For the perfect fluffy frosting that holds its shape, you’ll start with a full pound of unsalted butter, powdered sugar, a touch of salt, and vanilla extract. The secret weapon here is the heavy cream; you’ll use between three and four tablespoons, so keep tasting it until your frosting isn’t too stiff! We also have rainbow sprinkles saved aside to decorate the outside.
Step-by-Step Guide to Baking the Rainbow Funfetti Birthday Cake
Alright, time to get this party started! Baking this beautiful cake is rewarding, but you have to follow the order of operations, or we end up with soup instead of batter. I always like to have my mixer bowls ready and my ingredients measured out before the oven even starts warming up. If you need a quick side recipe to manage that waiting time, check out my apple dapple cake recipe—it’s super cozy!
Preparing Pans and Dry Mix
First things first: we need heat! Preheat your oven right up to 350°F. Grab your three 8-inch pans. Don’t skip this part: lightly grease them, dust them with flour, and then cut circles of parchment paper for the bottoms. This layering of preparation is your insurance policy against sticking! Next, grab a big bowl and sift your flour, baking powder, and salt together. You want these dry ingredients nice and airy before they meet the wet stuff.
Creaming Fats and Mixing the Batter
This is where the texture really starts to develop. In your mixer bowl—using the paddle attachment—beat the sugar, butter, and oil until it’s totally smooth and creamy. It takes about three minutes; just be patient! Now, drip those room-temperature egg whites in slowly, maybe in three batches, mixing just until they disappear before you add more. Scrape that bowl down often! Add the vanilla, and then we alternate. Add about a third of your flour mix, mix low, then half the buttermilk, mix low. Keep alternating until everything is just combined. Stop mixing as soon as the last flour streak is gone, and hand-fold in those rainbow sprinkles gently. You don’t want to crush them!
Baking and Cooling the Layers
Divide that glorious batter evenly between your three pans. Now, here’s a neat trick: set the pans on the counter and tap them down hard a few times. This forces out any giant air pockets that could cause uneven baking. Bake them for about 32 to 38 minutes. You’ll know they’re done when the center springs back lightly when you press it. Let them chill out in the pans for about 10 minutes before flipping them onto wire racks to cool completely. They absolutely must be cool before we even *think* about frosting them!
Assembling Your Perfect Layer Cake: Frosting the Rainbow Funfetti Birthday Cake
Now for the fun part where we turn those baked layers into something truly spectacular! Getting a professional look on this layer cake is actually quite straightforward if you stick to the plan. If you happen to have cake strips, soak them and wrap them around your pans next time you bake; they really help keep those sides incredibly level, minimizing the need for major trimming!
But for now, let’s focus on this amazing frosting. This buttercream is sturdy enough to handle three beautiful layers, but it’s still soft enough to eat by the spoonful when no one is looking. This is the sweet dream that finishes off our Rainbow Funfetti Birthday Cake.
Making the Buttercream Frosting
We start by beating that pound of butter and salt until it gets super soft and smooth—like velvet, about two minutes. Then, keep your mixer speed low and slowly start adding that powdered sugar, alternating that with the heavy cream, just a tablespoon at a time. You might only need three tablespoons, or maybe four! Add the vanilla and then crank the mixer up for a minute. You want that fluffy, perfect frosting texture, not something too stiff!
Layering and Decorating
Take your first completely cool layer and put it top-side up on your cake stand. Spread about one full cup of that lovely frosting all the way to the edges. Repeat that for the next two layers. Once the third layer is on, take about a cup of that frosting for a quick crumb coat around the whole thing to lock in any loose crumbs. Then, cover the whole cake with the rest of your frosting!
Here’s the showstopper moment: warm up some of that extra frosting slightly and put it in a piping bag. Then, take your remaining rainbow sprinkles and press them gently—only about two or three inches up—around the bottom edge of the cake. It looks just like a little skirt! Pipe some pretty dollops around the top edge for a final flourish. If you’re feeling inspired for another bake, you can check out my recipe for apple cake with cream cheese sometime!
Tips for Success When Making a Rainbow Funfetti Birthday Cake
Listen, even the best recipes can go a little sideways if we’re not careful with the little details. Since this is a slightly more involved layer cake, I wanted to share a few things I learned the hard way over the years to make sure your cake comes out perfectly structured and colorful!
Baking is chemistry, friend, so small changes make a huge difference in how the final dessert turns out. These tips will really boost your confidence when tackling a fun celebration cake like this one. If you need a simple, reliable bake to practice with next time, take a look at my recipe for flourless cottage cheese pancakes—they need minimal fuss!
Preventing Overmixing
This is a huge one, especially once those rainbow jimmies come out! Once you start adding the flour and buttermilk mixture—the dry and wet components—you need to switch gears mentally. You’re building gluten when you mix too vigorously after that point. Overmixing after the flour goes in makes cakes tough, chewy, or crumbly. You just want the streaks of flour to disappear. And when you fold in those beautiful sprinkles at the very end? Fold, don’t stir! We want those colors to stay intact, looking bright and distinct, not bleeding into the batter and turning everything muddy gray.
Achieving Level Layers
Nobody wants a leaning tower of cake, right? If you’ve got cake strips, definitely use them! They keep the sides of the pan cooler so the edges don’t bake faster than the middle. But if you don’t have those or if your cakes still dome a little bit, don’t stress. Once your layers are completely cool—and I mean *completely* cool, run your finger over them, they shouldn’t feel even a little warm—take a long serrated knife and gently shave off just the top dome until the layer is perfectly flat. This creates a beautiful, stable base for stacking your subsequent layer cake tiers!
Storage and Serving Suggestions for Your Dessert
Okay, we made this gorgeous cake, so let’s make sure it stays looking and tasting perfect until party time! When you’re dealing with this much buttercream frosting, you have a little flexibility on where to keep it. Think of this dessert as something that loves room temperature just as much as we do!
If you’ve got big plans for later in the week, you can definitely prep ahead, which is always a lifesaver when hosting. You can find some great ideas for making dishes ahead of time in my guide on the Blackberry Pretzel Salad Recipe.
Keeping the Rainbow Funfetti Birthday Cake Fresh
If you plan on serving your Rainbow Funfetti Birthday Cake within 24 hours, leaving it covered lightly at cool room temperature is actually my favorite way to store it. The cake stays so much softer! If you need to store it longer, say three glorious days, cover it loosely and pop it in the fridge. Just remember to pull it out about an hour before you plan to serve it so that buttercream gets lovely and soft again!
Frequently Asked Questions About This Cake Ideas Dessert Party Recipe
We’ve covered the baking and the frosting, but I know when you’re planning a big dessert for a party, you always have a few last-minute worries! That’s totally normal, especially when aiming for a show-stopping layer cake. Here are the top things people usually ask me about this specific recipe.
I find that having a good plan ahead of time prevents all that last-minute panic. When I’m not baking, I love experimenting with desserts like my pumpkin pie yogurt bowl—you can check out the easy recipe here: Pumpkin Pie Yogurt Bowl.
Can I make this Rainbow Funfetti Birthday Cake ahead of time?
Absolutely! I often bake the layers one day ahead of time, let them cool completely, wrap them tightly in plastic wrap, and store them in the freezer for up to a month. This actually makes the cake layers more moist when thawed! The frosting can also be made a few days ahead and kept in the fridge, but you’ll want to whip it again briefly with a splash of cream before you frost to make it workable again. Assembling the whole Rainbow Funfetti Birthday Cake is really best done the day before serving.
What kind of sprinkles work best for Funfetti?
This is super important for that vibrant look! You MUST use rainbow jimmies—those long, thin sprinkles. If you use the tiny, round nonpareils, trust me, the color will bleed right out into your white batter while mixing, and you’ll end up with a sad, grayish cake instead of a bright, fun dessert. Jimmies hold their shape and color beautifully, ensuring your layer cake looks festive!
Is this recipe truly beginner friendly?
Yes, I truly believe so! While this is a three-layer cake, which adds complexity just by the stacking process, the actual mixing steps are very straightforward. We alternate wet and dry ingredients, which is a standard technique taught early on. If you’ve successfully baked cookies, you can totally handle this. It’s a fantastic, beginner friendly project to tackle when you want to impress guests at your next party!
Nutritional Estimates for Your Layer Cake
Now, let’s talk turkey, or maybe I should say, let’s talk macros! I know some of you are keeping close tabs on what goes into your amazing dessert, so here are the numbers I pulled together for a slice of this glorious Rainbow Funfetti Birthday Cake. Remember, this is based on cutting the cake into 12 servings, which is a generous party size, admittedly!
Take these figures with a grain of sugar, though! The exact nutritional content can really swing depending on what brand of butter you use, the specific variety of sugar, and honestly, how thick you spread that frosting. These numbers are a great ballpark estimate, not a scientific guarantee!
If you’re looking for some other great recipes that pack a nutritious punch, you really should check out my high-protein triple berry bake—it satisfies that sweet tooth without all the fuss!
- Calories: 1129
- Total Fat: 55g (with 32g saturated fat)
- Carbohydrates: 154g (Watch out for 123g of sugar here!)
- Protein: 7g
- Cholesterol: 129mg
- Sodium: 446mg
Share Your Rainbow Funfetti Birthday Cake Creations
Whew! We made it! I hope you’re standing back right now, admiring your three-layer masterpiece. Honestly, seeing your finished bakes is the absolute best part of sharing these recipes. It turns baking from a private activity into a giant, colorful community celebration!
I really, honestly want to know how this Rainbow Funfetti Birthday Cake turned out for you. Did the kids go crazy for the colors? Was the frosting just the right amount of fluffy? Don’t be shy!
Please take a photo if you can and share it in the comments below. Knowing that I helped you celebrate someone special with this cake means the world to me. Also, if you loved this recipe, please take a moment to leave a star rating near the top of the page—it helps so many other beginner friendly bakers find this guide!
While you’re here, if you’re already dreaming up your next dessert project, you should definitely take a peek at my recipe for cottage cheese cookie dough. It’s surprisingly delicious and a great way to use up any extra mixing energy!
Happy Baking, and here’s to many more colorful celebrations!
Rainbow Funfetti Birthday Cake
Ingredients
Equipment
Method
- Preheat oven to 350°F. Lightly grease three, 8-inch round pans with baking spray or butter and flour, then line the bottoms with parchment paper.
- In a large bowl, sift together the flour, baking powder, and salt. Set aside.
- In a large mixing bowl with a hand mixer or stand mixer fitted with the paddle attachment, beat the sugar, butter, and oil on medium speed until completely smooth and creamy, about 3 minutes.
- Add the egg whites in three parts, mixing on low until fully combined before adding the next. Stop and scrape the bowl down occasionally. Add the vanilla and beat until fluffy, about 20 seconds.
- Add one-third of the flour mixture, then mix on low speed until combined. Add half of the buttermilk and mix until combined. Repeat with another third of the flour, the remaining buttermilk, ending with the remaining flour mixture, mixing between each addition. Scrape down the bowl and ensure the batter is well mixed and no lumps remain. With a silicone spatula, fold in the rainbow sprinkles.
- Divide the batter evenly among the prepared cake pans and spread into an even layer. Tap each pan several times on a towel on the kitchen countertop to settle the batter and release any big air bubbles. Bake for 32 to 38 minutes, rotating the pans on the oven rack after 20 minutes, until the centers spring back when gently pressed.
- Let the cakes cool in the pans for 10 minutes, then turn onto wire cooling racks. Remove the parchment paper.
- For the Frosting: In a large mixing bowl with a handheld mixer or stand mixer fitted with the paddle attachment, beat the butter and salt on medium speed until very soft and smooth, about 2 minutes.
- With the mixer on low speed, gradually add in the confectioners’ sugar, adding the heavy cream 1 tablespoon at a time, as needed, to keep the mixture creamy. Beat in the vanilla. Increase the speed to medium and beat for 1 to 2 minutes, until the texture is smooth and fluffy.
- For the Assembly: Place one cool cake layer top-side up on a cake stand. Spread 1 cup of frosting over the top of the cake all the way to the edge. Repeat with the remaining two cake layers.
- Transfer 1 cup of frosting to a piping bag fitted with a large, open star piping tip. Spread the remaining frosting all over the top and sides of the cake.
- Press rainbow sprinkles into the bottom of the cake, about 2 to 3 inches up the sides, like a “skirt”.
- Pipe dollops in 8 to 10 places around the top edge of the cake. Garnish with more sprinkles if you like.