

If you think baking means complicated steps and boring flavors, you are absolutely wrong! There is nothing quite like biting into a slice of pure, nostalgic indulgence, and that’s exactly what this cake delivers. We’re making the ultimate Oreo Cookies and Cream Cake here, but here’s my little secret: we start with a perfect, moist white cake base, which lets the chocolate crunch really shine through. Then, we finish it off with a tangy, rich cream cheese frosting—it’s the best combination, trust me!
I still remember the first time I made an Oreo-themed cake for a friend’s birthday. I wasn’t sure how it would turn out, but as soon as I folded those crushed cookies into the batter, the whole kitchen smelled like childhood happiness. Wow! When the cake came out of the oven — soft, beautifully speckled, and full of that cookies-and-cream goodness — everyone ended up asking for seconds right away. That moment reminded me how simple ingredients, handled with a little love, can bring so much joy and connection to any gathering.

Why This Oreo Cookies and Cream Cake Recipe Stands Out
Honestly, I think this recipe hits that sweet spot every home baker is looking for! It’s designed to impress without making you stress out. You don’t need to be a professional to nail this beautiful layer cake. Why is it my go-to for last-minute party planning?
- It’s surprisingly beginner friendly! The white cake base is straightforward, using the ‘dump and mix’ method until the final gentle fold.
- The flavor combo is unbeatable: the light cake lets those chunky bits of Oreo shine right through.
- We’re ditching basic buttercream for a tangy, perfect cream cheese frosting. If you love that flavor contrast, you should check out my tips for pairing frosting on another favorite layer cake.
- The result is a truly impressive dessert that always disappears first on the dessert table.
Essential Equipment for Your Oreo Cookies and Cream Cake
Okay, let’s talk tools! You don’t need a fancy industrial kitchen to make this spectacular dessert. I try to keep my equipment list tight because nobody wants to pull out a million specialized gadgets for a weekend bake. For this Oreo Cookies and Cream Cake, you only need a few good basics.
First up, you absolutely need good pans. We are making three layers, so make sure you have three sturdy 8″ cake pans. If you only have two, you can absolutely make it work, but you’ll just have to bake in batches and they might take a few minutes longer to set up.
Next, gather your standard mixing bowls. You’ll need one large one for the cake batter and a clean, dry one for those egg whites—seriously, don’t skip the clean bowl for whites, or they won’t whip up stiff for you! I usually use my stand mixer for the batter and the frosting, but a good electric hand mixer works just as well.
Finally, for that gorgeous, professional finish on top, pull out a piping bag and a large star tip. We’re using the Ateco 848 Piping Tip. It makes those beautiful swirls of cream cheese frosting so easy to achieve, even if you’re just starting out with decorating. Trust me, this tip makes you look like a pro!
Gathering Ingredients for the Perfect Oreo Cookies and Cream Cake
We’re getting ready for the magic now! Getting your ingredients lined up (mise en place, as the fancy chefs say!) is the secret to making this Oreo Cookies and Cream Cake come together without any last-minute panic. Since this is a layer cake, we have two main jobs: getting the perfect white cake base right and whipping up a luscious cream cheese frosting. Don’t substitute the room temperature items—they truly matter for the texture!
If you want to check out how I use cream cheese in other amazing desserts, you can look at my recipe for caramel apple cheesecake bars. But for now, let’s focus on these cookies and cream superstars.
For the Cake Batter
Remember, the egg whites need to be at room temperature—it helps them get those lovely stiff peaks we talked about earlier!
- All-purpose flour: 2.5 cups (that’s 315 g)
- Granulated sugar: 2 cups (400 g)
- Baking powder: 1 Tablespoon
- Salt: 1 teaspoon
- Unsalted butter: 6 Tablespoons (85 g), make sure it’s softened to room temperature
- Oil (Avocado, canola, or vegetable): 0.67 cup (157 ml)
- Sour cream: 0.5 cup (120 g)
- Clear vanilla: 1 Tablespoon (This keeps the cake looking bright white!)
- Whole milk: 0.75 cup (175 ml), room temperature preferred
- Large or extra large egg whites: 6, room temperature preferred
- Oreo cookies: 20, which need to be broken into pieces for mixing in
For the Cream Cheese Frosting
For the frosting, make sure your butter and cream cheese are perfectly softened—too cold, and you’ll end up with lumps, which we definitely don’t want on this beautiful cake. We need those glorious cookies in two forms here!
- Unsalted butter: 0.75 cup (170 g), softened. Seriously, use the full-fat brick-style cream cheese!
- Cream cheese: 12 oz, softened
- Powdered sugar: 5.25 cups (655 g)
- Salt: 0.25 teaspoon
- Clear vanilla extract: 1.5 teaspoons
- Heavy cream: 1 Tablespoon (Only if you need a little extra help with texture)
- Oreo cookies: 10, which need to be pulverized down into fine crumbs—these go right into a portion of the frosting!
Step-by-Step Instructions to Make Your Oreo Cookies and Cream Cake
Okay, now we put all those gorgeous ingredients to work! Remember, the key to an incredible Oreo Cookies and Cream Cake that everyone demands the recipe for later is keeping things gentle when we introduce the air we whipped into those egg whites. We are building structure and keeping things light all at once. If you want to check out my directions for frosting a different kind of beauty, I have some insights on my apple dapple cake that translate well.
Baking the White Cake Layers
First things first: get that oven warmed up! You need to preheat to 350F (175C). Please don’t skip the prep work—grease your three 8-inch round cake pans well and line the bottoms with parchment paper rounds. This is your insurance policy against sticking!
In your main mixing bowl, whisk together the dry stuff: flour, sugar, baking powder, and salt. Now, turn the mixer speed way down low and start adding that softened butter, just one tablespoon at a time. You have to wait until the first bit is combined before adding the next one! It should start looking like coarse sand.
Next, stream in the oil and stir until it blends. Then, gently add the sour cream and clear vanilla, followed by the milk, all on low speed. Do NOT overmix anything up to this point! Now for the crucial part: in a separate, perfectly clean bowl, beat your room-temperature egg whites until they hold stiff peaks. When you fold those in with a spatula—yes, fold, don’t stir!—you’re incorporating air. Do this gently until no egg white streaks remain. Finally, fold in those roughly broken Oreo pieces.
Divide that beautiful, speckled batter evenly among your three prepared pans and pop them in the oven for 30 to 35 minutes. They’re done when the tops spring back lightly if you touch them, or when a toothpick comes out clean. Let them cool in the pans for about 15 minutes before turning them out onto a rack to fully chill. Seriously, make sure they are completely cool before trying to frost!
Creating the Cream Cheese Frosting
While those cakes are cooling down, let’s make the best frosting ever. In your mixer bowl, cream together that softened butter and cream cheese until it looks fluffy and smooth. You don’t want any cold chunks hanging around, so make sure they’ve been out on the counter long enough. If you ever need help with frosting ratios, my post on apple pie cheesecake bars covers general frosting smoothing techniques!
Now, keep the mixer on low and add the powdered sugar gradually, scraping the sides often. Stir in the salt and vanilla, then crank the speed up high for 15 to 30 seconds until it’s airy and smooth. If it seems a little stiff, add that optional tablespoon of heavy cream.
Here is where the cookies come in twice: take about 3 or 4 big spoonfuls of the frosting and mix in that 1 cup of pulverized Oreo crumbs until it’s incorporated—this is for the filling layers! Keep the rest of the frosting plain white for the outside finish.
Assembling the Layer Cake
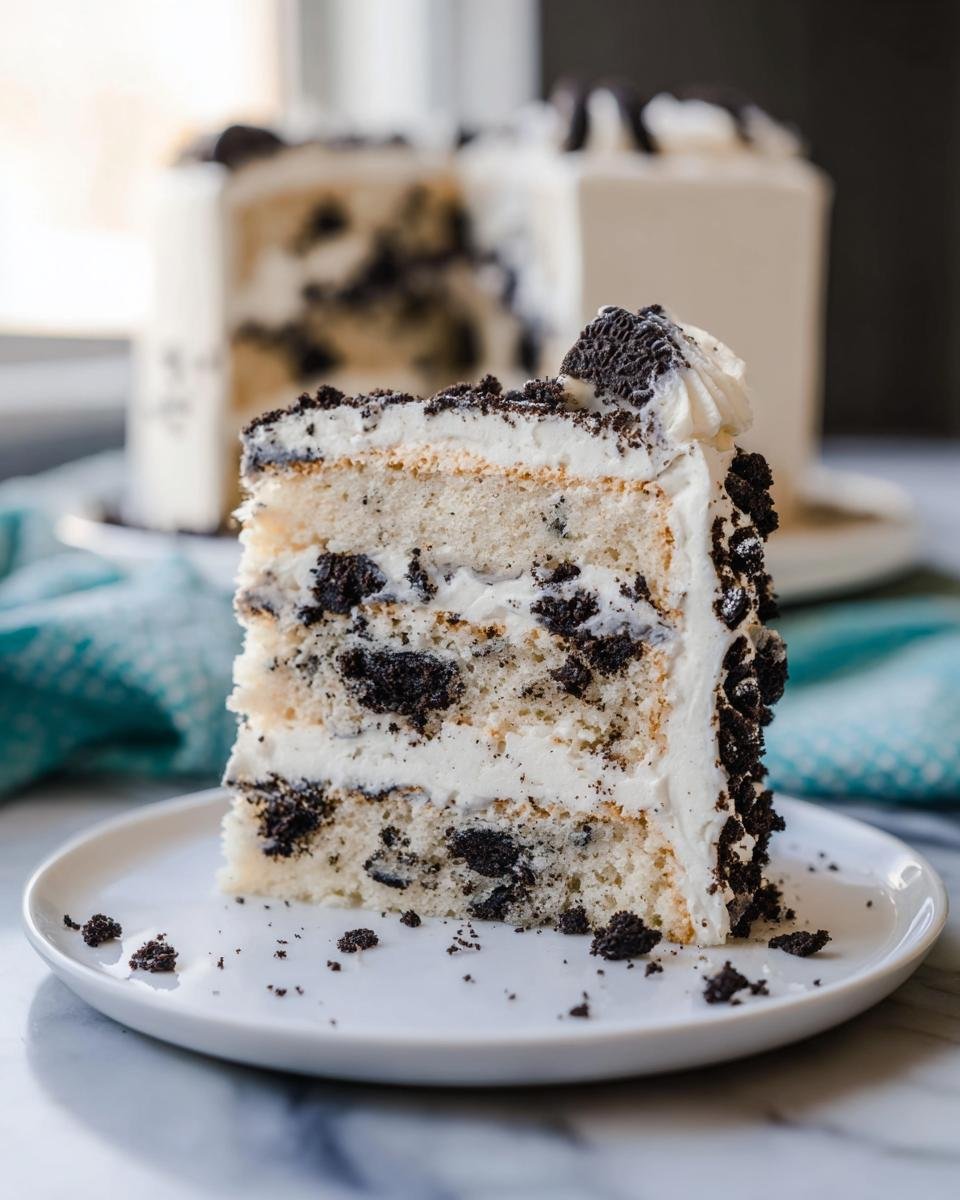
Time to build! Place your first cooled cake layer on your serving plate or stand. Spread a nice, even layer of the crumb-mixed frosting on top. Set the second layer on top of that.
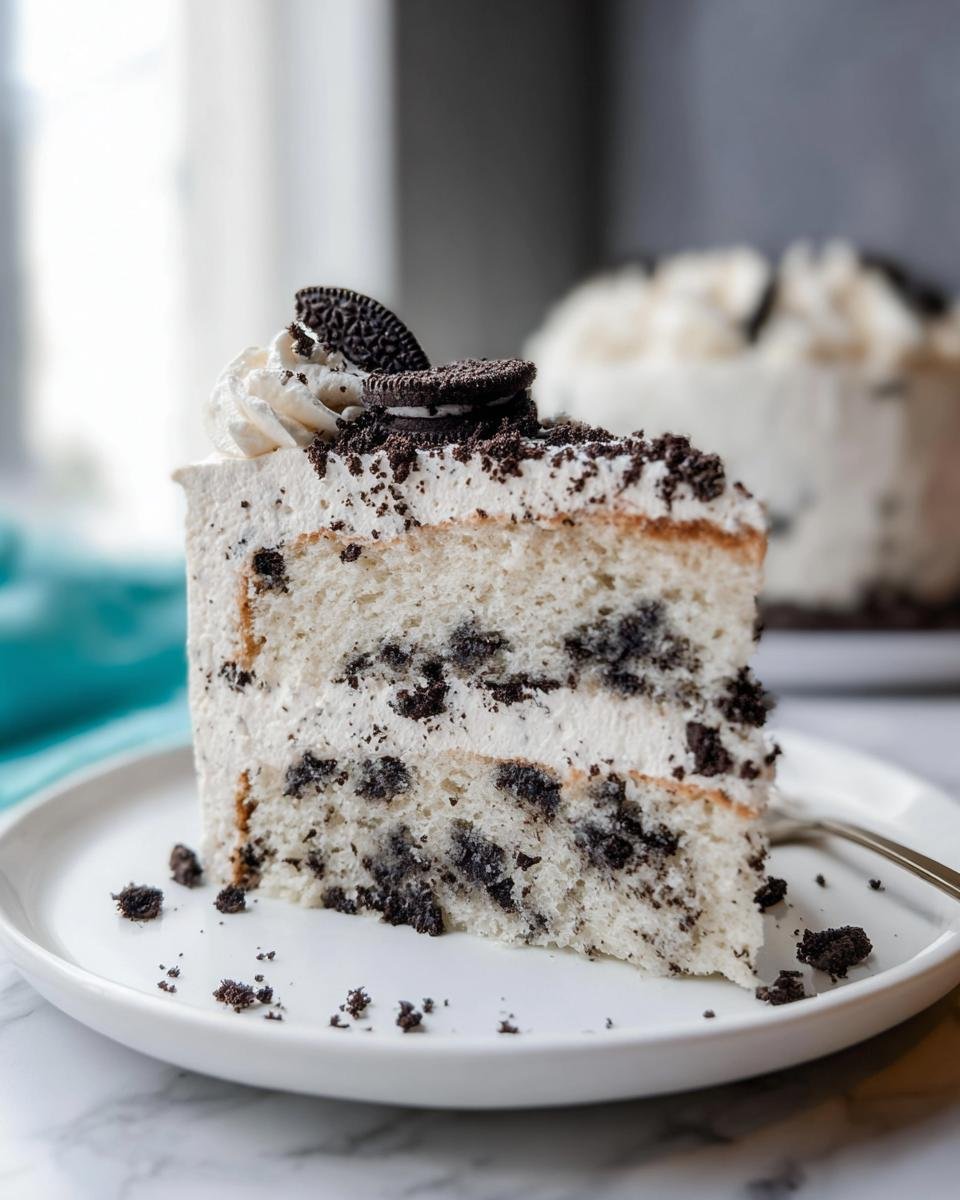
Now, use a big dollop of the plain white frosting to start coating the top and sides of the entire cake. Cover it completely! Once you have a crumb coat on, take your container of the plain white frosting and press the remaining pulverized Oreo crumbs evenly halfway up the sides of your cake. That texture contrast is just stunning!
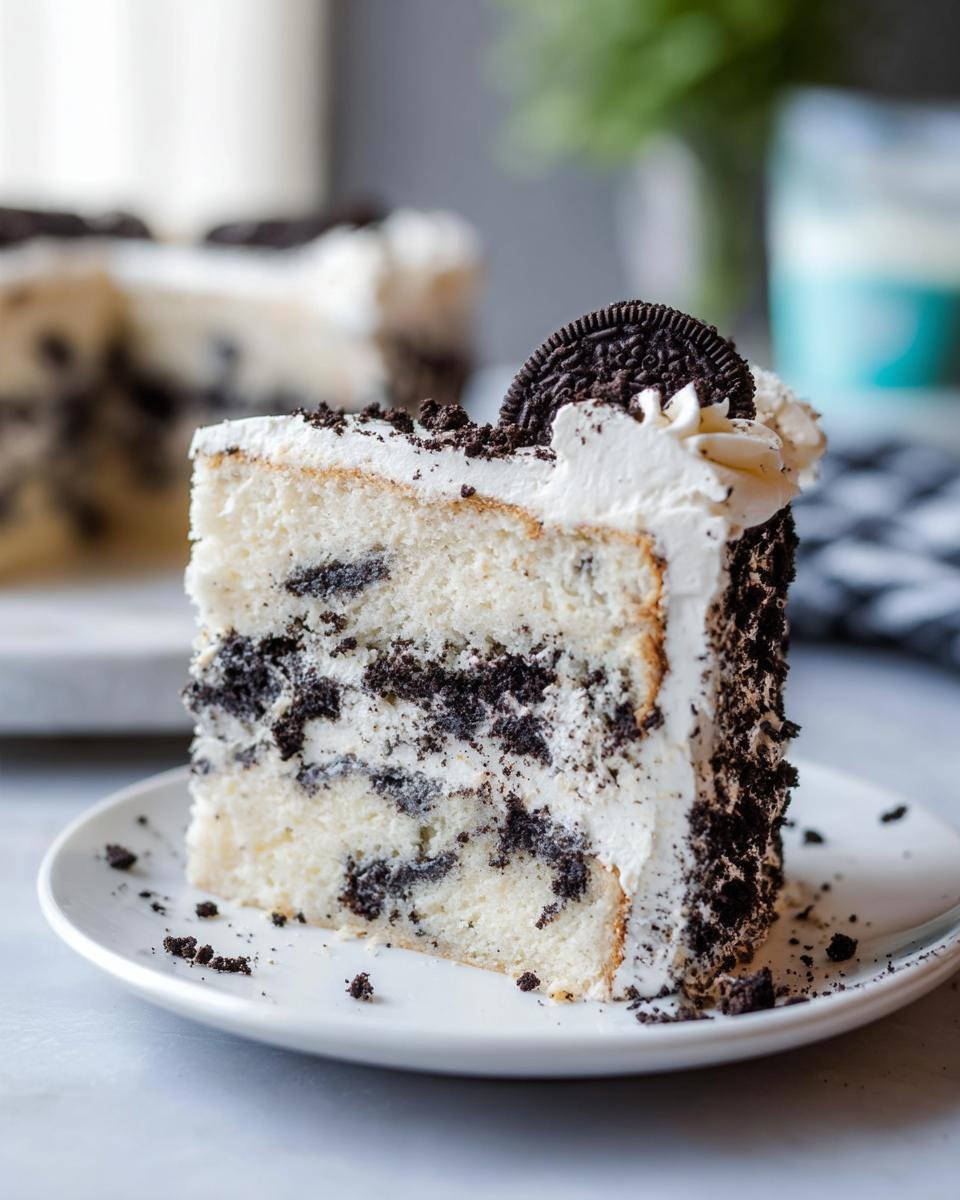
For the final touch of decoration, load up your piping bag fitted with the Ateco 848 Piping Tip with the rest of that gorgeous white frosting. Pipe beautiful swirls all over the top edge. A sprinkle of extra crumbs in the center, and step back—you just made an amazing layer cake!
Tips for a Perfect Oreo Cookies and Cream Cake Every Time
Baking this cake is fun, but getting it perfect every single time takes a few little tricks—and these are the ones I swear by! Since we are going for that beautiful, bright white cake appearance, a couple of ingredient choices really matter more than you might think.
First, let’s talk vanilla. I insist on using clear vanilla extract in the batter. If you use regular brown vanilla, it subtly colors your beautiful white cake base a slightly yellowish or beige shade. Clear vanilla gives you that necessary flavor without any unwanted tint. It keeps the contrast between the white cake and the black Oreo pieces really sharp. If you are curious about how vanilla plays into other baked goods, I detail some flavor pairings over in my oatmeal apple cake notes.
Next, and this is a big one for the cake structure, you must use room temperature ingredients, especially those egg whites! Cold egg whites absolutely refuse to whip up into stiff, airy peaks, and if your whites are flat, your cake will be dense—not light and fluffy like we want. Take the milk and the egg whites out at least an hour before you plan to bake.
When it comes to the pans, you have options, but adjusting the time is key. If you end up making this recipe in only two 8″ cake pans instead of three, remember that the center takes longer to bake through. You might need closer to 35 or 40 minutes total. Also, if you notice your oven is a little temperamental (mine always overheats on the right side!), remember to rotate those pans halfway through the baking time. It stops one layer from browning too quickly before the others are set.
And finally, for the Oreos in the batter—don’t crush them too finely! We want texture! You only need to break them up into rough, uneven pieces by hand or pulsing them maybe twice in the food processor. We want those satisfying, chunky pockets of chocolate sandwich cookie in every slice!
Storage and Make-Ahead Options for Your Oreo Cookies and Cream Cake
Planning ahead is my favorite way to stay sane when hosting parties, and luckily, this cake is super cooperative! You don’t need to stress about making it on the day, which is a huge win when you’re juggling other things. Since we used that gorgeous cream cheese frosting, we usually treat this differently than a pure butter-based cake.
For short-term keeping, this cake is happy sitting right out on the counter, provided your kitchen isn’t super hot. Since the sugar content is high, it acts as a natural preservative. Based on my experience with the recipe notes, the Oreo Cookies and Cream Cake will keep beautifully in an airtight container at room temperature for a solid 1 to 2 days. I love doing this because the flavors actually meld together nicely overnight—the cake gets even softer!
If you need it to last longer, pop it in the fridge. In an airtight container, it stays good for up to a week refrigerated. Just be warned: the cake might firm up a bit when cold, so pull it out about an hour before serving so the frosting softens up nicely again. If you’re tackling a big holiday menu, you might want to plan to freeze it!
Freezing is also an option, and it works perfectly for this recipe. You can freeze the fully assembled and frosted cake for several months. Make sure it’s wrapped tightly—I usually use a layer of plastic wrap followed by a layer of foil for extra protection against freezer burn. If you’re interested in other make-ahead treats that are great for batch prepping, you should take a look at my tips for making pumpkin overnight oats; they save so much time!
When you’re ready to thaw, just move the wrapped cake straight into the refrigerator overnight. It thaws beautifully, and you’ll have an almost-freshly baked layer cake ready for that party, no fuss required!
Variations on the Classic Oreo Cookies and Cream Cake
I love that this cake recipe is so forgiving! While the classic black-and-white look with Oreos is iconic, sometimes you just want to shake things up a bit. These little tweaks are easy and they don’t require you to hunt down exotic ingredients, which is always my goal!
First off, let’s talk about those cookie bits. Want to introduce a little chocolate variation? Go ahead and swap out half of the classic black Oreos for Golden Oreos or even Mint Oreos! The Mint Oreos create this fantastic, cool flavor burst that pairs surprisingly well with the richness of the cream cheese frosting. Just make sure to break them up the same way—you want those textural surprises!
If you want to add a subtle flavor twist to the white cake layers themselves, try the vanilla swap. Instead of using clear vanilla, use just a teaspoon of almond extract or even a citrus extract like lemon. A little lemon zest folded into the batter right before the Oreos gives the cake this unexpected brightness that cuts through the richness. It’s really lovely, and a great trick when you’re looking for subtle layers of flavor, similar to how I approach my zucchini cookies.
For the frosting, if you find the cream cheese version just a touch too tangy for a large event, you can adjust the ratio. Keep the butter and cream cheese the same weight, but slightly reduce the cream cheese by about 4 oz and increase the butter by the same amount. This gives you a creamier, more stable frosting that holds its shape even better if you’re worried about leaving the cake out on a warm day.
Lastly, if you absolutely hate piping swirls, just make a super smooth coat of the plain white frosting and then sprinkle any remaining pulverized or roughly crushed Oreos right over the top—no fancy tip needed! Sometimes simple coverage is the most elegant approach, and it saves you a few minutes of washing decorating tips!
Frequently Asked Questions About This Oreo Cookies and Cream Cake
I only have two 8-inch pans. Can I still make this layer cake?
Absolutely, you can! That’s a very common issue when baking for a casual party. Since this recipe yields enough batter for three layers, if you use just two 8-inch pans, you’ll need to fill them a bit more generously—about ⅔ to ¾ full. Just remember, the bake time will increase slightly, usually landing closer to 35 to 40 minutes. Keep an eye on it, and remember the toothpick test!
What is the best way to crush Oreo cookies really finely for the frosting?
This is a great question because the texture matters! For the crumbs that go *into* the frosting (for that middle layer), you really want fine dust. The easiest way is to put them in a food processor and pulse until they are completely pulverized into fine, dark powder. If you don’t have a processor, you can place them in a heavy-duty zip-top bag and smash them with a rolling pin, but you might have to work a bit harder to get away from those visible chunks. I have a neat trick for making low-carb versions if you ever want to compare textures, which you can read about here: Keto Oreos recipe!
Can I skip whipping the egg whites separately?
Oh, please don’t skip this step if you want that light texture! This is a white cake base, and we rely on those stiff, whipped egg whites for lift, since we aren’t using much baking powder relative to the density of the flour and sugar. If you mix the whole eggs in with the wet ingredients, you’ll get much denser results, and you won’t achieve the light crumb that makes this cake so lovely. Those whites are your main source of air!
Can I use almond extract instead of clear vanilla in the cake layers?
You certainly can! If you decide to use a regular or classic vanilla, your cake will bake up slightly off-white, which is totally fine, but the clear vanilla keeps it looking picture-perfect white. If you want to experiment, almond extract is a wonderful substitute! Use about 1 teaspoon of almond extract instead of the 1 tablespoon of clear vanilla. Almond adds a subtle, delicate nuttiness that complements the chocolate wafers beautifully!
Is this cake sturdy enough to transport to a party?
Yes, it holds up really well! Because we are using a denser formula than a light chiffon cake, and we’re using a stabilizing cream cheese frosting, it travels much better than you’d expect from a layer cake. Just make sure it’s completely chilled before you wrap it snugly in the fridge for transport, and try to keep it level. It’s one of my favorite dessert options for potlucks.
Nutritional Information For Oreo Cookies And Cream Cake
Listen, I know when we’re diving into a gorgeous, triple-layer, Oreo-stuffed masterpiece like this, we aren’t exactly looking for a salad recipe! This is pure indulgence, meant to be enjoyed generously at a celebration. It’s a party cake, not an everyday snack, right?
That said, I always like to keep the stats handy just so we manage expectations. Keep in mind that these figures are just estimates, calculated based on standard product measurements and serving sizes. If you use extra heavy frosting or sneak in a few extra cookies (and who can blame you?), the numbers will shift a little. This calculation is based on the recipe making 12 beautiful slices.
Here is a snapshot of what you’re looking at per serving:
- Calories: 834
- Carbohydrates: 111 g
- Protein: 7 g
- Total Fat: 41 g
- Saturated Fat: 18 g
- Cholesterol: 73 mg
- Sugar: 85 g
Wow, that sugar count is high, but that’s the joy of a celebration cake! It’s worth every bit of those 834 calories if you ask me. If you’re working on counting macros or tracking seriously, I always suggest plugging in *your* specific brand weights for flour and sugar, as ingredient variations can make a small difference!
Share Your Oreo Cookies and Cream Cake Creations
Well, that’s it! You’ve got the full blueprint for making what I think is the most fun, crowd-pleasing dessert out there—the incredible Oreo Cookies and Cream Cake. Now the hard part is over, and the best part begins: eating it!
I’ve tried to make this recipe as simple and foolproof as possible, especially for those of you making your first layer cake. But I can’t wait to see what y’all do with it! If you follow the instructions for 12 generous slices, you’ll have plenty to share.
When you finish decorating your masterpiece—whether you went for the piped swirls or just a rough smash of crumbs on top—please come back here and let me know how it went! Drop a rating below based on how easy you found the process and how much everyone loved the flavor.
If you snapped a picture of your beautiful cake, tag me on social media or send it over! I absolutely love seeing how my readers bring these recipes to life in their own kitchens. It truly makes my day!
If you want to learn more about my baking philosophy or just see what else I’ve been whipping up, you can always check out the behind-the-scenes stuff on my About Me page. Happy baking, and enjoy every single decadent bite!

Oreo Cookies and Cream Cake
Ingredients
Equipment
Method
- Preheat your oven to 350F (175C). Prepare three 8-inch round cake pans by lining the bottom of each pan with a round of parchment paper and greasing the sides with baking spray.
- In the bowl of a stand mixer or large bowl using an electric mixer, whisk together flour, sugar, baking powder, and salt.
- Turn mixer to low-speed and add butter, one tablespoon at a time. Do not add the next tablespoon until the first is completely combined. The mixture should resemble coarse sandy crumbs.
- Add canola oil and stir until combined. Then add sour cream and vanilla extract and stir on low-speed until completely combined. With the mixer still on low-speed, add milk until combined.
- In a separate, clean, dry, and grease-free bowl, use clean, dry beaters to beat egg whites to stiff peaks.
- Use a spatula to gently fold your whipped egg whites into the batter. Do not overmix, but make sure there are no lumps of egg white remaining.
- Carefully fold in broken Oreo pieces. Divide batter evenly into prepared baking pans and transfer to 350F (175C) oven. Bake for 30-35 minutes or until the tops spring back if lightly touched and a toothpick inserted in the center comes out clean or with a few moist crumbs. You may need to rotate pans halfway through baking if your oven does not bake evenly.
- Allow cakes to cool in the pan for 15 minutes. Carefully invert them onto a cooling rack and allow them to completely cool before assembling and decorating.
- Prepare frosting by creaming together butter and cream cheese with an electric mixer or stand mixer until creamy and well-combined.
- Gradually add powdered sugar with the mixer on low-speed. Scrape the sides and bottom of the bowl, and stir in salt and vanilla extract. With the mixer on low speed, add cream and gradually increase the mixer speed to high. Beat for 15-30 seconds until light and smooth.
- Evenly ice the cake. Once the whole cake is covered in icing, use your hands to press pulverized Oreo crumbs evenly halfway up the cake.
- Pour about 3-4 Tablespoons of remaining Oreo cookie crumbs into the remaining frosting and stir to combine. Fit a large piping bag with an Ateco 848 piping tip and fill with this frosting. Pipe swirls around the top of the cake. Serve.