
Oh, the sheer joy of variety! Sometimes just one flavor isn’t enough, right? That’s why I absolutely adore the idea of creating assortments. Thinking about making Mini Bundt Cakes Six Flavors for a party just makes my heart happy—it looks so impressive on a dessert table!

The first time I tried to make a batch of assorted minis was totally accidental. I had a tiny bit of cocoa, some lemon zest mix, leftover espresso powder, shredded coconut, vanilla, and cinnamon—all junk in the fridge! I threw them all into one big batter batch divided into small portions, and wow, what a fun surprise it was when they came out. Ever since then, creating assortments like this has become one of my favorite ways to bring color and creativity to baking. Now, don’t panic about the six flavors just yet; the recipe I’m giving you today is for the absolute best, richest dark chocolate version. It’s the perfect base you can easily split and flavor six ways when you’re ready to experiment!
You can read a bit more about me and my kitchen philosophy over at my About Me page if you want the full scoop on why I love mixing things up!
Why You Should Make Mini Bundt Cakes Six Flavors Today
Honestly, trying out a variety, even if you just split your batch into two or three flavors instead of six, is totally worth the effort, especially when you’re hosting. Mini Bundt cakes are perfect for so many reasons. They look incredibly elegant sitting out on a platter!
- Portion control is a dream—everyone gets just the right amount.
- They are fantastic for party prep because they travel so easily.
- You satisfy everyone’s sweet tooth by offering a little bit of everything.
Jump over to my holiday board for more ideas on easy party desserts!
Gathering Ingredients for Rich Chocolate Mini Bundt Cakes
Okay, before we can even think about dividing this for six different flavors of Mini Bundt Cakes Six Flavors heaven, we need the perfect base. This chocolate recipe is deep, dark, and so moist, trust me, you won’t even miss the complexity of different flavors when the cake tastes this good on its own! You’ll need to gather everything for the cake structure, the super simple ganache, and any fun finishers. Remember, the notes I share here are important—especially getting those eggs to room temperature; it really helps everything blend smoothly.
For the Mini Chocolate Bundt Cakes
For the cake itself, we start with 2 cups of gluten-free 1-to-1 flour—I usually grab the Bob’s Red Mill brand, it’s so reliable. Then you’ll stir in 1.75 cups of sugar. For that intoxicating dark color and rich taste, grab ¾ cup of a good, unsweetened dark or black cocoa powder. Two teaspoons of baking soda and one teaspoon each of baking powder and salt get mixed into the dry stuff. Wet ingredients include 1 cup of buttermilk (or sour cream if you’re out!), ½ cup of your favorite oil, and 2 extra-large eggs that absolutely must be at room temperature, along with 1 teaspoon of vanilla extract. The secret weapon here is ¾ cup of freshly brewed hot coffee; it really deepens the chocolate, but hot water works too if you prefer!
For the Chocolate Ganache
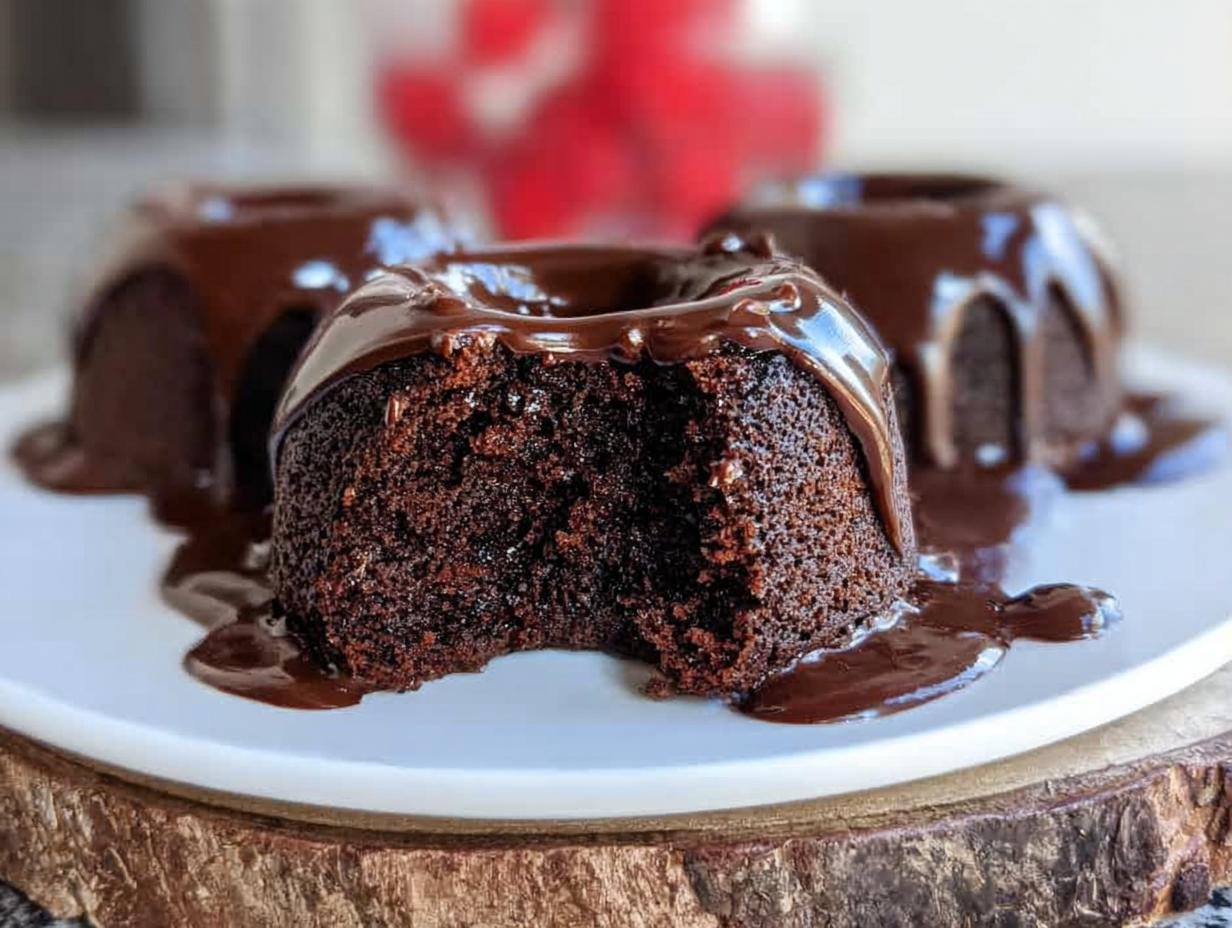
This topping is so quick and shiny, it screams high effort but takes practically no time, which keeps us beginner friendly! You only need one 14-ounce can of sweetened condensed milk and 1 cup of good chocolate chips. Microwave that for a minute, stir until totally glossy, and that’s it! Seriously, that’s the whole frosting component for these decadent little cakes.
Optional Toppings
If you want to get fancy for your party spread, have some sprinkles, fresh berries, or a little bit of whipped cream ready to go on the side. These are just for that final pop of color!
Step-by-Step Instructions for Perfect Mini Bundt Cakes Six Flavors
We are aiming for a total time of only 45 minutes here, which is incredible for such a delicious, deeply flavored cake! Remember, this chocolate recipe is the powerhouse foundation that lets you step into the world of Mini Bundt Cakes Six Flavors. Let’s get mixing!
Preparing the Batter
First things first, get your oven roaring at 350 degrees F. Now, grab your biggest mixing bowl and whip together all your dry stuff: the flour, sugar, cocoa powder, baking soda, baking powder, and salt. In a separate bowl, whisk up the wet ingredients—that’s your milk, oil, room temperature eggs, and vanilla. Once they are happy together, start adding the wet mixture slowly into the dry ingredients while your mixer runs on low speed. Keep that mixer on low, but just as everything starts to mix, pour in that hot coffee and stir until it’s *just* combined. Seriously, stop mixing then! Then, grab your spatula and make sure you scrape the bottom of the bowl to catch any hiding dry bits. If you decided to add those optional mini chips, fold them in right at the end.
Pan Preparation: Key for Release
This is the most important part to avoid heartbreak when you try to serve your gorgeous assortment! Don’t just wing it; you need to coat every last nook and cranny of that mini Bundt pan. I highly recommend using Baker’s Joy spray; it’s a life-saver. If you don’t have that, use some melted shortening and a pastry brush to get into the deepest parts, especially that center tube! Then, lightly dust the whole thing with cocoa powder or flour. Remember to flip the pan over and whack it gently to knock out all that extra powder—we don’t want greasy cake edges!
Baking and Cooling the Mini Bundt Cakes
Because the batter is a bit runny (which is great for moisture!), using a piping bag makes getting the batter into those little molds way tidier, but honestly, a measuring cup works fine too; just have a napkin ready for drips. Fill each little mold about 2/3rds full. Pop them in the hot oven and check them between 22 to 26 minutes; you want a tester or a thin knife to come out clean. The trick is patience: let them cool *in* the pan for exactly 10 minutes on a wire rack. After that, you carefully invert the pan onto the rack, lift off the pan, and let the cakes finish cooling completely.

Making and Applying the Ganache
While those beauties are cooling down, make the easy ganache. Toss the sweetened condensed milk and chocolate chips into a microwave-safe bowl. Microwave on high for just one minute, stir well until you see it smooth out, and if there are still some lumps, zap it again in 15-second bursts. Once it’s silky, let it cool down just enough so it’s not super watery, but still nice and pourable. Then, drizzle it right over the cooled or slightly warm mini cakes while they are sitting on your cooling rack so any extra drips fall away. Add those fun sprinkles here!

Check out my quick recipe board for more baking shortcuts!
Tips for Mastering Mini Bundt Cakes Six Flavors Assortments
Now that you know the chocolate base is solid—and it really is perfect because it’s adapted from that Ina Garten recipe—let’s talk about branching out into your Mini Bundt Cakes Six Flavors project. The secret to variety isn’t usually starting six different recipes; it’s starting one big batch and splitting it!
If you want to make three distinct flavors, just halve my chocolate recipe above. Take half and keep it chocolate. To the other half, you could stir in a teaspoon of almond extract and some lemon zest right before baking. Instant flavor change! If you want to double the recipe completely, you could easily end up with enough batter for six different smaller batches of flavor variations.
When you are doing these little flavor experiments, make sure your additions are subtle. A little maple extract here, maybe some cinnamon added to the flour mixture there. It’s all about balance so you don’t mess up that beautiful texture we worked so hard for. You can see some of my favorite clean eating flavor ideas over at my clean eating section for inspiration!
Equipment Needed for Your Mini Bundt Cakes Six Flavors Project
You asked about buying the things you need, and honestly, this recipe is fantastic for beginners because the equipment is pretty standard, nothing too scary or specialty required—except for the main star, of course! We’re aiming for beautiful results without needing a professional baking setup, which is why I love making these for a fun afternoon baking session.
The absolute must-have piece here is your mini Bundt pan. Since these little pans have all those fancy ridges, using something high-quality really helps prevent sticking, especially when you’re dealing with a runny batter or trying to pull out six different flavors successfully! Here’s what you’ll want on hand to get started:
- A couple of good, sturdy mixing bowls for wet and dry ingredients.
- Your electric mixer; it makes creaming and combining so much faster than whisking by hand.
- The essential Mini Bundt Pan. Make sure it’s a good size, usually holding about 12 cakes total, though many people buy two pans to save time!
- If you’re feeling fancy for the drizzle, some piping bags will make getting that ganache perfectly into the grooves easier.
- A wire cooling rack is super important so air can circulate underneath while they cool down completely.
See? Totally beginner friendly! Once you have that special pan, everything else is standard issue, making this a super quick project for any day of the week.
Storing and Reheating Your Mini Bundt Cakes
Storing little guys like this is easy, but you have to keep the ganache in mind! If you leave them unfrosted, they’ll keep beautifully in an airtight container at room temperature for about three days. They stay super moist, I promise! But because this ganache contains condensed milk, you should probably tuck them into the fridge if you aren’t planning to eat them within a day, especially if you’re making a big batch for your Mini Bundt Cakes Six Flavors assortment.
When you bring them out of the fridge, let them sit on the counter for about 30 minutes to take the chill off; they taste way better when they aren’t cold! If you need to speed things up, pop one in the microwave for just 5 to 10 seconds, but don’t overdo it or the texture gets sticky. For more ideas about keeping food fresh, check out my meal prep tips!
Serving Suggestions for Your Six Flavored Mini Bundt Cakes
This is where the fun really happens! Once you’ve successfully created your Mini Bundt Cakes Six Flavors assortment, presentation becomes everything. Since these are perfectly portioned, they are naturally fantastic for any party dessert setup. Forget the fussy layer cake slicing—these little rings make serving ridiculously easy!
For a really dramatic presentation, especially if you’ve managed to flavor them slightly differently, arrange them on a tiered serving tray. I love using white platters so the dark chocolate truly pops!

Since this base recipe is super rich and chocolatey, you want accompaniments that cut through that intensity a little bit. Think light and bright things. A dollop of fresh, homemade whipped cream is always a winner.
- If you went with a lemon-flavored mini cake in your assortment, serving it next to a raspberry or strawberry coulis makes the color contrast stunning.
- For the pure chocolate versions, try a little bit of good quality flaky sea salt sprinkled just over the ganache right before serving. It really boosts the depth of flavor!
- A small side of fresh mint leaves adds a gorgeous green pop against the dark brown cake.
If you’re looking for more ways to lighten up heavy desserts without losing flavor, you’ve got to check out my board dedicated to comfort food makeovers. These chocolate minis are definitely comfort food, but they look so elegant!
Frequently Asked Questions About Mini Bundt Cakes
I know sometimes when you look at a recipe, especially one aiming for fun variety like our Mini Bundt Cakes Six Flavors idea, you get a few jitters! Don’t worry at all; these are totally beginner friendly, and mastering them means you master the mini pan, which is the hardest part. Here are just a few things folks ask me most often when they are trying to get the ganache just right or trying to figure out how to split the batter!
How do I ensure my Mini Bundt Cakes release perfectly?
Oh, honey, I’ve wrestled with more stuck Bundt cakes than I care to admit! The release is 99% of the battle, especially with these detailed little pans. You simply can’t skip the prep step. You need to be thorough! Forget just spraying; you must coat every single ridge and the center tube with your fat—yes, that Baker’s Joy spray is amazing for this, or use solid shortening or butter with a brush. Once that’s coated, you *must* dust it with a little flour or cocoa powder (depending on what flavor you are baking) and then flip it upside down and bang out the excess. If you do that right, they should pop out happily onto the cooling rack after that essential 10-minute rest period!
Can I make these without coffee?
Absolutely, you can skip the coffee! I love coffee in chocolate cake—it just deepens the flavor and makes it taste darker, but it’s not mandatory at all. If you don’t want the caffeine or just don’t have any brewed, the recipe notes say you can swap that ¾ cup of coffee out for ¾ cup of hot water. That hot liquid is important because it blooms the cocoa powder just a little bit, so make sure you use hot water if you skip the coffee!
What are simple flavor swaps for a party dessert assortment?
This is the fun part where we actually achieve the Mini Bundt Cakes Six Flavors dream! When you’ve mixed your dry and wet ingredients but *before* adding the hot coffee, divide that batter exactly how many flavors you want. Since this recipe makes about 12 cakes, if you want 6 different flavors, you’d split the batter into 6 equal portions (about 1.5 cups each). For flavor swaps, keep it simple:
- For a bright pop, add about a teaspoon of lemon zest and a tiny splash of lemon extract to one section.
- Another section gets ½ teaspoon of almond extract mixed in.
- A third could use a teaspoon of cinnamon mixed into the dry ingredients before combining.
Mix those additions in gently, pour into your greased pans, and boom—you’ve customized your assortment! If you try these out, you can see lots of other lighter options over at my quick lunch board that might even give you some non-dessert ideas!
Sharing Your Mini Bundt Cakes Six Flavors Creations
I truly hope you get a chance to try this rich chocolate base, and even more, I hope you take the leap into making your own assortment of Mini Bundt Cakes Six Flavors!
When you do whip up a batch—whether you stick to chocolate or branch out to vanilla, lemon, and spice—I absolutely want to see them! Please drop a rating for the recipe right here on the blog so I know how they turned out for you. And if you’re sharing photos on social media, tag me! Seeing your beautiful, varied mini Bundt towers totally makes my day.
Happy baking, friend! You can find more inspiration from my kitchen over at my wellness recipes board!

Mini Chocolate Bundt Cakes with Ganache
Ingredients
Equipment
Method
- Preheat the oven to 350 degrees F.
- Using a mixer, in a mixing bowl, combine the flour, sugar, cocoa, baking soda, baking powder, and salt.
- In another bowl, whisk together the milk, oil, eggs, and vanilla. Slowly add the wet ingredients to the dry ingredients.
- With the mixer still on low, add the coffee and stir just to combine. Scrape the bottom of the bowl with a rubber spatula. Add mini chocolate chips if you are using them.
- Right before you pour the batter into the bundts, coat your pan well with Baker’s Joy or melted or solid shortening using a brush or paper towel. Make sure to coat all the nooks and crannies, including the center tube of the pans. Dust the pan with cocoa powder or flour. Flip the pan over and tap out the excess flour to prevent a buildup of grease and flour on the finished cakes.
- Because the batter is runny, divide the batter into large piping bags to make it easier to get the batter into the mini pans.
- If you do not want to use piping bags, use a spoon or a glass measuring cup. Have a paper towel ready to wipe away any excess batter on the sides.
- Pipe or spoon/pour the batter into the prepared pan until 2/3rds full. Bake for 22 to 26 minutes, until a cake tester comes out clean. Let the cakes cool in the pan for 10 minutes before removing them to cool the rest of the way on a cooling rack.
- After removing from the oven, place the pan on a wire rack and let cool for 10 minutes. This allows the cake to firm up enough to remove from the pan without breaking. Carefully slide a table knife or spatula down the sides and center of the pan to release any sticking spots. After the required cooling time, tap the pan firmly a few times and shake it gently to help loosen the cake. Invert the pan onto the rack, lift it off, and let the cake continue to cool on the rack.
- Add sweetened condensed milk and chocolate chips to a microwaveable bowl. Microwave on high for one minute and stir until the chips are melted and the mixture is smooth. Melt in 15 second increments after that if needed. Cool slightly before drizzling over cakes. You can cool and reheat this ganache in the microwave if making it ahead of time.
- Spoon ganache over cakes while they are on the cooling rack. Add sprinkles, berries, or whipped cream if desired.