

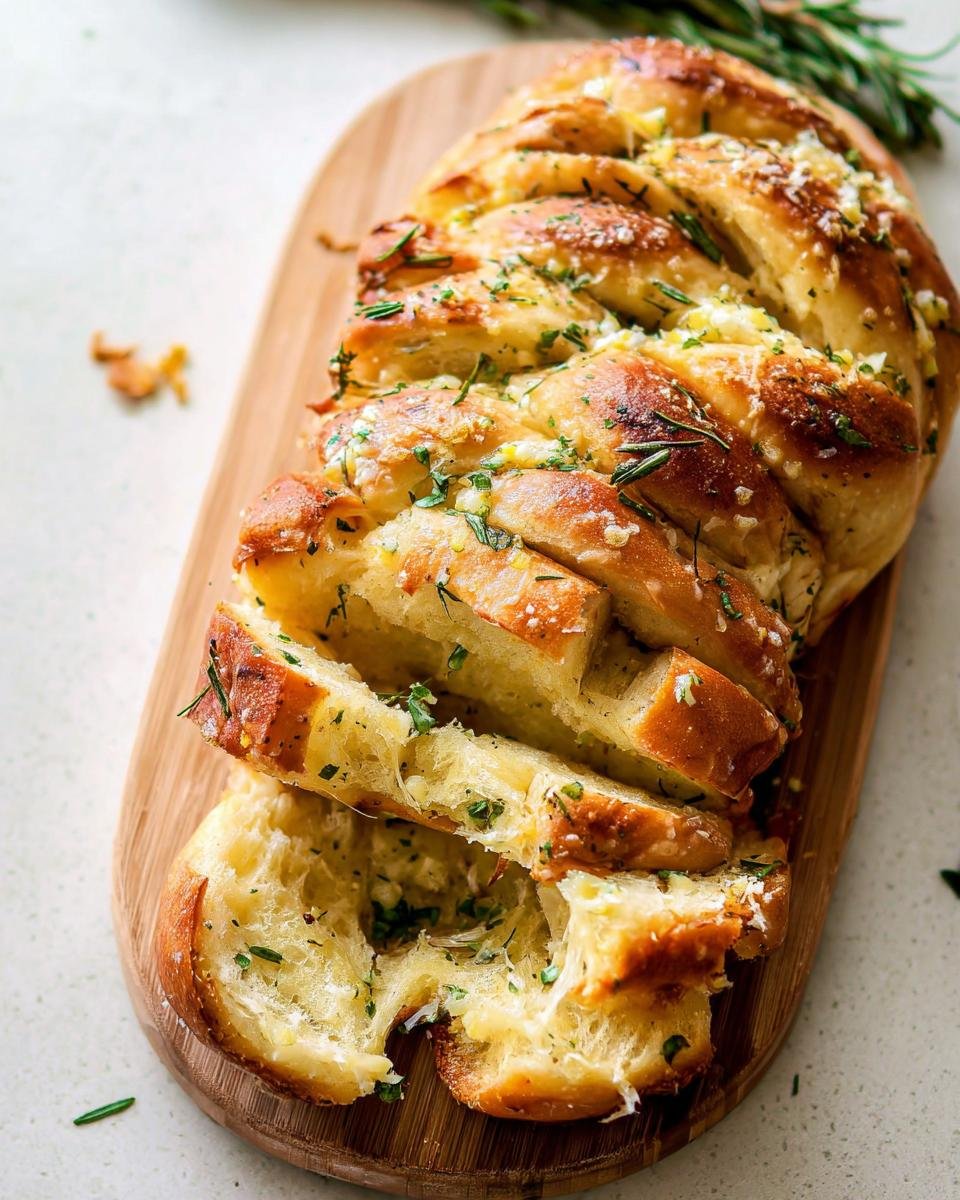
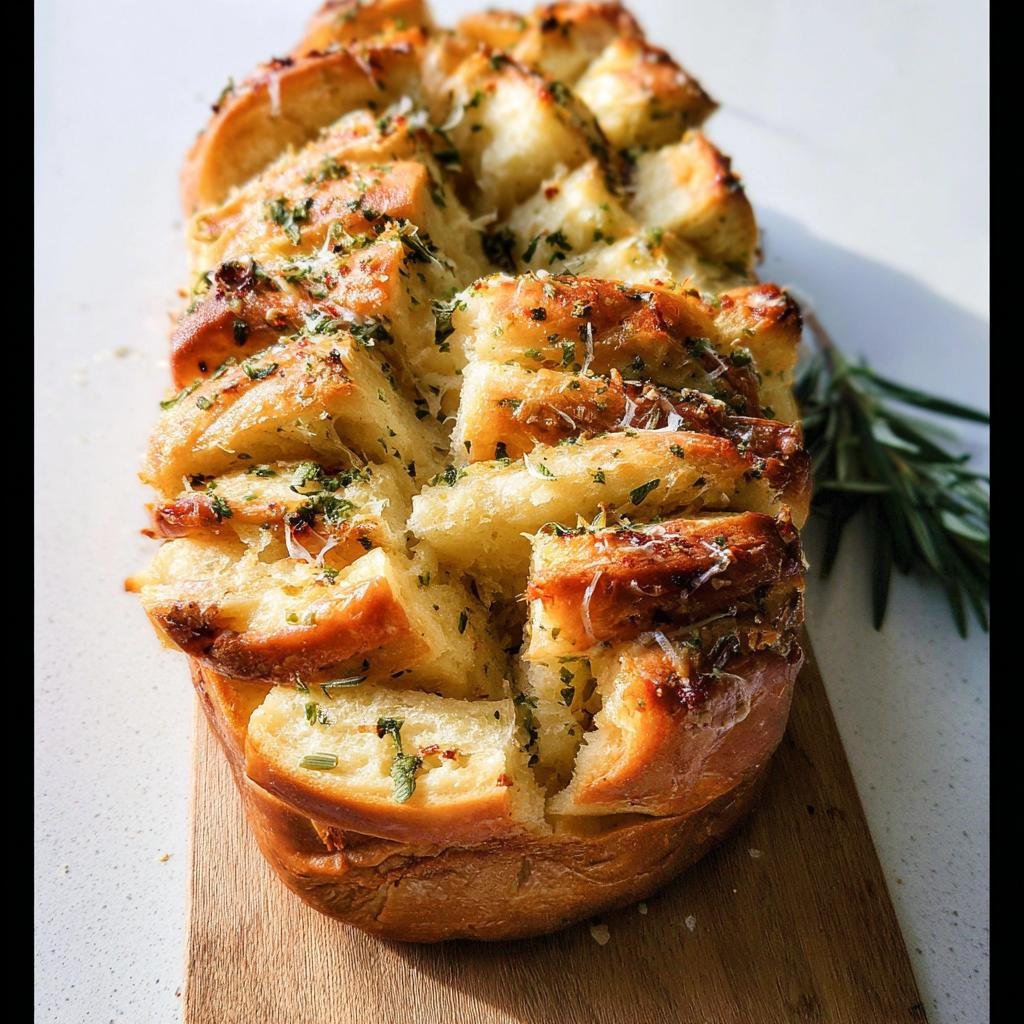
Oh, you just HAVE to try making these bread rolls. Forget those dry, boring dinner rolls you see everywhere else. These Herb Pull Apart Rolls Rosemary Thyme are soft, they basically melt in your mouth, and the steam that comes off them when you pull them apart smells straight-up divine! I know kneading dough sounds like a lot of fuss, but trust me, these are worth every minute because they feel so incredibly special when you serve them.
I still remember the first time I watched fresh herbs get folded into a warm dough—it was during a quiet autumn afternoon in the test kitchen with Chef Violet. The aroma filled the room instantly, and each roll pulled apart like a soft cloud infused with herbs. That moment made me appreciate how simple ingredients can create a comforting, nourishing experience, and it’s been one of my favorite recipes to review ever since. You are going to bring that cozy, fragrant kitchen magic right into your own home!

Why You Will Love These Herb Pull Apart Rolls Rosemary Thyme
Honestly, I wouldn’t bother writing this up if these rolls weren’t absolutely stellar. People always ask me for bread recipes that feel fancy but aren’t a total nightmare, and this is it! You’ll be reaching for these again and again once you see how easy the payoff is. Check out why these are going straight into your regular rotation:
- Incredibly Soft Texture: Seriously, they are fluffy on the inside. We use milk and plenty of butter in both the dough and the filling to guarantee that pillowy bread experience.
- Aromatic Flavor Bomb: That blend of fresh rosemary, thyme, and garlic isn’t just tasty; it makes your whole house smell like an Italian bakery! It really elevates simple dinner time.
- Perfectly Buttery Finish: We brush them with extra melted butter right after they come out of the oven. You get that irresistible, slightly crispy crust with a rich, buttery interior.
- Great for Make Ahead: You can totally shape these, tuck them into the pan, and let them rise overnight in the fridge. Pull them out in the morning and bake when needed!
- They Pull Apart Happily: These aren’t stiff rolls! Everyone defaults to grabbing one piece, which makes serving them at dinner parties super interactive and fun.
- Cheesy Goodness: That little bit of Parmesan or cheddar sprinkled between the layers adds just the right hit of salty umami flavor without overpowering the herbs.
- Tried and Tested Reliability: Even though they need a bit of kneading, the process is straightforward, meaning you get fantastic results even if you don’t bake bread often. For more lighthearted comfort foods, check out my best comfort food roundups!
Essential Ingredients for Perfect Herb Pull Apart Rolls Rosemary Thyme
When you’re baking something this aromatic, the ingredients really have to shine. We aren’t messing around here. I’ve broken down everything you need into three clear groups. Don’t skip the notes on butter softness, though—that truly makes a difference in how well these rolls come together! If you follow these measurements exactly, you’ll have no trouble achieving that soft, pillowy interior wrapped around delicious herbs.
For the Dough
This is the foundation of our buttery bread structure. Make sure you use good quality yeast; I always grab the Platinum Yeast from Red Star for reliable yeast activation. The milk is just as important! Heat it gently until it’s warm to the touch—about 110°F—to wake up that yeast right away. Everything else is standard pantry gold:
- 2 teaspoons Platinum Yeast from Red Star
- 1 Tablespoon granulated sugar
- 3/4 cup whole milk (180ml)
- 3 Tablespoons unsalted butter, softened to room temperature (43g)
- 1 large egg
- 2 and 1/3 cups all-purpose flour (291g), spooned & leveled, plus more as needed
- 1 teaspoon salt
- 1 teaspoon garlic powder
- 1 Tablespoon finely chopped fresh rosemary (or 2 teaspoons dried)
For the Savory Herb Filling
This is where the magic happens! The secret note here is using butter that is *extra* soft, almost like it’s just starting to melt. This allows it to spread like a dream and coat every little piece of dough evenly. Those fresh herbs are powerful, so chop them finely!
- 5 Tablespoons unsalted butter, extra soft (71g)
- 1 Tablespoon finely chopped fresh rosemary (or 2 teaspoons dried)
- 1 Tablespoon finely chopped fresh parsley (or 2 teaspoons dried)
- 2 cloves garlic, minced or 1/2 teaspoon garlic powder
- 1/4 teaspoon salt
- 3/4 cup shredded parmesan, mozzarella, or white cheddar cheese (95g) (or your favorite shredded cheese)

Optional Topping Ingredients
We wait until the rolls are out of the oven for this step. A quick brush of melted butter right before serving gives them that professional sheen, and a sprinkle of flaky salt just makes every bite pop. It’s optional, but honestly, why would you skip it?
- 1 Tablespoon unsalted butter, melted (14g)
- 1 to taste coarse or flaky sea salt for sprinkling
Equipment Needed for Herb Pull Apart Rolls Rosemary Thyme
You don’t need a million fancy gadgets for these rolls, which is another thing I love about them! Having the right tools just makes the process smoother, especially when dealing with yeast dough. We need a couple of specific items for mixing and baking these beauties perfectly. It’s all about setting yourself up for success before that first cup of flour hits the bowl!
If you’re looking at your setup and think, “Oops, I don’t have that,” don’t panic! Most of these items have easy workarounds, but having them makes achieving that professional, soft texture much easier. Here’s what I recommend having ready to go:
- A stand mixer equipped with a dough hook attachment is a huge help when doing the required kneading, but you can absolutely manage this with a sturdy wooden spoon and some elbow grease if you prefer mixing by hand!
- You’ll need a 9×5-inch loaf pan for this recipe to get those lovely, tall rolls packed together.
- Finally, make sure you have a wire rack ready—it helps the bottom of the bread cool evenly so it doesn’t get soggy waiting for that perfect warm moment.
Step-by-Step Instructions for Making Herb Pull Apart Rolls Rosemary Thyme
Okay, here is where we transform those simple ingredients into something truly spectacular. While some rolls recipes easy no knead from scratch exist, I promise you—the little bit of effort we put into the kneading here really pays off in the final texture. Get your pan greased and ready, because once we start assembling, things move fast!
Activating the Yeast and Mixing the Dough
First things first, we need to get that yeast happy! Warm up your milk until it feels just cozy—around 110°F is the sweet spot. Pour that warm milk over the yeast and the sugar in your mixer bowl (or big mixing bowl if you’re going old school). Give it a tiny whisk, cover it loosely, and let it sit for about 5 to 10 minutes. You are waiting for it to get foamy and bubbly on top; that means your yeast is ready for action!
Once it’s frothy, toss in the softened butter, the egg, flour, salt, garlic powder, and that gorgeous fresh rosemary. Start mixing on low speed. If you aren’t using a mixer, just stir determinedly with a wooden spoon. The dough should start coming together and pulling away from the sides of the bowl after about 3 minutes. If it seems too wet and just gloppy, add a tablespoon of flour at a time until it looks slightly tacky, not sticky enough to glue your hands together!
Kneading and First Rise for Soft Herb Pull Apart Rolls Rosemary Thyme
Now, we knead! If you’re using a mixer, switch to the dough hook and let it go for 5 full minutes. If you’re doing this by hand, be prepared to push and fold for 5 solid minutes on a lightly floured surface. The goal here is developing just enough structure so these become marvelous, soft rolls, not tough ones. Don’t overdo the flour while kneading, aim for a dough that is soft but only slightly tacky.
How do you know when you’re done? Poke it! If the dough slowly springs back, you’re golden. For the show-offs among us, try the windowpane test: stretch a tiny bit thin enough that light passes through without tearing. That’s expertise right there! Now form it into a nice ball, place it in a greased bowl, cover it up, and find a slightly warm spot. Let it double in size—usually 60 to 90 minutes depending on how warm your kitchen is.
Preparing the Filling and Assembling the Rolls
While that dough is having its first big nap, pivot to the filling. Remember that extra soft butter? Mix it vigorously with your finely chopped rosemary, parsley, garlic, and a sprinkle of salt until it’s perfectly blendable. We want it spreadable, not melted!
When the dough is doubled, give it a good punch down to deflate it (it’s satisfying!). Turn it out onto your counter and use a kitchen scale or just your eye to divide it into 12 equal little balls—they should be about the size of a golf ball. Take each piece and gently flatten it out into a circle about 4 inches wide. Spread a teaspoon or two of that herby butter mixture onto the dough circle. Then, sprinkle about a tablespoon of your chosen cheese over the filling. Fold that piece in half and nestle it, rounded side up, into your prepared loaf pan. Keep snugging them together until the pan is full!
Second Rise and Baking the Buttery Herb Pull Apart Rolls Rosemary Thyme
Once they are all nestled in, cover the pan again and let them have their final rest, about 45 minutes, until they look puffy and soft. While they rise, get your oven preheated to 350°F (177°C). It needs to be on the lower third rack, so the bottoms get cooked through!
Bake them for about 50 minutes. If you notice the tops getting too dark and bronzed before the internal temperature is right—and this happens often in a loaf pan—just gently tent a piece of aluminum foil over the top partway through. After 50 minutes, pull them out! Immediately brush the tops with that last tablespoon of melted butter and sprinkle them with flaky sea salt—this is what makes them incredibly buttery and delicious. Let them cool in the pan for just 10 minutes before turning them out onto a rack to finish cooling slightly. You can see Chef Violet’s approach to other great breads over at A Quick Guide to Italian Bread!
Expert Tips for Perfect Herb Combination Benefits in Your Rolls
When you’re working with herbs like rosemary and thyme, the flavor payoff is huge, but you have to treat them right! The combination of evergreen rosemary and earthy thyme sings when paired with a rich fat, which is why we use so much butter in this recipe—it acts like a carrier for all those lovely aromatic oils. Trust me, these aren’t just bread rolls; they are a flavor vehicle!
I get asked all the time about using dried versus fresh herbs here. Since this recipe relies so much on the vibrant flavor profile, fresh herbs are always my number one recommendation. Fresh rosemary and thyme release their oils when chopped and warmed by that soft butter, creating layers of flavor in every pocket of dough. If you absolutely must use dried, cut the amount by about a third because dried herbs pack a much stronger punch. For more great flavor combinations that treat fats and accompanying ingredients well, you might want to check out my recipe for Butternut Squash Sage Pasta—different dish, same focus on ingredient synergy!
Here are a few quick pointers to maximize the herbal goodness and keep that texture just perfectly buttery:
- Chop Finely: Whether it’s the rosemary or the parsley for the filling, make sure everything is chopped as finely as possible. Giant pieces of rosemary can be slightly tough or overwhelmingly sharp in a soft roll.
- Don’t Over-Bake: Because we are aiming for that soft, yielding crumb that separates easily, pulling the rolls out right when they are golden brown is crucial. Overbaking dries out the soft dough and turns the herbal flavor brittle.
- The Butter Chill Trick: Prepare your filling butter mix but leave it out just long enough to remain spreadable, but not actually greasy or melted. When you spread cold, stiff butter onto the warm dough, it cuts through the dough and creates little pockets of air as it melts during the bake, which contributes hugely to that soft, buttery texture.
- Use the Parmesan Sparingly: The cheese is meant to augment the herbs, not become the main event. Too much cheese can interfere with the dough’s rise or make the gaps between the rolls too stiff. A light sprinkle on each piece is all you need!
Make Ahead and Storage Instructions for Herb Pull Apart Rolls Rosemary Thyme
I know that sometimes life gets hectic, and juggling dinner prep with bread baking is a lot! The good news is that these rolls are fantastic for planning ahead. We totally covered the make ahead option in the process, but let’s talk about how to store leftovers because nobody wants dry bread the next day, right?
When it comes to storing baked rolls, you have a couple of options depending on when you plan to eat them. If you know you’ll finish them up the next day, just leaving them loosely covered at room temperature is fine. That crispy exterior tends to soften a bit by day two, but the soft interior stays nice!
If you need them to last beyond 24 or 48 hours, pop them into an airtight container in the fridge. They’ll keep for up to a week that way. But listen to me: refrigerated bread always gets a little stiff. That’s why reheating is non-negotiable!
To bring these beauties back to life so they taste like they just came out of the oven (buttery and soft!), you need low, slow heat. Don’t zap them too long in the microwave unless you are just eating one or two immediately! For the best result, wrap the whole batch (or even individual rolls) loosely in foil and warm them up in a 300°F (149°C) oven for about 10 to 15 minutes. That steam trapped in the foil re-moisturizes that crust perfectly. If you’re making these for a holiday gathering, you can even assemble them completely, cover the pan, and chill them overnight. Just let them warm up on the counter for an hour before their second rise and baking!
For more ideas on making savory breads that hold up well, you absolutely must see my recipe for Savory French Onion Sausage Rolls—they are another great option for make-ahead meals!
Serving Suggestions for Your Aromatic Rolls
These rolls are far too special to just sit there pretending to be plain dinner bread! Because we loaded them up with rosemary, thyme, and cheese, they really feel like they belong next to a deeply flavored main course. Think rich, savory dishes where the subtle onion and herbal notes in the roll can cut through the richness perfectly. They steal the show!
When I make a big batch of these Herb Pull Apart Rolls Rosemary Thyme, I always plan on serving them with something hearty. It makes the whole meal feel instantly cozy and homemade, even if the main dish is quick to put together. Trust me, when you pull one of these warm rolls apart and dip it into the sauce of your entrée, you’ll understand why I love them so much!

Here are a few of my absolute favorite ways to feature these rolls on the dinner table:
- Smothered in Gravy or Jus: They are perfect for soaking up the extra juices left on your plate after eating roasted meats. My favorite is serving them alongside my Chicken Normandy—the creamy sauce and the herbs are just spectacular together.
- With Hearty Soups and Stews: Forget plain cornbread! These savory rolls are sturdy enough to handle thick chili or a vegetable-heavy stew. Just tear off a piece and use it like a spoon.
- As the Star of a Cheese Board: If you bake them slightly smaller, they function almost like small savory biscuits. They pair beautifully with sharp cheddar, salty olives, and maybe some fig jam if you want a sweet/savory contrast.
- Alongside Pasta Bakes: When you are making a comforting, cheesy baked ziti or lasagna, having a side of warm, garlicky rolls is non-negotiable for scooping up any sauce that escaped the casserole dish. They really round out a heavy meal!
Frequently Asked Questions About Herb Pull Apart Rolls Rosemary Thyme
I know you might have a few burning questions, or maybe you’re wondering how to simplify this recipe just a little bit since you have a busy week. Trust me, I’ve thought through all the little workarounds. Let’s tackle some of the most common things people ask me about these glorious, herby, buttery breads!
For the best flavor, can I use dried herbs instead of fresh?
That’s a great question! You absolutely can use dried herbs if that’s what you have on hand, but you need to adjust the quantity. Dried herbs are much more concentrated than fresh ones—think of fresh rosemary as the soft note and dried as the loud note! For the recipe amounts specified (1 Tablespoon fresh), you should use only 2 teaspoons of dried rosemary or thyme. I know some people look for rolls recipes easy no knead from scratch, and when you have dried herbs, it does streamline the prep just a tiny bit.
I really hate kneading. Can I skip it completely?
I totally hear you! Kneading develops the gluten structure that makes the rolls strong enough to hold all that delicious filling and rise beautifully without collapsing. If you skip it, you risk a dense, cake-like final product rather than a stretchy, pull-apart bread. We knead here for 5 minutes with the dough hook to ensure we get that amazing texture—it’s not as long as traditional bread kneading! If you really want to skip it, you might want to look specifically at recipes labeled as rolls recipes easy no knead from scratch, but be aware the texture will change.
What is the absolute best cheese to use in the filling?
The recipe calls for Parmesan, mozzarella, or white cheddar, and honestly, you can’t go wrong with any of those! If you want the sharpest, tangiest flavor that really cuts through the richness of the butter, use fresh Parmesan. If you want the softest, meltiest pockets of gooey goodness, go for low-moisture mozzarella. Cheddar (sharp) works great too, especially if you plan on eating these alongside a hearty beef stew or smoked meat!
How can I make these Herb Pull Apart Rolls Rosemary Thyme even easier for a busy morning?
That’s where the make ahead potential shines! You can complete Step 1 (activating yeast) and Step 2 (mixing and kneading the dough). After kneading, grease your bowl, cover the dough, and place it in the refrigerator overnight (up to 18 hours). The cold slows the yeast down. When you wake up, let the dough sit on the counter for about an hour to take the chill off, then proceed with dividing, filling, shaping, and the second rise as described in the steps. It breaks that 3-hour process into two manageable days!
If you want to explore more streamlined options that focus purely on simplicity, I have a run-down of the best rolls recipes easy no knead from scratch right here!
Estimated Nutritional Information
Now, look, I’m a cook, not a nutritionist, so please take this information with a grain of salt! Since we are using rich ingredients like whole milk, eggs, and a very generous amount of buttery filling, these rolls are going to be decadent. They taste amazing, and sometimes, that’s what matters most, right?
This is just an estimate based on serving the recipe above into 12 equal rolls using the ingredients listed. Heavy cream or different cheeses would definitely shift these numbers, so consider this your starting point!
For one of these glorious, herby, buttery rolls, you can generally expect:
- Calories: Approximately 230-250 kcal
- Total Fat: Around 11g to 13g (Yes, it’s buttery, but good fat!)
- Protein: About 6g to 7g
- Total Carbohydrates: Roughly 27g to 30g
Remember, because these are so satisfying, one roll is usually enough to hit that comfort food craving! They are perfect alongside a lighter main dish, which helps naturally balance out the meal. Enjoy them while they are warm!
Share Your Homemade Herb Pull Apart Rolls Rosemary Thyme
Whew! If you made it through those steps, you deserve at least one warm roll right now! Seeing these Herb Pull Apart Rolls Rosemary Thyme come out of the oven is always one of the best feelings, and the aroma that fills my kitchen makes me want to bake them every single week. I truly hope you loved the process as much as I do!
Now that you’ve got that amazing, buttery bread cooling on the rack, I need to see them! Seriously, these aromatic rolls look incredible when they’re fresh out of the oven, and I love seeing how they look in your kitchen, whether you served them for Sunday dinner or took them to a big party.
- If you loved this recipe, please do me a huge favor and click over to the recipe card and leave a star rating! It helps other home cooks find these reliable recipes, and it always makes my day to see those high scores roll in.
- Snap a photo! Tag me on social media when you share your heavenly rolls. I check my mentions religiously! It’s the best payoff to see my friends enjoying the results of Chef Violet’s inspiration.
- If you made any little tweaks—maybe you swapped out the cheese or found an even better herb combination—drop a comment below! We all learn from each other, and I want to know what works for you when creating these perfect rolls.
If you’re looking for more comforting, tried-and-true recipes that just feel like home, make sure to stop by my ‘About Me’ page to see what else I’ve been baking up lately. Happy baking, dear friend!
Herb Pull Apart Rolls with Rosemary and Thyme
Ingredients
Equipment
Method
- Heat the milk on the stove or in the microwave until warm to touch, about 110°F (43°C). Place the yeast and sugar in the bowl of a stand mixer fitted with a dough hook or paddle attachment, or in a large mixing bowl. Pour the warm milk over the yeast and sugar. Whisk gently to combine, cover loosely with a clean kitchen towel, and let it sit for 5 to 10 minutes until the mixture is frothy.
- If you are not using a mixer, mix the dough with a wooden spoon or silicone spatula in this step. Add the butter, egg, flour, salt, garlic powder, and rosemary. Beat on low speed until the dough comes together and pulls away from the sides of the bowl, about 3 minutes. If the dough does not pull away, add a little more flour, one Tablespoon at a time. The dough will be soft.
- Keep the dough in the mixer (switch to the dough hook if using the paddle) and beat for an additional 5 full minutes, or knead by hand on a lightly floured surface for 5 full minutes. If the dough becomes too sticky during kneading, sprinkle 1 Tablespoon of flour at a time onto the dough or work surface/in the bowl to make a soft, slightly tacky dough. Do not add more flour than necessary to avoid a dry dough. After kneading, poke the dough with your finger; if it slowly bounces back, the dough is ready to rise. Alternatively, perform a windowpane test: tear off a small piece of dough, gently stretch it until thin enough for light to pass through, and hold it up to a light source. If light passes through without the dough tearing, it is kneaded enough.
- Shape the kneaded dough into a ball. Place the dough in a greased bowl (use nonstick spray for greasing) and cover with plastic wrap or aluminum foil. Place it in a slightly warm environment to rise until doubled in size, about 60 to 90 minutes.
- As the dough rises, prepare the filling. Grease a 9×5-inch loaf pan. In a medium bowl, mix the soft butter, rosemary, parsley, garlic, and salt together using a spoon, fork, or electric mixer. Cover tightly and set aside at room temperature until ready to use.
- Punch down the dough to release the air. Place the dough on a lightly floured work surface. Divide it into 12 equal pieces, each about 1/4 cup of dough and slightly larger than a golf ball. Using lightly floured hands, flatten each piece into a circle about 4 inches in diameter. Spread 1 to 2 teaspoons of the filling mixture onto each circle. Sprinkle 1 Tablespoon of cheese onto each piece. Fold the circles in half and line them in the prepared baking pan, round side up.
- Cover the pan with plastic wrap or aluminum foil and allow the rolls to rise again in a slightly warm environment until puffy, about 45 minutes.
- Adjust the oven rack to the lower third position and preheat the oven to 350°F (177°C). Bake until golden brown, about 50 minutes. If the top browns too quickly, tent it with aluminum foil. Remove the pan from the oven and place it on a wire rack. If desired, brush the top with melted butter and sprinkle with sea salt.
- Cool the bread for 10 minutes in the pan, then remove it from the pan and serve warm.