
Oh my gosh, you have to stop everything you are doing right now, because I have cracked the code on the ultimate summer savior! When the heat is blazing, and the last thing I want is to turn on my oven, I turn to this miracle recipe. Forget complicated steps and lengthy bake times; this is the absolute Favorite No Bake Dessert: A Delicious Peanut Butter Pie that tastes like pure euphoria.
Seriously, I’ve been making this exact recipe for family gatherings, impromptu get-togethers, and just Tuesday evenings for over a decade now. It’s my secret weapon when I need something impressive but have zero patience. The crust is buttery and crumbly, and that filling? It’s rich, fluffy, and just the right amount of salty-sweet obsession. You won’t believe this amazing peanut butter pie hasn’t seen an oven!
Why This is Your Favorite No Bake Dessert: A Delicious Peanut Butter Pie (EEAT Focus)
The best thing about this recipe—besides tasting like a dream—is that it absolutely refuses to heat up your kitchen! We are talking zero bake time, folks. That’s why it holds the title of my Favorite No Bake Dessert: A Delicious Peanut Butter Pie in our family. I first mastered this back in college when I needed something that looked gourmet but took minimal effort.
I learned fast that the key to a truly great no-bake pie isn’t just the ingredients; it’s the texture you achieve by working quickly and using proper technique, even without heat. This pie delivers that perfect, satisfyingly salty punch balanced against a cloud of sweet, velvety filling. If you need a dessert that impresses guests without stressing you out, this is it. Want to explore other peanut butter treats you don’t have to bake? You can check out my recipe for Chocolate Peanut Butter Cookies for a baked alternative!
Quick Facts: Prep Time and Servings for Your Favorite No Bake Dessert
Look how fast this comes together! It practically makes itself, though the chilling time is crucial.
- Prep Time: Just 20 minutes! I promise.
- Cook Time: 0 minutes (Hooray for no oven!).
- Chilling Time: A non-negotiable 180 minutes (that’s 3 hours) to get it firm.
- Servings: This makes 8 perfect slices.

Gathering Ingredients for Your Favorite No Bake Dessert: A Delicious Peanut Butter Pie
Okay, this recipe looks long because I’ve broken down every component, but trust me, it’s not complicated stuff! We are keeping it straightforward—graham crackers, peanut butter, cream cheese, and cream. You only need a few simple items, but you have to be precise about a couple of them, or your pie won’t set right. That’s where the expertise comes in!
Always use creamy peanut butter; the natural, oily kind will absolutely ruin the texture here. And for the heavy cream? It needs to be ice cold straight from the fridge for whipping. Read through these lists and make sure you have everything before you even grab the mixer!
For the Graham Cracker Crust
This crust comes together in about 5 minutes, but it’s the backbone of the whole pie, so don’t skimp on the butter!
- 1 1/2 cups graham cracker crumbs (That’s usually about 12 full sheets crushed up, if you’re crushing them by hand!)
- 1/4 cup granulated sugar
- 6 tablespoons unsalted butter, melted
For the Creamy Peanut Butter Filling
This is where the magic happens. Make sure that cream cheese has been sitting out long enough to be truly soft. It makes beating so much easier!
- 8 ounces cream cheese, softened
- 1 cup creamy peanut butter (And I mean creamy—no big chunks allowed here!)
- 1 cup powdered sugar
- 1 cup heavy whipping cream, cold
- 1 teaspoon vanilla extract
Optional Topping Components
If you want to dress it up for company, these additions are fantastic, but you can skip them and still have a perfect pie.
- 1 cup whipped topping (like Cool Whip, thawed)
- 2 tablespoons melted chocolate chips (just for drizzling, swoon!)
Step-by-Step Instructions for Your Favorite No Bake Dessert: A Delicious Peanut Butter Pie
Alright, let’s get this show on the road! Since this is a no-bake situation, timing is mostly about chilling, but you still need to move efficiently so things don’t melt or get too warm before they set. We tackle this pie in stages, starting right at the bottom layer. If you want to see some wonderful baked alternatives while you wait for this to chill, check out my recipe for Brown Butter Chocolate Chip Cookies!
Preparing and Chilling the Crust
First things first, we build the foundation. In a medium bowl, just whisk your graham cracker crumbs and the white sugar together until they look evenly mixed. Now, drizzle in that melted butter—don’t dump it all in one spot! Stir it all up quickly until it looks like wet sand and holds together when you squeeze it in your hand. Pat that mixture down firmly and evenly into your 9-inch pie plate. Make sure you push it up the sides a little bit too. Pop that crust right into the freezer while you work on the filling—this helps it firm up and keeps it from getting mushy later.
Mixing the Smooth Peanut Butter Filling
Grab your big mixing bowl. We need that softened cream cheese to be completely smooth before anything else goes in. Beat it with your electric mixer until there are absolutely no lumps left; it should look like fluffy frosting already. Next, add the creamy peanut butter and that cup of powdered sugar. Beat this on medium speed until it’s all incorporated and beautifully smooth. You’re aiming for a thick, heavy paste consistency here. Scrape down the sides of the bowl a few times so you don’t end up with grainy spots!
Whipping Cream and Folding
Now for the air! In a *separate, clean* bowl—and I mean clean, because residual fat will stop your cream from whipping—pour in your very cold heavy cream and the vanilla. Whip this until you get stiff peaks. You know they are stiff when you lift the beaters out and the cream stands straight up without drooping over. This is your volume, so don’t mess it up!
Here’s the most important part, pay attention! You cannot just dump the whipped cream into the peanut butter mix. Take about a third of that fluffy cream and stir it vigorously into the heavy peanut butter base just to lighten it up. My personal trick is to be gentle but firm when folding in the remaining two thirds—use a large spatula and slice down the middle, then scoop up from the bottom and fold over. You’re mixing, but you’re trying hard not to deflate all that lovely air we just whipped in. Stop mixing the second you don’t see any streaks of white cream left.
Final Assembly and Setting Time
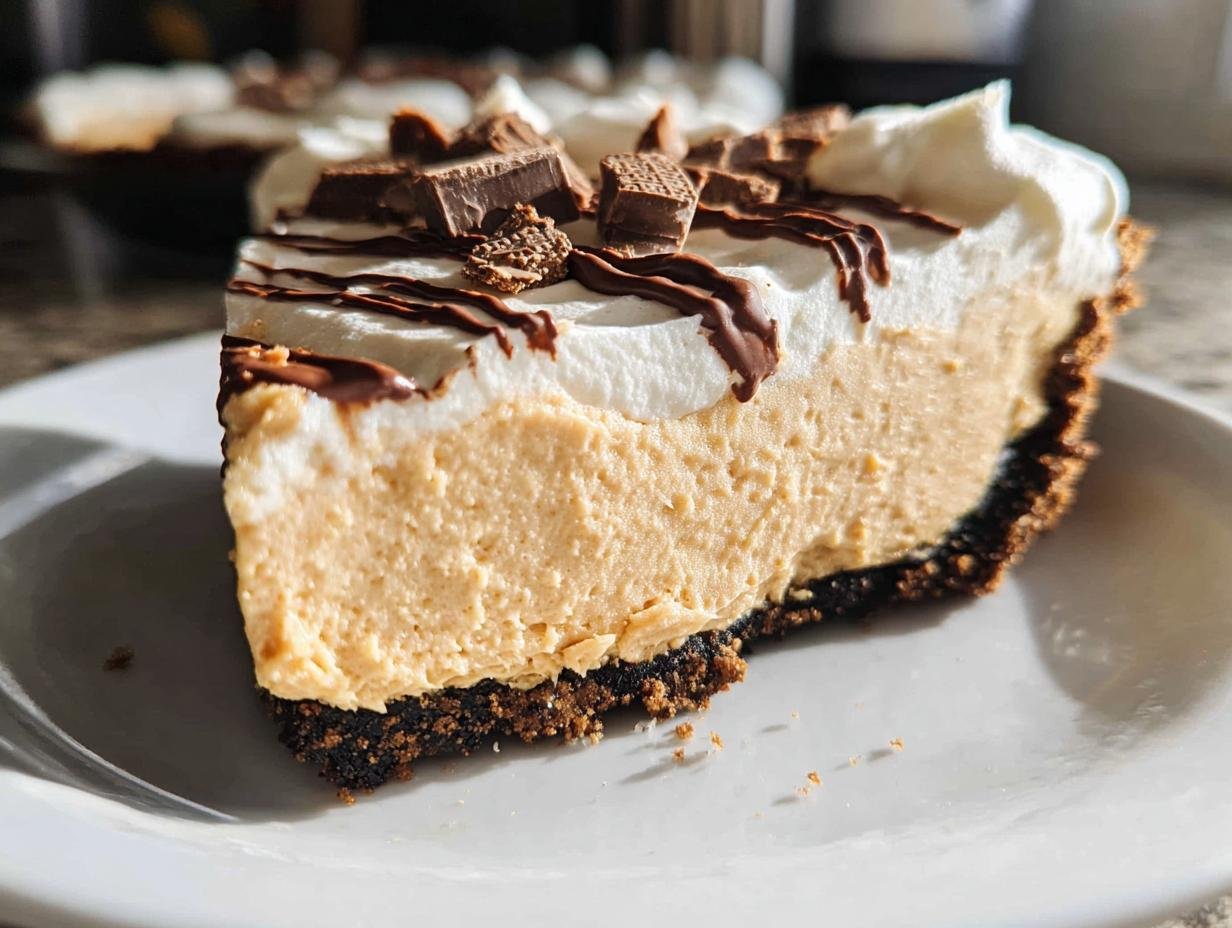
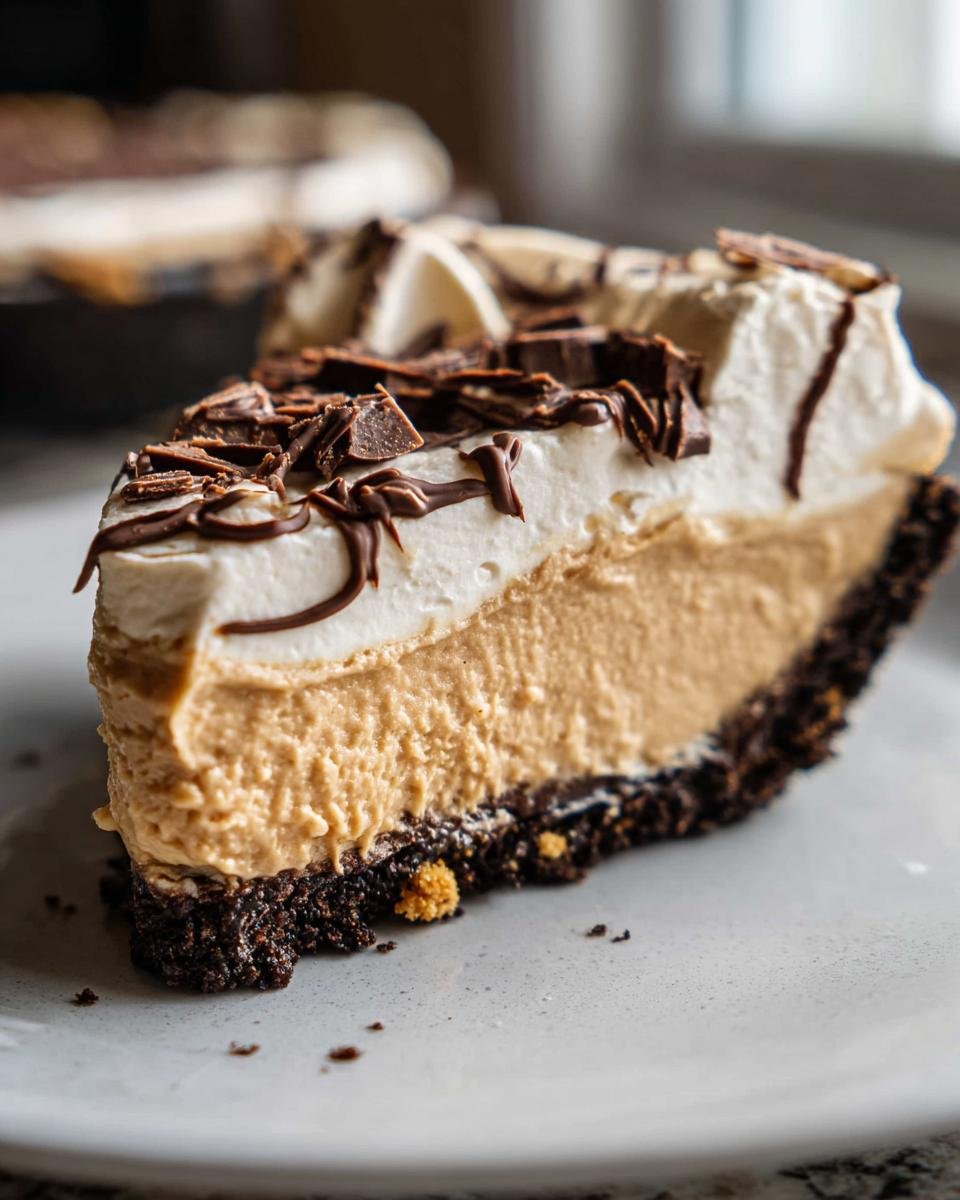
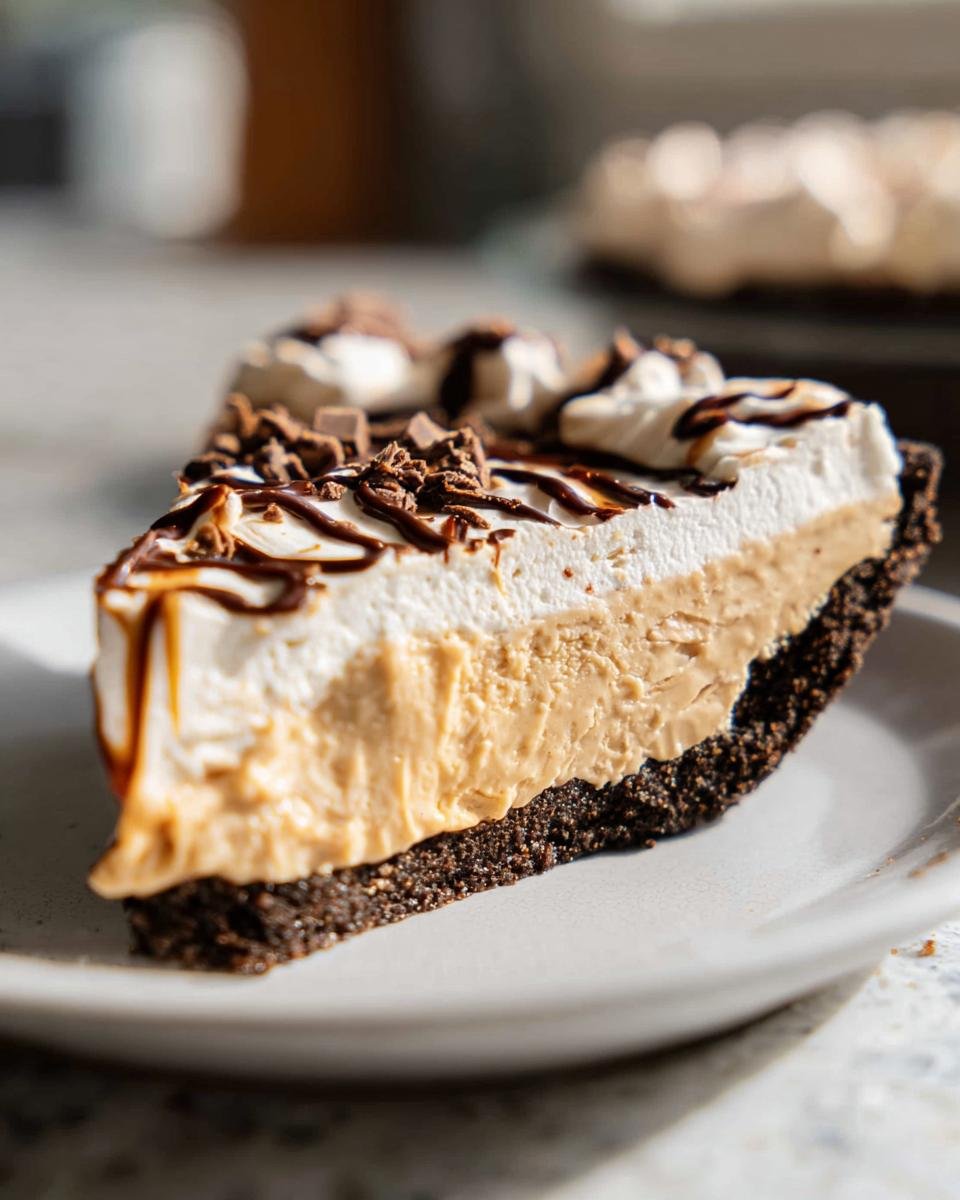
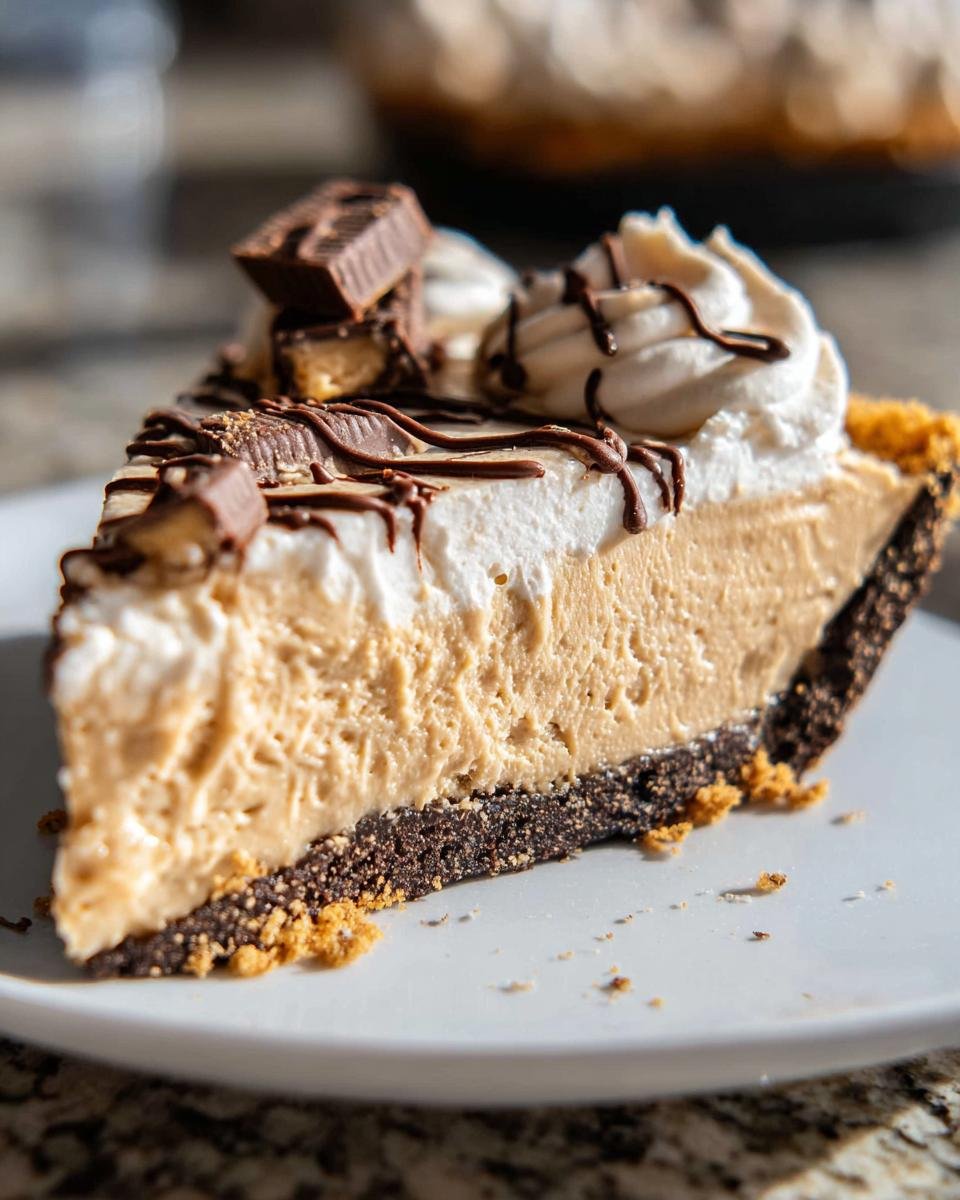
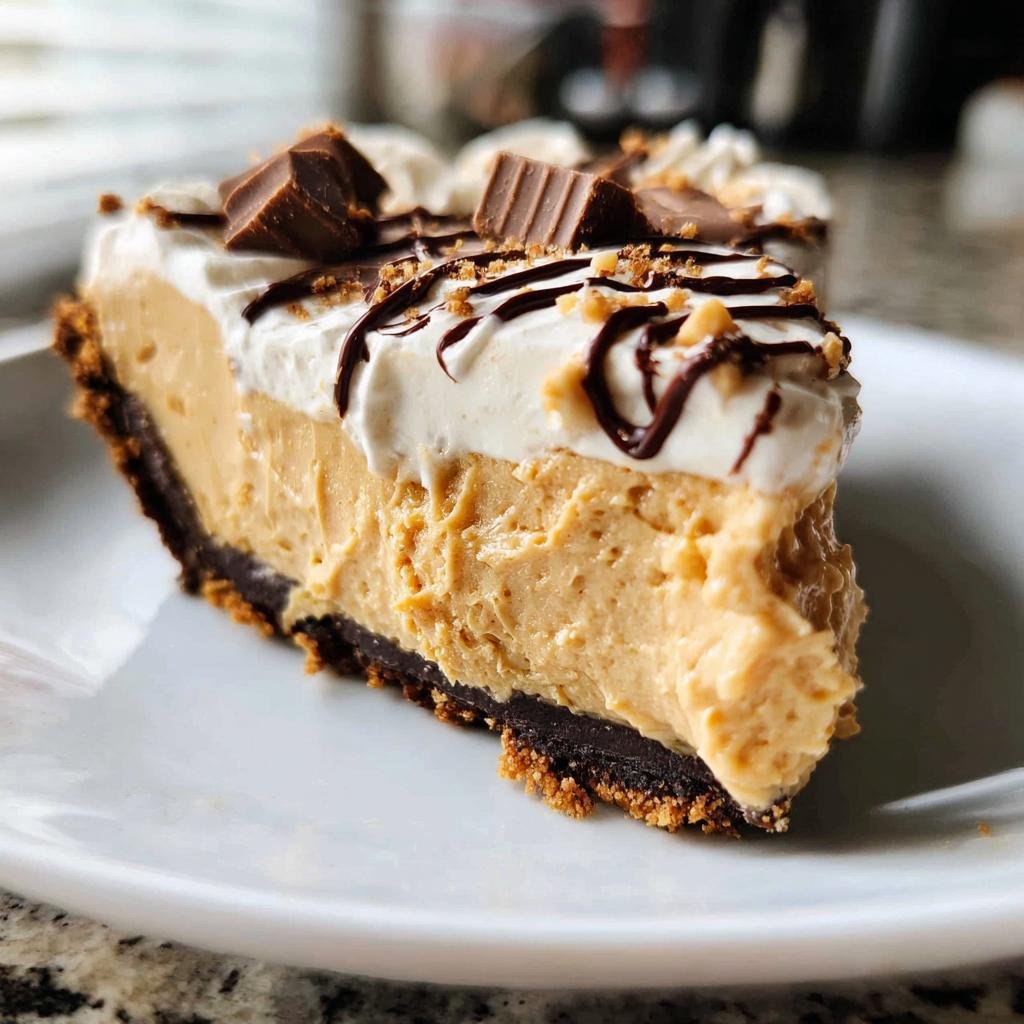
Quickly spoon all that gorgeous, airy filling into your chilled crust. Use an offset spatula or the back of a spoon to smooth the top nicely so it looks professional! Now, back into the refrigerator it goes. You absolutely must let this chill for a minimum of 3 hours, but honestly? It’s always better after 4 or 5 hours, or even overnight, so the filling gets totally firm. Once it’s set, you can top it off with that thawed whipped topping and a little chocolate drizzle if you’re feeling decadent!
Tips for Success Making Your Favorite No Bake Dessert
Even though this is called a ‘no-bake’ recipe, precision is still everything if you want that perfect slice! Trust me, I made every miserable, soupy mistake so you don’t have to. Keep these pointers close when you make your Favorite No Bake Dessert: A Delicious Peanut Butter Pie for the best results.
First up: the peanut butter. I cannot stress this enough—you must use that conventional, slightly sugary, jarred peanut butter. Think Jif or Skippy. If you use natural peanut butter where the oil separates, your filling will never set properly. It will stay oily and runny, which is a disaster for structure in a no-bake situation.
Second thing that always gets skipped? The cream cheese must be truly room temperature. If it’s cold, when you try to beat it, it will leave frustrating little lumps in your filling that won’t dissolve even when mixed with the powdered sugar. Let that block sit out for at least an hour, or zap it in the microwave for just 10 seconds if you’re in a rush. It should be totally soft to the touch.
And finally, remember what I said about folding? That’s your authority on texture! When you bring in the whipped cream, you’re trying to preserve those air bubbles. If you mix it too hard or too long, you’ll just deflate all the air, and your beautiful fluffy filling will collapse into a dense, heavy block. Gentle turns, stop when you see almost no streaks—that’s the secret handshake for a light pie.
Follow those three things, and you’ll have the most stable, delicious version of this pie ever!
Ingredient Notes and Substitutions for Peanut Butter Pie
I get asked all the time about swapping things out in this recipe, especially since it’s so popular for parties where you might have dietary concerns or just run out of an ingredient. This recipe is pretty specific about a few things, but honestly, there are some easy tweaks that still keep it tasting amazing!
Let’s talk non-negotiables first, and that’s the peanut butter. I know people love those healthy, natural peanut butters, but for this specific pie, you have to stick with the conventional, jarred stuff. The oil separation in the natural kinds means your filling won’t whip up right—it stays too loose and oily. If you skip this, you risk a soupy pie, which is the absolute worst!
The Importance of Conventional Peanut Butter
When I first tried using a natural, oily brand years ago, I ended up throwing the whole pie out! It just wouldn’t set, even after 12 hours in the fridge. The stabilizers in the standard creamy peanut butter are essential because they interact perfectly with the cream cheese and keep the filling firm once that heavy cream is folded in. Stick to the traditional style, and you guarantee that beautiful, sliceable texture.
Crust Customizations: Making it Chocolatey!
If you aren’t a huge graham cracker fan, or maybe you just ran out of them, don’t panic! The crust is your easiest element to change up. If you want a richer flavor that pairs wonderfully with all that peanut butter, go for chocolate wafer cookies—Oreos are fantastic.
To swap crusts, just follow the same ratio: use 1 1/2 cups of the crushed chocolate cookies crumbs instead of graham crackers, and keep the sugar and butter the same. You’ll love how that dark chocolate contrasts with the light, fluffy filling. Just make sure you crush those cookies finely, just like you would the crackers!
Sweetener Swaps (A Little More Advanced)
If you want to dial back the refined sugar slightly, you can reduce the powdered sugar in the filling by about 1/4 cup, but I really wouldn’t go much further, since it helps stabilize the texture alongside the cream cheese. For the crust sugar, if you are using chocolate wafers, you might even be able to skip that 1/4 cup entirely, since the wafers are usually sweeter already. Just taste your crumb mixture before pressing it in, that’s the best way to check!
Storage and Make-Ahead Options for Your Favorite No Bake Dessert
One of the best parts about making my Favorite No Bake Dessert: A Delicious Peanut Butter Pie is that it’s practically designed to be made ahead of time! This is huge when you’re planning a big meal or a party and can’t deal with dessert at the last minute. Because there’s no actual baking involved, the texture actually gets *better* as it sits and lets all those creamy components meld together perfectly.
If you want the absolute best eating experience, I always recommend making this pie the day before you plan to serve it. That minimum 3-hour chill time is essential to get it firm enough to slice, but letting it sit overnight lets the peanut butter filling really absorb that vanilla flavor and structure up beautifully. It just tastes richer the next day!
Keeping It Fresh in the Fridge
Once your pie is fully set, cover it loosely with plastic wrap or transfer it to an airtight container. We usually keep it in the refrigerator, and honestly, it lasts surprisingly well. As long as it stays cold, you can safely enjoy this pie for up to four days. Now, keep in mind that the graham cracker crust starts to soften a bit after day three because of the moisture in the filling, but it still tastes amazing!
If you are preparing other make-ahead meals, like my favorite make-ahead egg muffins, you can easily fit this pie into your prep schedule!
Can You Freeze Peanut Butter Pie?
Yes, you absolutely can freeze this peanut butter pie, and it’s a great option if you want to make it weeks ahead of time! The only tricky part is the texture of the whipped cream topping, so I have a very specific method for freezing.
If you plan to freeze it, I highly recommend skipping the whipped topping and chocolate drizzle until *after* it thaws. Just chill the pie in the crust until it’s totally firm, then wrap the whole thing tightly in two layers of plastic wrap, followed by a layer of aluminum foil. This double wrap keeps freezer burn away, which is the enemy of creamy desserts!
Thawing from the Freezer
When you are ready to serve it, move the wrapped pie from the freezer directly into the refrigerator. You need to let it thaw slowly—this usually takes a whole day, maybe 8 to 10 hours, depending on how big your pie is. Do not try to rush this on the counter! Once it’s completely thawed in the fridge, *then* you can add your whipped topping and drizzle on that chocolate. Trust me, the slow thaw keeps the texture much better than letting it get warm quickly.
Serving Suggestions for This Easy Dessert
So, you’ve finished chilling your masterpiece, and it’s time to serve this amazing Favorite No Bake Dessert: A Delicious Peanut Butter Pie! Because this pie is so rich and decadent, sometimes all it needs is a little something light on the side to balance that creamy, salty filling. I usually serve this up right after dinner, and a few simple additions always make it feel extra special.
If you serve it plain, it’s still great, but here are my go-to things to have on hand:
- A piping hot cup of dark roast coffee. The bitterness of the coffee is totally heavenly when paired with that sweet peanut butter!
- Fresh berries. I’m not kidding—a small handful of tart raspberries or sweet strawberries cuts right through the richness perfectly. It makes the whole plate feel lighter, which is a nice psychological trick when you know you’re eating something super satisfying.
- A light dusting of unsweetened cocoa powder right before you serve each slice. It gives that visual appeal and a hint of chocolate without adding heavy sauce.
If you’re looking for lighter fare throughout the week, maybe to balance out all this amazing dessert, you should check out some of my ideas for light, fresh lunch ideas to keep things feeling balanced!
Frequently Asked Questions About This Favorite No Bake Dessert
I get asked the same handful of questions every time I share this recipe, so I figured I’d just put them right here so you don’t have to hunt around! Dealing with no-bake recipes means dealing with texture, so most of the confusion centers around getting that filling perfectly stiff.
Can I use crunchy peanut butter instead of creamy for the filling?
This is probably the number one question I get! My answer is always no, you really shouldn’t try to use crunchy peanut butter in this specific recipe. Remember how I emphasized needing a smooth, stable base? Crunchy peanut butter will introduce little hard pieces into the filling, and they won’t soften during the chill time. Worse than that, the crunchier texture doesn’t blend as seamlessly with the cream cheese and powdered sugar, which can actually make your entire filling structure a bit less stable. Stick to the creamy kind for the best, smoothest result in this Favorite No Bake Dessert: A Delicious Peanut Butter Pie.
How do I make sure my heavy cream whips up correctly?
If your cream won’t whip, it’s almost always temperature related! Heavy whipping cream needs to be ice cold, right out of the back of the fridge minimum, but I even toss my metal mixing bowl and whisk attachment in the freezer for about 15 minutes before I start. That chill helps the fat molecules hold onto the air you’re whipping in.
The second thing is speed. Start slow when you turn the mixer on, then move up to medium-high. You’re going for stiff peaks—that means when you lift the whisk attachment out of the bowl, the peak that stands up stays straight up and doesn’t flop over. If it’s still floppy, it’s too loose, and that means your pie will be too soft!
What happens if I try to skip the chilling time?
Oh, honey, don’t do it to yourself! If you skip the chilling time, you will end up with peanut butter soup! Seriously. The filling is just heavy ingredients mixed with air. It needs that mandatory minimum of 3 hours in the cold, ideally 4 or more, for the cream cheese and the fat from the whipped cream to truly firm up and lock that shape in place. If you try to slice it early, it will ooze right out, and you’ll just have a lovely peanut butter dip in a cracker bowl!
Can I use sugar-free powdered sugar if I’m cutting back on sugar?
That’s a very thoughtful question! If you use artificial sweeteners, you need to be careful because powdered sugar isn’t just sweet; it really helps with the structure and density of the filling. If your sugar substitute is a 1:1 replacement for powdered sugar (meaning it measures cup-for-cup the same way), it *might* work, but I would highly recommend reducing the amount by about a quarter cup initially. Then, when you fold in the whipped cream, make sure you whip it really stiff, because the structure might be slightly weaker without the regular sugar binding everything. I haven’t tested this extensively, but small reductions usually work best.
Is it okay to press the graham cracker crust in with my fingers?
While I totally recommend using the bottom of a dry measuring cup to firmly pack the crust down evenly, using your fingers is perfectly fine too, especially for getting the sides done! Just make sure your hands are clean and dry. The key is getting a solid, compact layer on the bottom so the filling doesn’t soak right through or crumble when you go to slice it. A firmly packed base is non-negotiable for this easy dessert!
Reader Feedback and Next Steps
Whew! We’ve made it through the whole process. I really, truly hope you are as excited to pop this pie into the fridge as I am when I make it. It’s my absolute go-to, and I can’t wait for you to try this Favorite No Bake Dessert: A Delicious Peanut Butter Pie!
Now that you’ve got the ingredients, the instructions, and all my little quirks ironed out, the hard part is over—unless you count waiting for it to chill! Once you finally taste that glorious, creamy filling, please come back and tell me all about it. I live for feedback!
Did it set perfectly for you? Did you add any extra peanut butter cups on top or decide to drizzle it with caramel instead of chocolate (ooh, good idea if you did!)? Use the rating system below to give it stars, and please leave a detailed comment sharing your experience. It helps me know what’s working for you guys!
If you want to check out more about my kitchen adventures and see what else I’m cooking up, feel free to visit my About Me page! Happy chilling, and enjoy every bite of that easy, amazing peanut butter pie!
Favorite No Bake Peanut Butter Pie
Ingredients
Equipment
Method
- Prepare the crust: Mix the graham cracker crumbs and granulated sugar in a medium bowl. Pour in the melted butter and stir until the mixture resembles wet sand.
- Press the crumb mixture evenly into the bottom and up the sides of a 9-inch pie plate. Place the crust in the freezer while you prepare the filling.
- Make the filling: In a large bowl, use an electric mixer to beat the softened cream cheese until it is smooth. Add the peanut butter and powdered sugar. Beat until fully combined and smooth.
- In a separate, clean bowl, whip the cold heavy cream and vanilla extract until stiff peaks form.
- Gently fold the whipped cream into the peanut butter mixture until no white streaks remain. Do not overmix.
- Spoon the filling into the chilled crust and spread it evenly.
- Chill the pie in the refrigerator for at least 3 hours, or until firm. This is important for setting the filling.
- Before serving, top the pie with whipped topping, if using. Drizzle with melted chocolate chips if desired. Slice and serve cold.