
I honestly used to think if I wanted that shattering, crackly chicken skin, I needed industrial-sized tubs of oil and a deep fryer. Forget that! Deep frying is messy and honestly, who has the time when Monday hits? I spent far too many nights wrestling with soggy chicken skin—it was the bane of my dinner existence.
But I cracked the code. Seriously, this method changed everything. I’m giving you my ultimate **Crispy Baked Chicken Thighs No Fail** recipe today. It uses just a few simple pantry staples, a secret little butter maneuver that I adore, and high oven heat to deliver that audible crunch every single time. It’s genius for fitting right into your **Quick Meal Preparation** rotation and making weeknight **Simple Family Meals** feel totally gourmet.
It took me way too many attempts to get the skin right without drying out the meat underneath, but trust me now: this technique works. Prepare to be amazed by the flavor and texture! You can check out my general guide on how to make oven-baked chicken thighs if you want a similar technique with different seasoning mixes.
Why You Will Achieve Crispy Baked Chicken Thighs No Fail Results
This recipe isn’t just about taste; it’s about getting dinner on the table fast without sacrificing quality. We’re maximizing flavor while sticking to a busy schedule. If you’re looking for more time-efficient meals, check out these quick 30-minute healthy dinner recipes!
- Speed and Simplicity for Busy Schedules
Seriously, you are only looking at about 10 minutes to prep everything, and then the oven does the heavy lifting. Since we use bone-in thighs, they stay lovely and juicy, which means minimal worry for you. Cleanup is a breeze too! For more ideas on making chicken your weeknight hero, take a peek at my healthy chicken recipes everyone will love.
- Guaranteed Crispy Skin Every Time
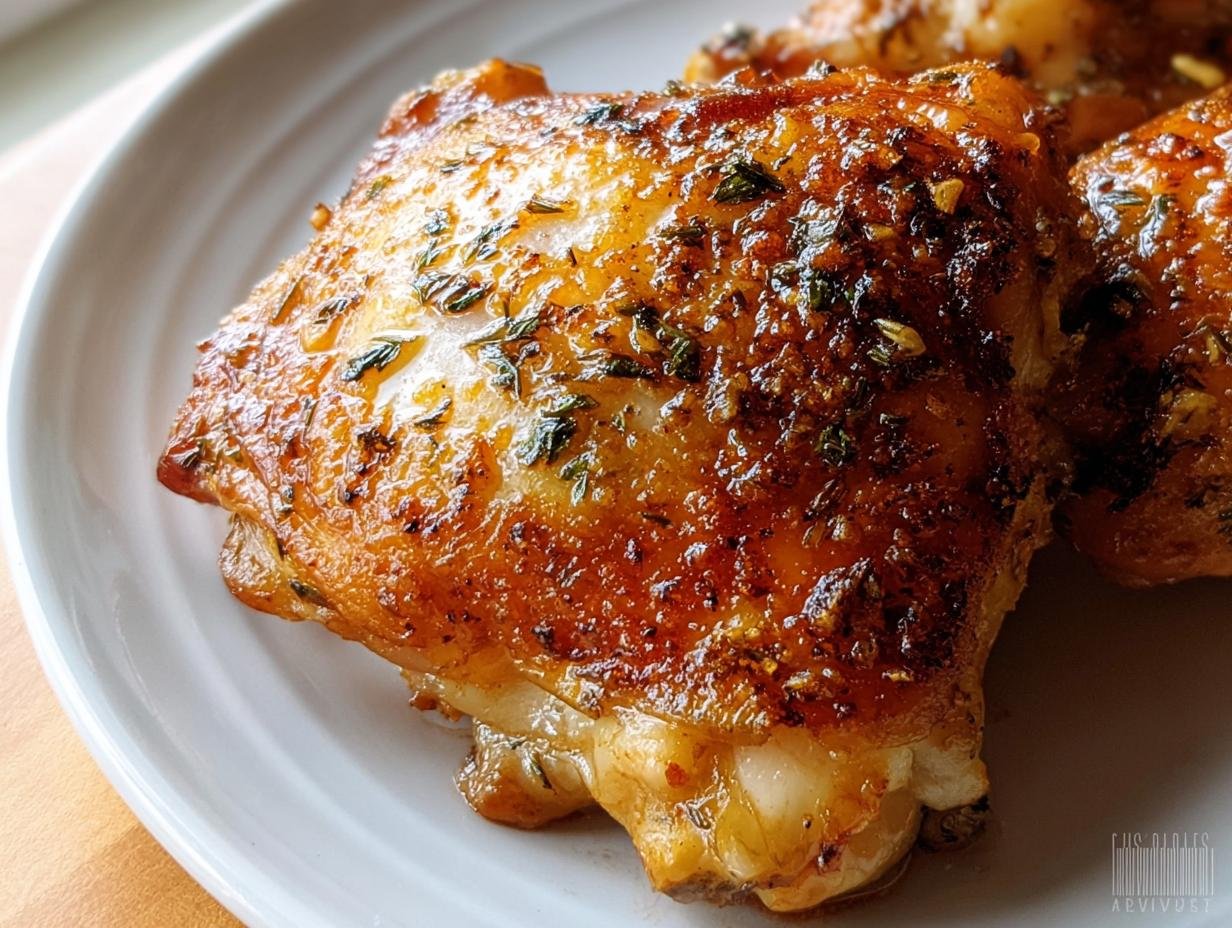
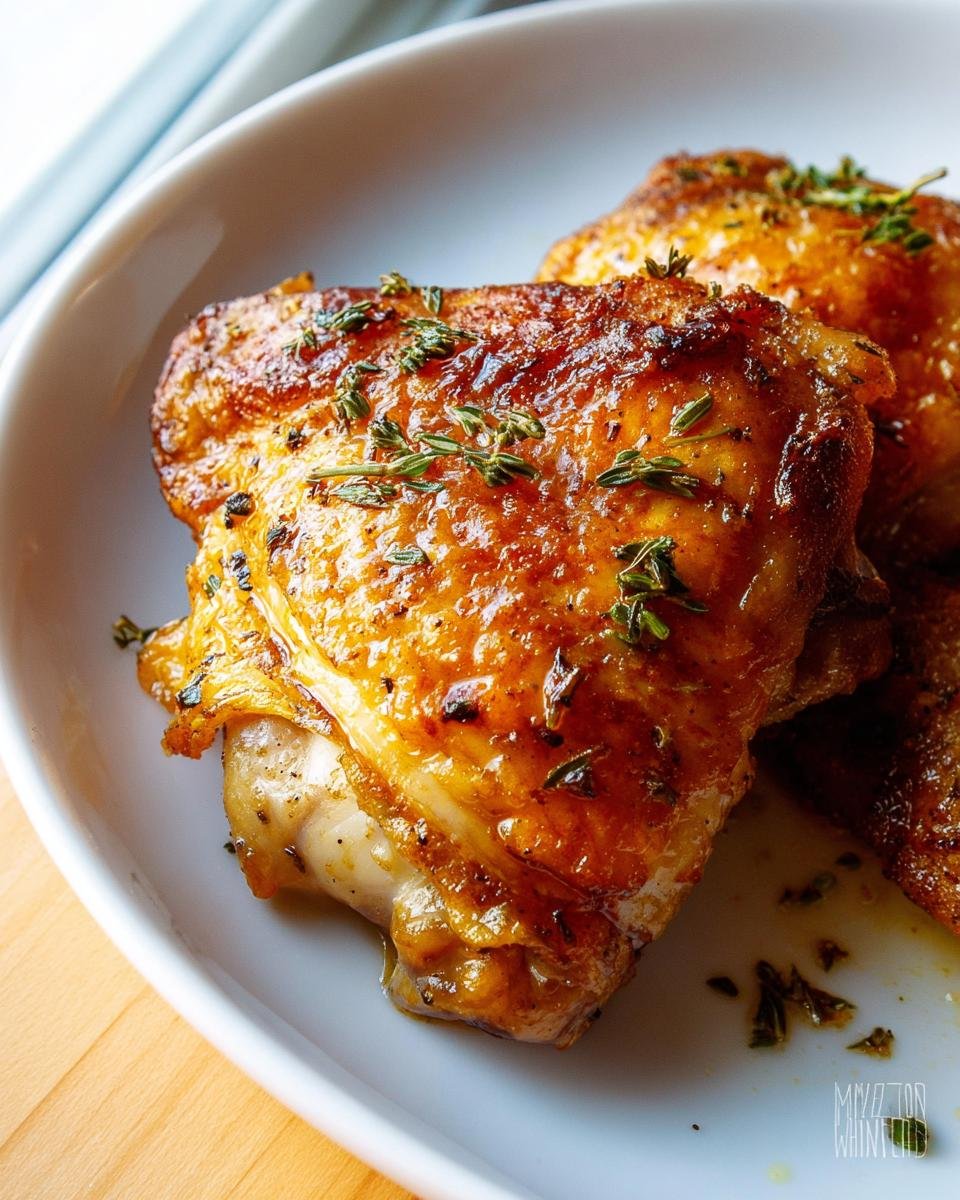
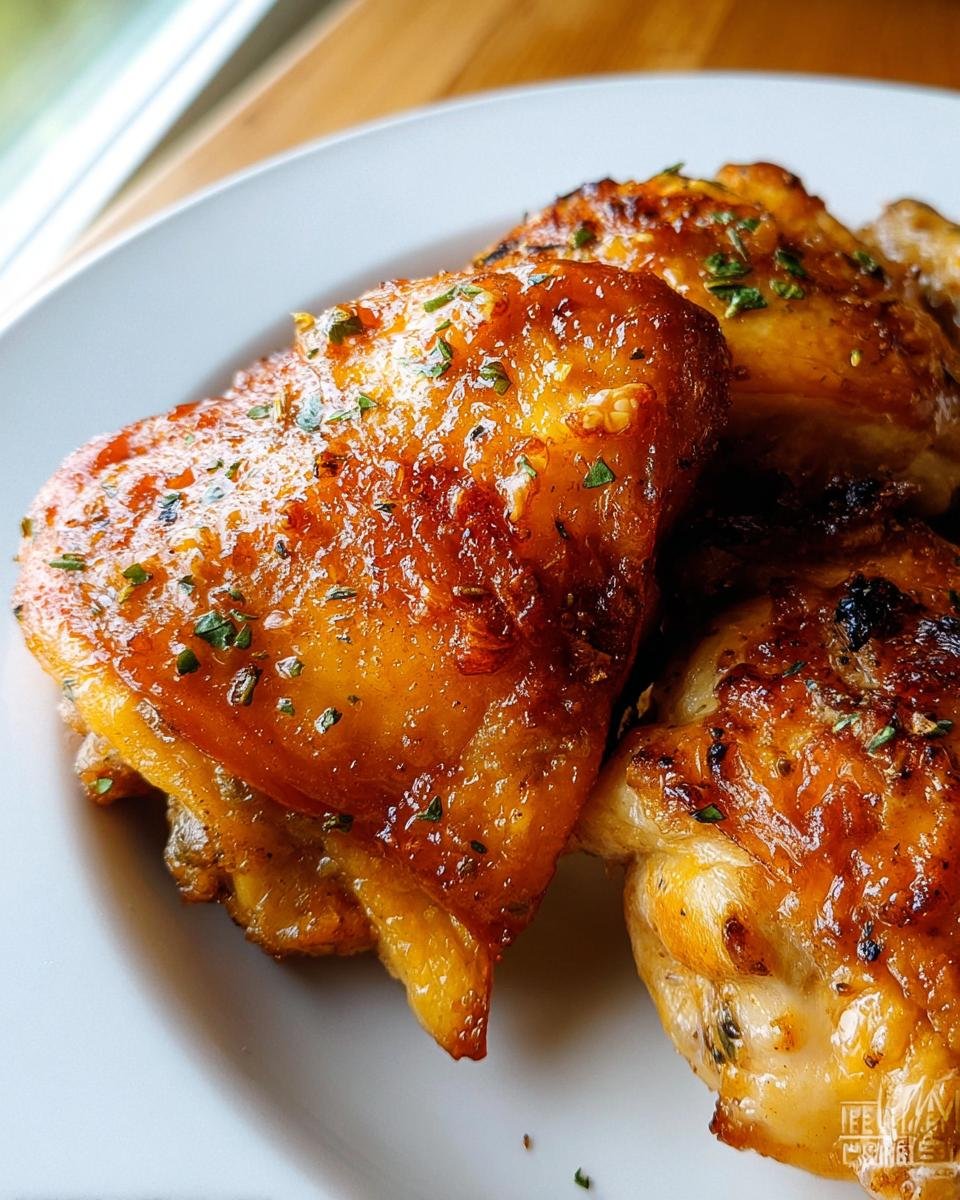
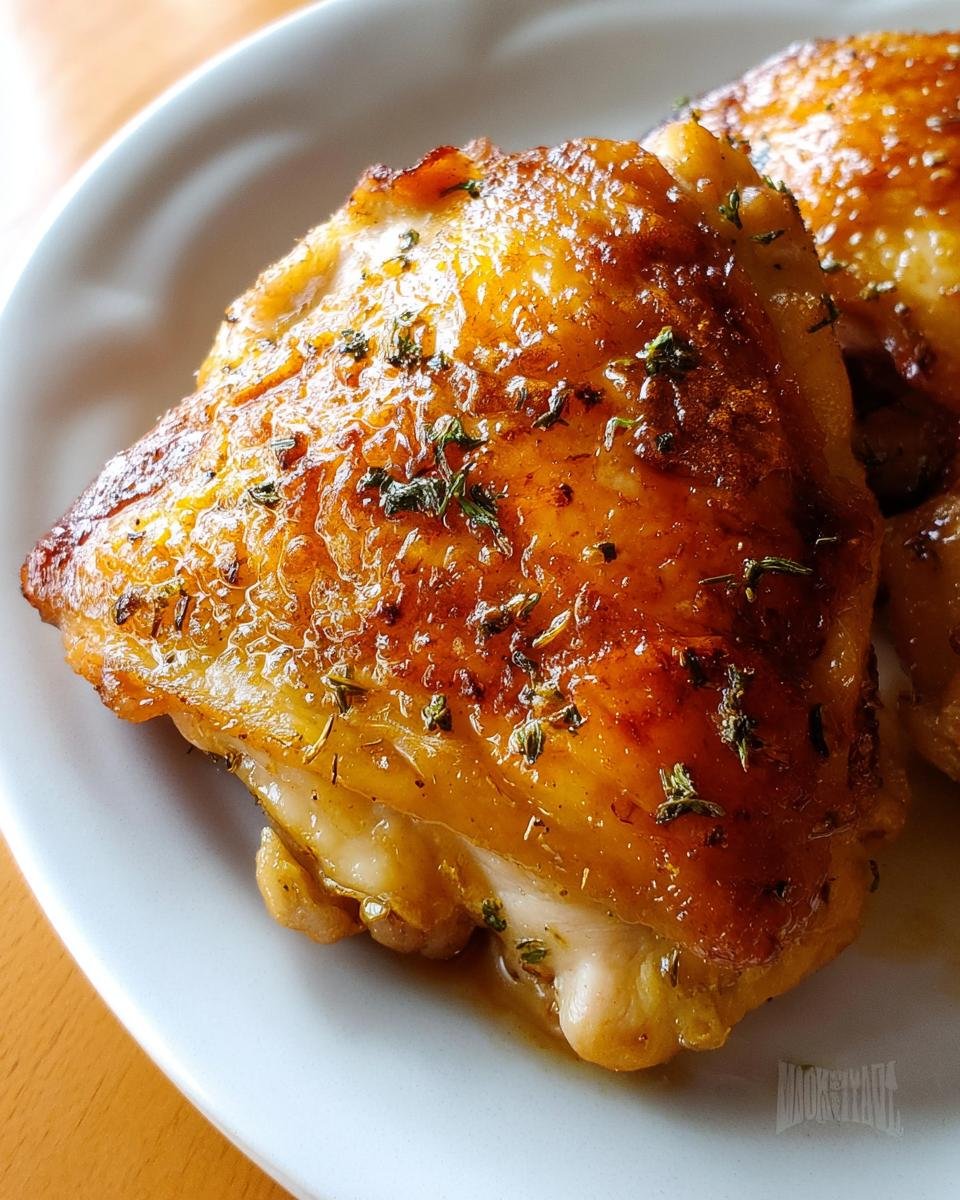
This is the magic trick: we start the cooking process skin-side down on high heat. This renders out all that fat underneath slowly while the skin sears against the hot pan. When we flip them, the skin is perfectly set up to get that final blast of heat and turn beautifully crisp. I promise, this technique delivers that satisfying crunch!
Essential Ingredients for Crispy Baked Chicken Thighs No Fail
Okay, listen up, because the ingredients are where we build that famous crunch and keep the meat ridiculously juicy. We aren’t just throwing salt on these bad boys; we’re stuffing them! It sounds fancy, but it’s super simple flavor building that guarantees results. Don’t skip the pat-down step—it’s non-negotiable for crispiness!
For the Compound Butter Mixture
This butter is the secret sauce for flavor because we’re tucking it right under all that delicious skin. You need:
- 1/4 cup Unsalted butter, and make sure it’s nicely softened—really soft!
- 2 cloves Garlic, and you must crush those up good.
- 1/2 tbsp Fresh parsley, chopped finely.
- 1/2 tbsp Fresh dill, also chopped.
- 1/8 tsp Sea salt for seasoning the butter itself.
For the Chicken and Seasoning
We need the right cut here, remember? Get bone-in, skin-on chicken thighs. The bone keeps things moist, and the skin gives us that beautiful texture we are chasing.
- 3 lb Bone-in chicken thighs, skin on is key.
- 2 tbsp Avocado oil—it has a high smoke point, which we need.
- 1/2 tbsp Sea salt.
- 1 tsp Smoked paprika—this gives it that lovely color.
- 1 tsp Garlic powder.
- 1/4 tsp Black pepper.
Before you do anything else with the chicken, grab those paper towels and pat every single piece until it feels dry to the touch. Seriously, dry skin equals crispy skin! If the skin is wet, the oven steams it!
Equipment Needed for Your Crispy Baked Chicken Thighs No Fail
You won’t believe how simple the setup is for this recipe. We keep the tools minimal because we want to focus our energy on the chicken, not washing a million pots! For this specific method, you really only need two things to get started, but I have a little trick about the pan that I want to share so you get that amazing lift on the skin.
You will need:
- A decent-sized baking sheet. This is what gives the thighs space to breathe in the oven.
- A small bowl. This is just for mushing up that delicious herb butter we made earlier.
Now, about that pan—remember, we want heat transfer all around the chicken for maximum crispness. If you have one of those metal cooling racks that fits inside your baking sheet, great! Pop the chicken on the rack and then place the rack on the baking sheet. That little bit of air circulation underneath the thighs really helps prevent the bottom from getting soggy while the top crisps up. If you don’t have a rack, don’t panic, just make sure your thighs aren’t touching, and you can see my favorite one-pan healthy dinner ideas for cleanup tips later!
Step-by-Step Instructions for Crispy Baked Chicken Thighs No Fail
Alright, let’s get cooking! This isn’t complicated, but we do need to follow the steps in order, especially with the temperature, because high heat is our secret weapon here. I promise, if you watch closely, you’ll see the skin start to puff up beautifully. If you want to get even more juice out of your thighs, check out my tips on how I get juicy chicken thigh recipes perfect.
Preparation and Butter Application for Crispy Baked Chicken Thighs No Fail
First things first: crank up that oven! We need it roaring hot at 450 degrees F (232 degrees C). While it’s heating, get your baking sheet lined with foil—or whatever non-stick surface you chose. Now, grab that soft herb butter from earlier. I like to take a little piece and gently work my fingers underneath the skin of the chicken thigh. It feels weird, I know, but do it! Then, take a dollop of that herby butter and tuck it right under the skin, close to the bone end if you can. Use your fingers on top of the skin to gently press and spread that flavor around. Don’t worry if you tear the skin a little; the butter keeps the meat safe.
Seasoning and Initial Bake Phase
Once the butter is tucked in, we season for real. Drizzle that avocado oil all over the chicken pieces, making sure the skin gets a layer. Then, go heavy on the salt, smoked paprika, garlic powder, and pepper, hitting both the top of the skin and the bottom sides of the chicken. Here’s the very important first step: place the thighs on the sheet **skin-side down**. We do this for 10 minutes. This initial blast allows some of the moisture and fat trapped under the skin to release directly onto the pan instead of steaming the skin itself. It sets up the crisp factor!
Final Crisping and Resting for Perfect Crispy Baked Chicken Thighs No Fail
After those first 10 minutes, carefully flip every single thigh so the crispy-ready skin is facing up. Let them roast for about 15 more minutes. You are aiming for the internal temperature to hit 170 degrees F (77 degrees C). I always use an instant-read thermometer for accuracy here! Once they hit that magic number, pull them out immediately—don’t be tempted to overcook them or the meat dries out. The crucial final step? Let them rest on the counter for 5 minutes. They need that time to redistribute the juices you just worked so hard to keep inside.

Expert Tips for Maximum Crispy Baked Chicken Thighs No Fail Success
We’ve covered the basics, but if you want to move from good crispy chicken to *legendary* crispy chicken that lives up to the **Crispy Baked Chicken Thighs No Fail** title, you need to know these little secrets. These aren’t in the basic instructions because they are the tweaks that really separate home cooking from restaurant quality. Trust me, I learned these the hard way!
The Importance of Bone-In, Skin-On Thighs
I know, I know, buying only skinless, boneless thighs is easier sometimes, right? But for this recipe, you absolutely need the bone and the skin. The bone acts like a temperature regulator inside the thigh; it slows down the cooking right at the center, keeping the meat tender and moist even when the high heat is blasting the skin crispy. Plus, everything tastes better if it cooks on the bone, honestly!
The skin is the main event here, of course. The fat underneath the skin renders out when we cook it skin-side down first, essentially basting the meat while simultaneously creating a barrier that turns into that perfect, crackly shell. If you try this with boneless thighs, the meat cooks too fast before the skin even gets a chance to crisp up properly—you’ll end up with uneven results.
Air Circulation for Optimal Browning
This is a huge one if you’re putting more than four thighs on one sheet. If your chicken pieces are touching each other, what happens? They steam! And we just spent all that time beating moisture out of the skin, so a little steam is our enemy.
When you lay your thighs out after that initial skin-down flip, make sure there is at least an inch of space between every single piece. They should look a little lonely on that pan. This airflow allows the hot air in the 450-degree oven to hit every millimeter of the skin directly. If your pan looks a bit crowded, just use two sheets! It’s worth the tiny bit of extra cleanup for that perfect, even browning all the way around. You can find more tips for getting that perfect roast by reading about extra crispy chicken thighs in the oven on my other post!
Serving Suggestions for Your Crispy Baked Chicken Thighs No Fail
So you have this perfectly cooked, juicy chicken with that unbelievable crunchy skin. Wow! But what do you serve with a star like that? Since we kept the technique quick and simple for weeknights, we want sides that follow suit—nutritious but not demanding your attention for an hour.
My go-to strategy for any simple family meal like this is making sure we get lots of green on the plate to balance out that rich flavor. I always aim for something low-fuss that roasts right alongside the chicken, or maybe something light that takes about 15 minutes on the stovetop.
Here are a couple of things I always have on hand when I make these thighs:
- Roasted Asparagus with Lemon: This is probably my favorite. Toss the asparagus spears with a little olive oil, salt, and pepper. If you have an extra 10 minutes after the chicken comes out, you can throw the asparagus on the same sheet pan (just give it space) and roast it for about 8 to 10 minutes while the chicken rests. The bright lemon cuts right through the richness of the butter and the savory paprika seasoning. So fresh!
- Garlic Parmesan Green Beans: If you prefer something quicker than roasting veggies, steaming or sautéing green beans is the speediest route. Toss those steamed beans with some butter, a splash of lemon juice, and a sprinkle of Parmesan right before serving. Every member of my family eats their veggies when they come with garlic.
- Quick Cauliflower Mash: If you need something starchy but lighter than potatoes, boil some cauliflower until it’s fork-tender. Then, drain it really well and mash it with a knob more of that gorgeous compound butter, a splash of cream, and salt. It’s creamy comfort food that pairs perfectly. You can find how I balance protein and veggies for these kinds of balanced meals with veggies, protein, and flavor on this other post!
Honestly, anything green and simple works best. You want the chicken to be the showstopper!
Storage and Reheating Crispy Baked Chicken Thighs No Fail
Look, let’s be real—sometimes there are leftovers, even when the meal is amazing! If you are lucky enough to have any of these crispy thighs left over (which usually means you’ve planned ahead using my make ahead healthy lunch and dinner ideas), storing them properly is crucial. We don’t want to ruin all that hard work we did to get the skin crispy in the first place!
The absolute key here is to cool the chicken completely before you put it away. If you seal up warm chicken, the trapped steam will instantly turn your beautiful crispy skin into sad, rubbery mush. Let it sit on the counter until it reaches room temperature first—this might take about an hour.
Storing Your Leftovers
Once cooled, transfer your thighs to an airtight container. Don’t crowd them if you can help it; if you have to stack them, put a small piece of parchment paper or a paper towel between the layers. This absorbs any residual moisture that tries to creep up. Pop that container into the fridge. They should keep nicely for about three or four days, but honestly, they rarely last that long in my house!
Reheating Tips for That Crunch Back
Okay, the microwave is your final resort and I really, truly suggest you avoid it unless you are in a massive hurry. Microwaving is guaranteed to bring back steam and ruin the texture we worked so hard for.
Here are my two favorite ways to bring back the crispness:
- The Oven Method: This is my preferred way. Place the thighs directly on a wire rack set over a baking sheet. Preheat your oven to about 350 degrees F (175 degrees C). Bake them for about 8 to 10 minutes. This gentle heat warms the meat through without drying it out while giving the skin just enough time to gently re-crisp using the dry heat.
- The Air Fryer Trick: If you have one, the air fryer is your fast track to perfection. It’s basically a tiny, super-efficient convection oven. Set it to 350 degrees F and cook the thighs for just 3 to 5 minutes. Watch them closely! They get perfectly crunchy in a flash.
Remember, dry skin is happy skin, so whatever method you choose, the goal is dry, circulating heat!
Frequently Asked Questions About Crispy Baked Chicken Thighs No Fail
Even though this recipe is designed to be virtually foolproof, I always get a few emails asking about timing or swaps! That’s okay; that’s what I’m here for. It’s important to understand why we do what we do, especially when dealing with high heat for that perfect result. We want every single person who tries this to achieve excellent **Crispy Baked Chicken Thighs No Fail** results!
Can I make Crispy Baked Chicken Thighs No Fail with frozen thighs?
Oh, please don’t try to rush the process by baking them straight from frozen! Please, please thaw them first. If you put a frozen thigh into a 450-degree oven, the outside will burn long before the center gets safe, let alone crispy. You’ll end up with dry edges and raw meat near the bone, which totally defeats the purpose of a simple, nutritious dinner idea.
I recommend thawing them overnight in the fridge. Once they are totally thawed, you still need to pat them bone-dry with paper towels, just like the fresh ones. That initial moisture lurking under the skin is the enemy of crispiness, whether they were fresh or thawed!
What is the best internal temperature for chicken thighs?
Legally, or safely, chicken is done when it hits 165 degrees F (74 degrees C). You can absolutely stop cooking when you hit that number, of course. However, if you look back at the instructions, I told you to pull them out at 170 degrees F (77 degrees C), right?
Here’s the thing about thighs: they have a lot more connective tissue than breasts. That extra 5 degrees allows the fat and tissue to break down just a little bit more, giving you that incredibly tender, fall-off-the-bone texture we all love. Since they are dark meat, they benefit from cooking a little hotter than white meat. You still get amazing juiciness at 170 degrees F, especially after that 5-minute rest we insist on.
For more ideas about getting the perfect texture on your poultry, you can browse through my healthy chicken dinner recipes everyone loves collection for inspiration!
Share Your Results Making Crispy Baked Chicken Thighs No Fail
Whew! You made it through the butter application, the high heat, and the patience required for that 5-minute rest. Now comes the best part: enjoying that shatteringly crisp skin!
I’ve shared every secret I have for making this **Crispy Baked Chicken Thighs No Fail** recipe consistently perfect for my own family dinners. But I truly want to know what you think!
Did the compound butter stay put? Did you hear that crunch when you cut into the skin? Don’t be shy!
- Seriously, if you loved this recipe as much as we do, please take a moment and give it a 5-star rating right below the instructions. Those great ratings really help others see that this simple technique actually works!
- If you snapped a photo of your beautiful, golden-skinned thighs, please tag me! Seeing your dinner spread makes my whole week. You can find me on social media tagged under our family dinner posts, like those quick recipes here healthy family dinners that kids enjoy.
Happy cooking, friends! I hope this recipe has solved your crispy chicken dilemmas forever. Let me know how it goes!

Crispy Baked Chicken Thighs No Fail
Ingredients
Equipment
Method
- Preheat the oven to 450 degrees F (232 degrees C). Line a baking sheet with foil, or use a quality non-stick pan.
- In a small bowl, mash the butter with a fork. Add the garlic, fresh herbs, and salt. Mash again.
- Pat the chicken dry with paper towels, and place on the baking sheet, skin side up. Run your hands under the chicken skin to separate it from the chicken underneath. Place dollops of compound butter all over underneath the skin and then press down over the skin to spread around underneath.
- Drizzle or brush avocado oil onto the chicken on both sides. Sprinkle both sides with sea salt, smoked paprika, garlic powder, and black pepper.
- Bake chicken thighs in the oven, skin side down, for 10 minutes.
- Flip the chicken thighs, so that the skin side is up. Roast for about 15 more minutes, until the internal temperature reaches 170 degrees F (77 degrees C). Rest for 5 minutes before serving.