
When you need a cake that screams, “We are celebrating something BIG!” you can’t just whip up a quick bake. You need layers, you need show-stopping flavor, and you need absolute decadence. I’ve been baking layer cakes for family birthdays and anniversaries for years—trying every fussy technique out there—but nothing, absolutely nothing, beats the sheer joy of cutting into my signature **White Chocolate Raspberry Dream Cake**.
Honestly, perfecting the balance of that creamy sweetness against the tart burst of fresh raspberries took me about four tries. I kept ending up with frosting that was too heavy or cake that crumbled when I sliced it. But now? Now I have the foolproof method down cold. It’s rich, it’s stunning, and it always gets rave reviews. This isn’t just a dessert; it’s the centerpiece of any happy gathering, and I’m thrilled to share every single secret with you so you can master it too!
Why This White Chocolate Raspberry Dream Cake Stands Out
You might see other white chocolate layered cakes out there, but trust me, they aren’t this one. My goal when I developed this **White Chocolate Raspberry Dream Cake** was to stop that cloying sweetness that sometimes ruins white chocolate desserts. It’s all about sharp contrast and wonderful texture that holds up beautifully.
- The cake layers are surprisingly tender—not dense like a pound cake, but moist enough to almost melt in your mouth.
- The white chocolate frosting whips up into this incredibly light, fluffy cloud. Seriously, you’ll want to eat it with a spoon!
- The tartness from the fresh berries cuts through the richness of the white chocolate perfectly.
Perfect Texture in Every Layer
It’s all about that marriage between the perfectly leavened cake and the frosting. I spend extra time ensuring the butter is just right when creaming it for the layers, which keeps them soft. Then, the frosting isn’t just heavy, sugary stuff; incorporating the melted white chocolate airy way keeps it lofty and smooth, not greasy.
Fresh Raspberry Impact
Don’t even think about using jam or frozen raspberries inside the cake layers of this recipe—it just isn’t the same! Fresh raspberries provide that necessary pop of acidity. When you bite down, you get sweet chocolate, then bam! A burst of tartness that resets your palate. That’s the dream component right there.
Essential Equipment for Your White Chocolate Raspberry Dream Cake
Baking a show-stopping layer cake like this needs the right tools, or you’re just making things harder on yourself! I’ve got all my fancy gadgets, but honestly, you don’t need a huge setup for this **White Chocolate Raspberry Dream Cake**. Prepping right means everything goes smoothly when you get to the assembly stage.
You absolutely need the basics for mixing, but the biggest thing you need to make sure you have on hand are the right sized pans. If you try to cram this batter into two pans instead of three, you’ll end up with layers that are too thick and take forever to bake properly—plus they’ll likely sink in the middle. Not a good look!
Here is what you should gather before you even think about turning on the oven:
- Mixing bowls: You’ll need at least two good ones—one for the cake ingredients and one for tackling that incredible frosting.
- An electric mixer: Handheld is fine, but if you have a stand mixer, now is the time to bring it out for creaming that butter and sugar!
- Three 8-inch cake pans: This is non-negotiable for even baking! Make sure they are sturdy.
- A wire cooling rack: Patience is hard, but these cakes must cool completely before frosting, or you’ll have a melted, sliding mess.
Gathering these things first means you can focus purely on the fun stuff later—the mixing and decorating—without scrambling around mid-recipe!
Ingredients for the White Chocolate Raspberry Dream Cake Layers
Okay, for the cake layers themselves, we are keeping things classic because the white chocolate and raspberry are doing all the heavy lifting in the flavor department. Remember, we want moistness here, not fudginess. If you’re looking for some other fun baking inspiration while you gather these, check out some of my favorite cake ideas!
Everything needs to be ready to go! Make sure your 1 cup of unsalted butter is truly softened—test it out by poking it gently; it should give easily but not look greasy. Also, sifting is important for that light texture we talked about, so don’t skip that step for the flour or the powdered sugar later on!
- 2 1/2 cups of All-purpose flour (Sifted, please!)
- 1 1/2 cups of Granulated sugar
- 1 tbsp Baking powder
- 1/2 tsp Salt
- 1 cup Unsalted butter (Softened)
- 4 large Eggs
- 1 tsp Vanilla extract
- 1 cup Whole milk
Having these ready to go in separate bowls makes the process so much faster. When we start mixing, we move quickly!
Ingredients for the White Chocolate Raspberry Filling and Frosting
This is where the “Dream” part of the cake really comes to life! The frosting needs to taste luxurious, not waxy. That means your 12 ounces of white chocolate absolutely must be high quality—I’m picky here because cheap chocolate doesn’t melt well and leaves a nasty film in your mouth. Make sure you chop it finely!
We need 1 cup of softened butter, the powdered sugar sifted—because lumps are the enemy of smooth frosting—and then our fresh raspberries to tuck inside. If you aren’t using high-quality white chocolate, the whole **White Chocolate Raspberry Dream Cake** is going to suffer, so splurge a little on this ingredient!
- 12 oz White chocolate (Finely chopped—don’t cheat this!)
- 1 cup Unsalted butter (Softened)
- 4 cups Powdered sugar (Sifted)
- 1/4 cup Heavy cream (Plus more if needed)
- 1 tsp Vanilla extract
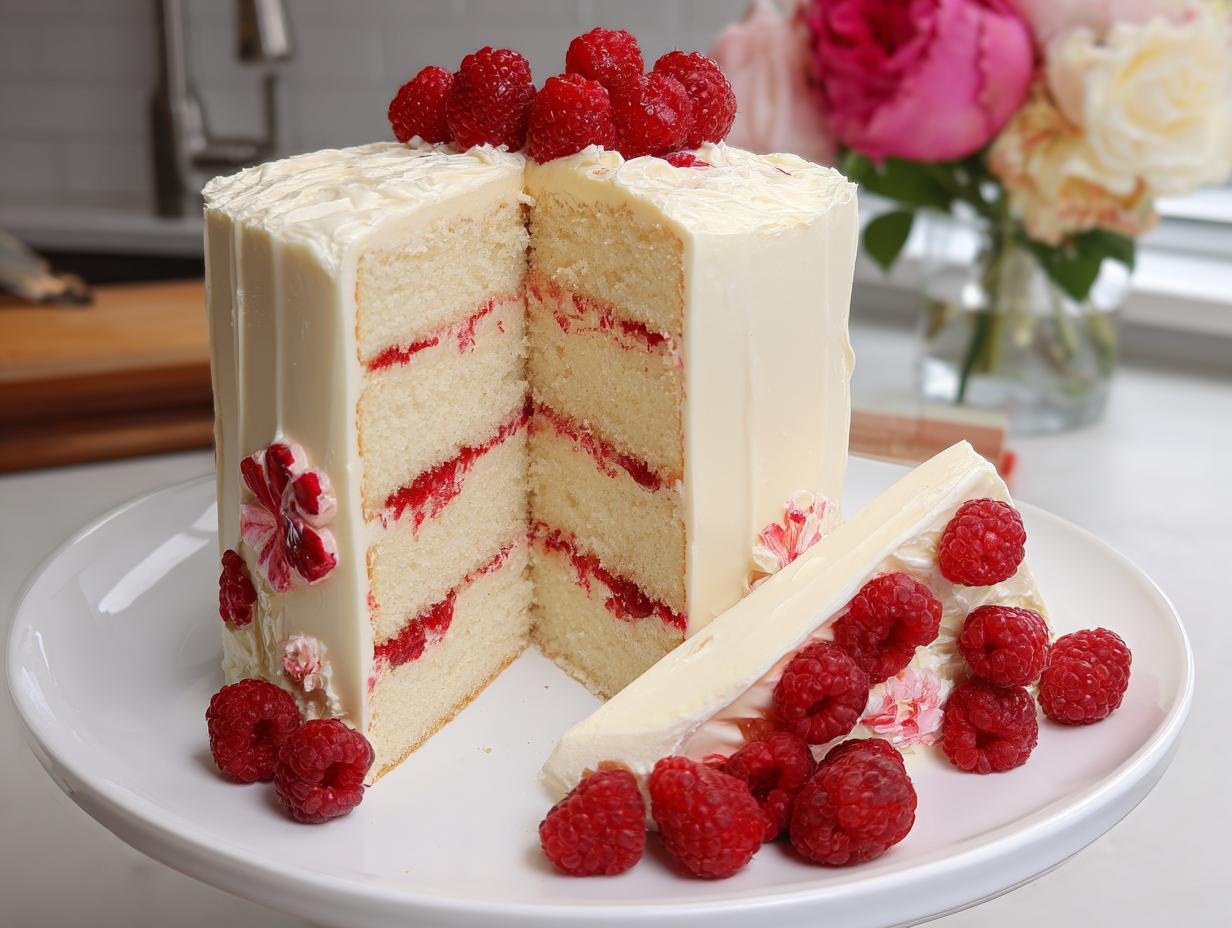
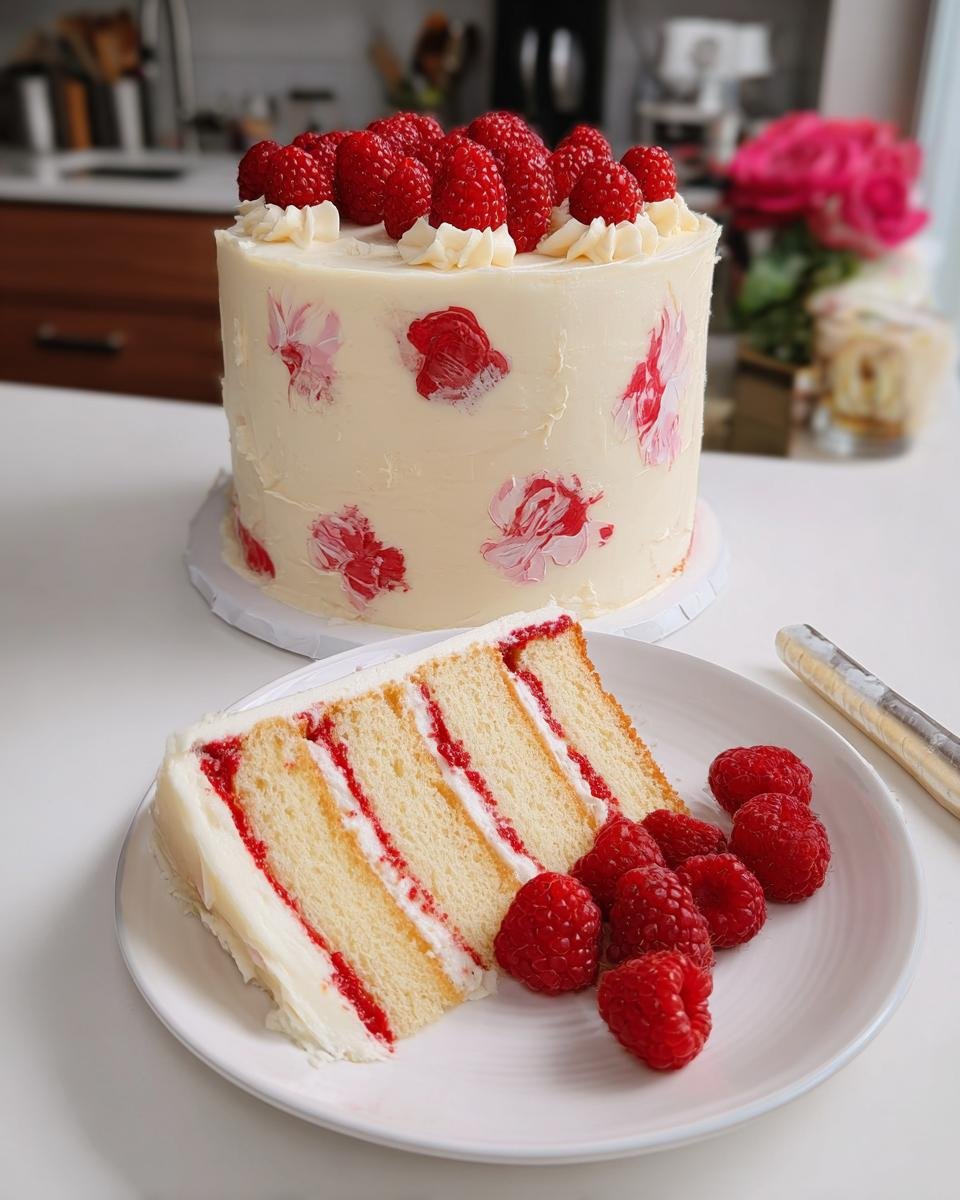
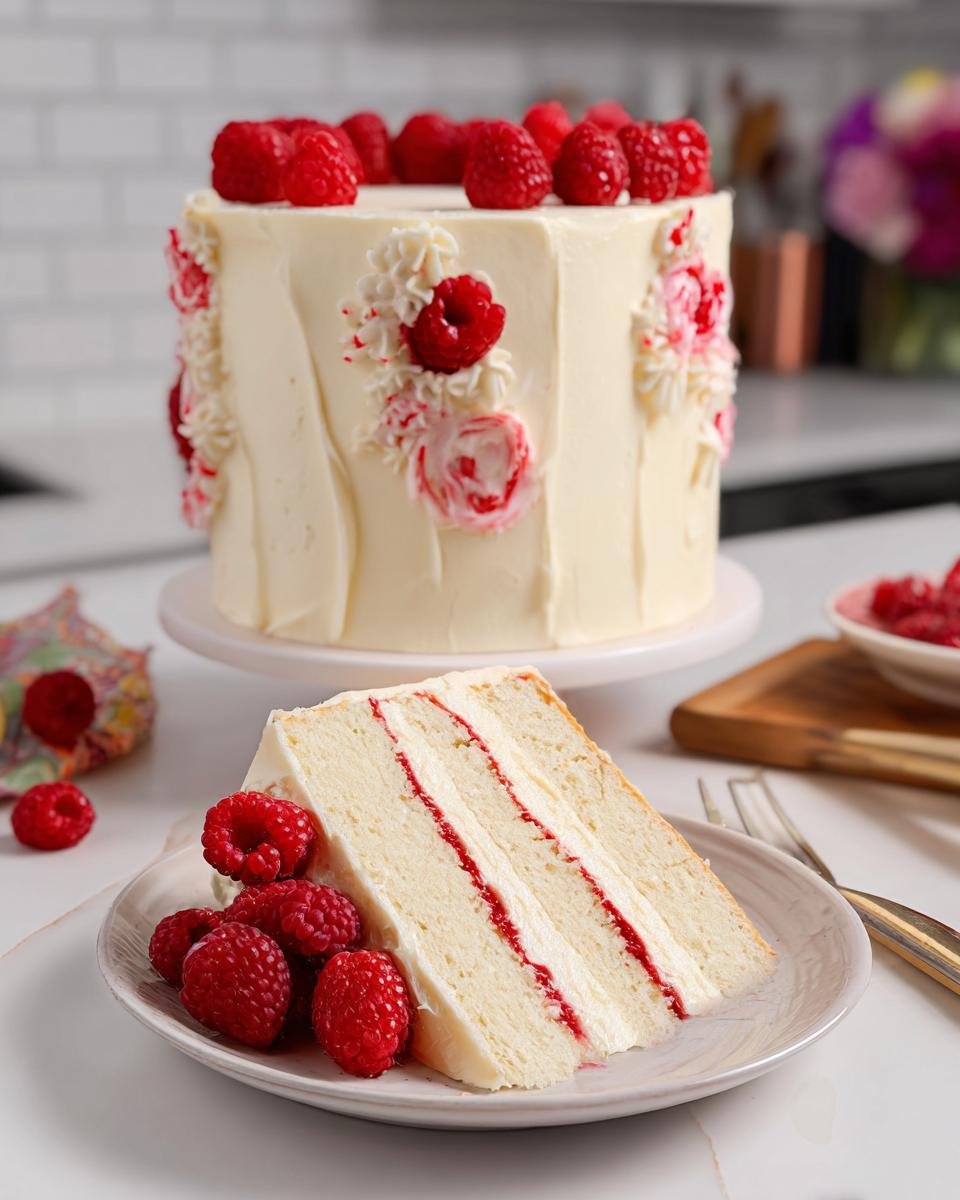
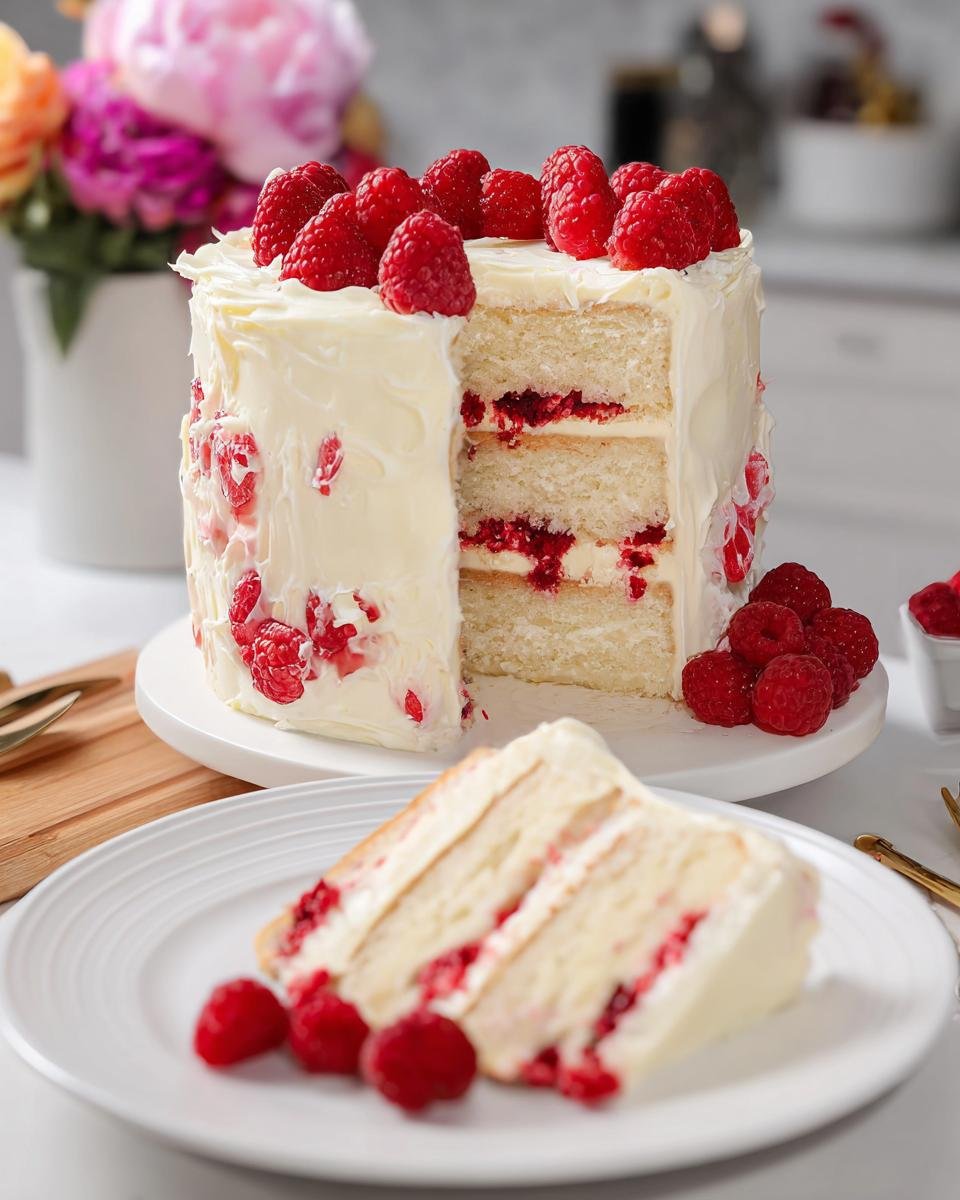
- 1 1/2 cups Fresh raspberries (For filling and garnish)
Step-by-Step Instructions to Make the White Chocolate Raspberry Dream Cake
Now, we get to the fun part! This whole process flies by if you have your ingredients prepped, and I learned the hard way that organization is key when working with three layers of cake. If you’re looking for ways to speed up your prep time later on, I have some great tips in my guide on quick and easy keto recipes—some of those methods actually apply here too!
Before we mix anything, remember the number one rule for cake layers: treat them gently! We want tender crumb, not concrete. For the cake layers, I always take extra time to properly cream the butter and sugar. It’s crucial! You need to beat that softened butter and sugar until it’s visibly pale and fluffy—it incorporates air which gives the cake structure without making it tough. Don’t rush it; that five minutes of mixing is worth the texture payoff later.
Baking the Perfect White Chocolate Raspberry Dream Cake Layers
Okay, here’s the routine for getting those three layers baked evenly. Pay attention to step 5—that’s where batter discipline comes in.
- First, get that oven right up to temperature: 350°F (175°C). Make sure your three 8-inch pans are greased, floured, and have that parchment paper lining the bottom—this makes the release so much easier. Trust me on the parchment paper!
- In a big bowl, whisk together all your dry goods: the sifted flour, sugar, baking powder, and salt. Get them friendly with each other.
- Now, add that softened butter to the dry mix. Use your mixer on low speed. You’re looking for the mixture to look like coarse, happy crumbs. This coats the flour particles and keeps gluten development in check.
- In a separate measuring cup, whisk the eggs, milk, and vanilla together until they are well-combined.
- Gradually add the wet mix to the crumb mixture. Mix on medium speed, but stop as soon as it comes together. I’m talking barely combined! Overmixing the flour turns this cake tough instantly.
- Divide that beautiful batter evenly between your three pans.
- Bake for about 30 to 35 minutes. Start testing around the 30-minute mark. You want the toothpick inserted in the center to come out clean.
- Once they are done, let them hang out in the pans for about 10 minutes. Then, flip them gently onto the wire rack and let them cool completely. I mean stone cold—warm layers and frosting do not mix!
Preparing the Creamy White Chocolate Frosting
While those cakes are cooling—which feels like an eternity, I know—we tackle the star of the show: the frosting. Melting white chocolate takes a little finesse. Use a double boiler setup (a heatproof bowl over simmering water, but don’t let the water touch the bottom of the bowl). Stir it until it’s silky smooth, then pull it off the heat.
Crucially, you need to let that melted chocolate cool down a bit before adding it to your butter mixture. If it’s piping hot, it will melt your beautiful creamed butter, and you’ll end up with soup! Once it’s just warm to the touch, move to the next step.
In your mixing bowl, beat the softened butter until it’s dreamy and creamy. Then, start adding that sifted powdered sugar slowly, alternating with splashes of the heavy cream and vanilla. Once it’s mostly mixed, pour in your slightly cooled melted white chocolate. Beat it all aggressively until it’s light, fluffy, and perfectly smooth. If it feels too stiff—which can happen as the chocolate re-solidifies—just splash in a tiny bit more heavy cream until you get that perfect spreading consistency.
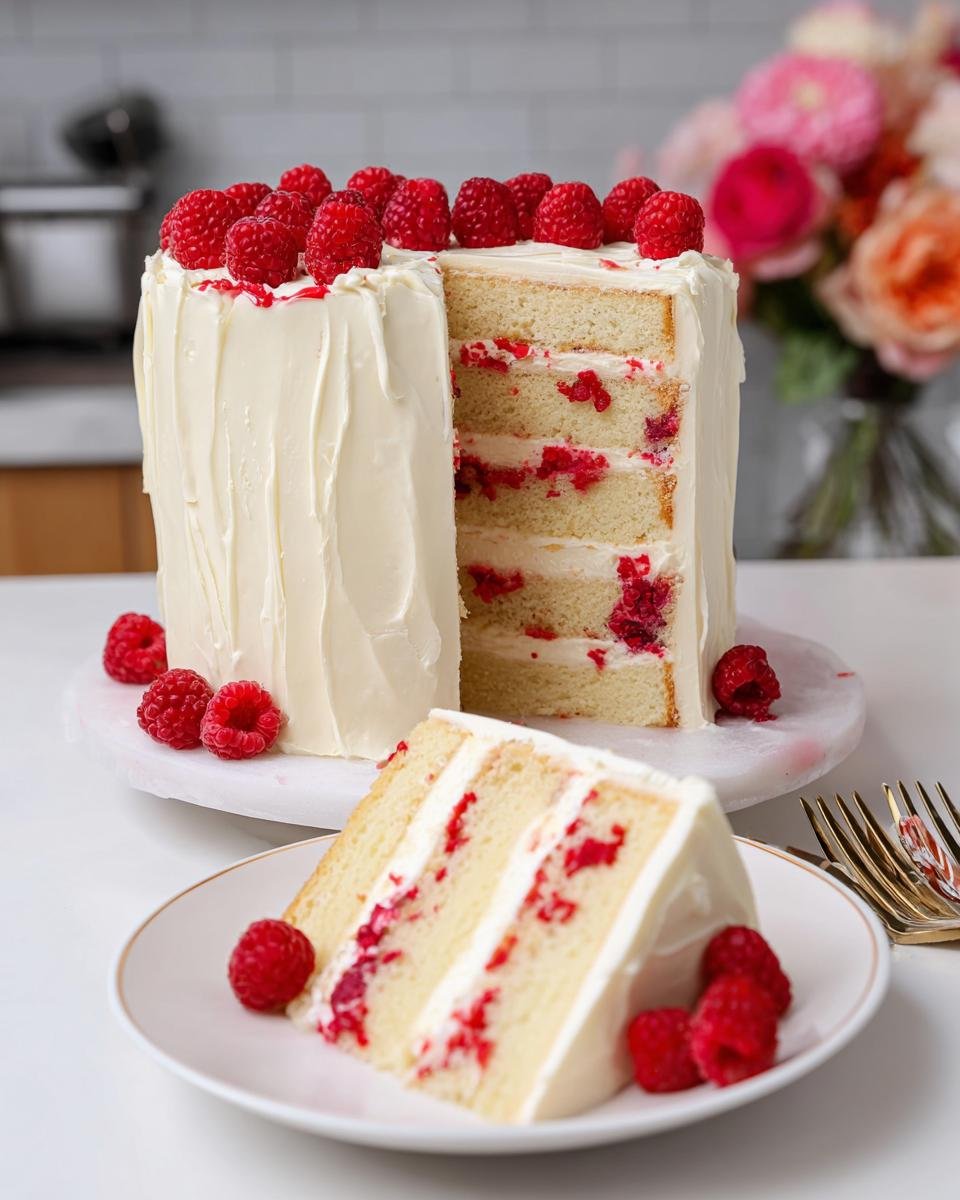
Assembling Your Dream Cake
This is where all your hard work comes together! Get your serving platter ready. Take your first cool cake layer and set it down.
Spread a generous layer of that white chocolate frosting on top—don’t be shy! Then, scatter about half a cup of your fresh raspberries right over the frosting. Press them down *very* gently so they stick, but don’t smash them into the cake. If you prefer a strong tart flavor, mash those raspberries slightly before placing them, just like I suggested in the notes!
Place the second cake layer down and repeat: frosting layer, then the rest of your raspberries.
Top with the final cake layer. Now, cover the top and sides of the whole creation with the remaining white chocolate frosting. I like to use an offset spatula to get the sides looking fairly straight, but honestly, this cake looks amazing even if it’s a tiny bit rustic. Finish it off by decorating the very top with those last beautiful fresh raspberries! Give it a quick chill before serving so the layers set up nicely.
Tips for Success with Your White Chocolate Raspberry Dream Cake
Baking a layer cake with delicate ingredients like white chocolate and fresh fruit means we sometimes have to address minor disasters before they happen! I’ve messed up enough times to know a few tricks to keep this **White Chocolate Raspberry Dream Cake** looking and tasting perfect. You do not want curdled frosting or runny layers, so pay attention to these little things!
First off, let’s talk about those eggs. When you’re combining the wet ingredients for the cake layers, don’t just dump the egg mixture into the butter/flour all at once! That sudden temperature change is what causes the batter to seize up and look curdled. Add the wet ingredients in about three separate additions, mixing just enough to incorporate each time. If it starts looking a little suspicious, add a tablespoon of your sifted flour into the wet mix first before combining everything—that little bit of flour helps stabilize the emulsion.
Checking Your White Chocolate Quality
Seriously, this is a game changer for your frosting. If you use cheap white chocolate chips, you’re going to struggle when melting them. Most chips contain stabilizers designed to help them hold their shape in cookies, which means they don’t melt smoothly into buttercream for your **White Chocolate Raspberry Dream Cake**. I always use real white chocolate bars (high cocoa butter content!) that I finely chop myself. It’s worth the extra two minutes of chopping, I promise, because the result is silky, not grainy.
The Chill Factor is Your Friend
Once you have assembled the cake with the filling, it’s tempting to frost it immediately. Resist! If you put the frosting onto room temperature cake layers that have soft raspberries tucked inside, you are asking for instability. After you stack the first two layers, pop the whole thing in the fridge for about 15 minutes. This chills the frosting and keeps the raspberries snug. It’s my secret weapon for getting those crisp, clean sides when applying the final coat of frosting.
Don’t Forget the Zest for Added Zing
While the recipe calls for vanilla, you know me, I always like to sneak in a little extra brightness. Before you fold in your fresh raspberries into the filling or use them for garnish, gently zest half a lemon or an orange right over them. It sounds simple, but that tiny bit of citrus oil just wakes up the entire profile! It makes the raspberry flavor pop against the rich white chocolate, turning a great cake into an unforgettable one. You can find some other great flavor enhancers in my guide on brown butter chocolate chip cookies, too!
Storage and Reheating Instructions for Leftover White Chocolate Raspberry Dream Cake
Oh, the happy problem: having leftovers from your magnificent **White Chocolate Raspberry Dream Cake**! Since this cake features fresh fruit tucked inside and a rich buttercream coating, we absolutely have to treat it right so it stays perfect for the next day.
My number one rule here is refrigeration. Because of those juicy fresh raspberries and the dairy in the white chocolate frosting, leaving this cake out on the counter for too long is never a good idea, especially if your kitchen is warm. Cover the entire cake loosely with a cake dome or large container. I usually find that an airtight container is too messy because it squishes the frosting, so loose plastic wrap works better for a day or two.
You can easily keep this masterpiece refrigerated for up to three days. The cake layers might firm up a tiny bit because of the cold, but that’s normal. Don’t worry about the texture; we fix that in just a minute!
Bringing Those Slices Back to Life
If you cut a slice the next day and it feels stiff—which it probably will because the butter in the frosting hardens up when it’s cold—don’t just power through it! That glorious white chocolate frosting needs to soften up a bit to taste creamy again.
Take your slice out of the fridge about 35 to 45 minutes before you plan on serving it. Just let it sit on the counter, uncovered if possible in a cool spot, to come up to room temperature. This short rest time is magic! It brings back the incredible softness of the cake layers and makes the white chocolate frosting melt slightly in your mouth again, just the way it should taste.
If you’re saving individual slices, you can wrap each piece tightly in plastic wrap before putting it in the fridge; that helps keep them extra moist. For the best experience of your **White Chocolate Raspberry Dream Cake**, always let those leftovers mellow out on the counter before diving back in!
Frequently Asked Questions About This Layer Cake
I totally get it—baking a showstopper like this **White Chocolate Raspberry Dream Cake** can bring up a few questions! People always want to know how far ahead they can prep or what to do if the grocery store ran out of those perfect fresh berries. I’ve gathered the most common things folks ask me after they read through the steps. Don’t worry if you need a little extra guidance; we’ve all been there!
If you are looking for ways to fit this into a busy week, there are definitely some make-ahead tricks! For more general tips on timing your baking or prepping meals, you might want to look at some awesome resources over in my guide on recipes for weight loss—planning ahead is key for any big bake!
Can I make the White Chocolate Raspberry Dream Cake ahead of time?
Yes, you absolutely can, but you have to plan the timing right! The cake layers are actually sturdy and do great if baked a day ahead. Once they are cooled completely, wrap each one *tightly* in plastic wrap and keep them on the counter or in a cool pantry. Do not stack them once wrapped, or they might stick or compress.
For the assembly, I recommend waiting until the day you plan to serve it, or maybe the morning of. If you assemble the night before, the moisture from the raspberries can start to seep into the bottom layer by morning. However, if you must assemble early, chill the fully frosted cake immediately after decorating. If you plan to freeze it, the cake layers freeze beautifully on their own, unfrosted, for up to two months!
What is the best substitute for fresh raspberries?
If the fresh raspberries are tiny, sad, or totally unavailable in your area, you do have options, but they change the texture slightly. My preferred backup is high-quality raspberry jam—the kind that has real chunks of fruit in it, not just jelly! You can thin the jam slightly with a teaspoon of hot water to make it spreadable enough to use between the layers, acting just like the fresh fruit, only much sweeter.
If you want to use frozen raspberries, you *must* thaw them thoroughly and drain off almost all the liquid first. If you put frozen berries straight in, they release too much water while baking or assembling and will make your entire **White Chocolate Raspberry Dream Cake** soggy. Thaw them on a paper towel-lined plate, then gently press them with another paper towel to wick away anything extra before adding them in as your filling layer.
Estimated Nutritional Data for White Chocolate Raspberry Dream Cake
Okay, listen up. This **White Chocolate Raspberry Dream Cake** is pure celebration food, and let’s be real, it’s not exactly calorie-free—it’s loaded with butter and white chocolate because that’s what makes it heavenly! But for those of you who like to keep track once the celebration is over and you’re scraping crumbs off the plate, here is the nutritional estimate.
Remember, these numbers are based on the recipe yielding exactly 12 generous servings, as written. If you cut bigger slices (which I certainly don’t judge you for!), these numbers will obviously change!
Here’s what my best estimate gives us for one slice:
- Calories: 550
- Fat: 28g (That’s the butter and white chocolate doing their work!)
- Carbohydrates: 70g
- Protein: 6g
- Saturated Fat: 17g
- Cholesterol: 100mg
- Sodium: 250mg
- Fiber: 2g
- Sugar: 50g
See? Deliciously decadent! A slice of this dream cake is definitely an indulgence, but when you’re celebrating, you deserve every bit of that 550 calories. We bake this for the sheer joy of it, not for marathon training, right?

White Chocolate Raspberry Dream Cake
Ingredients
Equipment
Method
- Preheat your oven to 350°F (175°C). Grease and flour three 8-inch round cake pans. Line the bottoms with parchment paper.
- In a large bowl, whisk together the flour, sugar, baking powder, and salt.
- Add the softened butter to the dry ingredients. Mix on low speed until the mixture resembles coarse crumbs.
- In a separate bowl, whisk the eggs, vanilla extract, and milk together.
- Gradually add the wet ingredients to the dry ingredients, mixing on medium speed until just combined. Do not overmix.
- Divide the batter evenly among the three prepared pans. Bake for 30 to 35 minutes, or until a toothpick inserted into the center comes out clean.
- Let the cakes cool in the pans for 10 minutes before inverting them onto a wire rack to cool completely.
- To make the frosting, melt the chopped white chocolate in a heatproof bowl set over simmering water, stirring until smooth. Let it cool slightly.
- In a large bowl, beat the softened butter until creamy. Gradually add the powdered sugar, alternating with the heavy cream and vanilla extract. Beat until smooth.
- Pour the slightly cooled melted white chocolate into the buttercream. Beat until fully incorporated and the frosting is light and fluffy. Add a small amount of extra cream if the frosting is too stiff.
- Place one cake layer on a serving plate. Spread a layer of frosting over it, then top with about half a cup of fresh raspberries.
- Repeat with the second layer, frosting, and remaining raspberries. Top with the third cake layer.
- Frost the top and sides of the entire cake with the remaining white chocolate frosting. Garnish with extra fresh raspberries before serving.