
If you’ve ever stared at those gorgeous, perfectly executed drip cakes online and thought, “There’s no way I can pull that off for my party,” well, I have excellent news for you! Getting that professional, show-stopping look is shockingly easy once you know the little secrets to the drip itself. Trust me, I know stress; the first time I tried a chocolate drip for my cousin’s graduation, my hands were shaking so badly the ganache was running everywhere but where it should be! But we laughed, fixed it, and the cake was a hit. That’s what this is about: creating a beautiful, indulgent Chocolate Drip Cake Party Ready without needing specialized skills or a massive fuss. It’s all about the viscosity of your drips!
Why This Chocolate Drip Cake Party Ready Recipe Delivers
Honestly, making a cake look like a million bucks shouldn’t require enrolling in pastry school. This recipe cuts straight to the fun part—the decoration—while making sure the basic elements are totally foolproof. You’re going to love how much impact you get for so little hands-on work!
- Instant Wow Factor: Drips automatically make any layer cake look like it came from a high-end bakery. It’s the ultimate visual trick!
- Flavor Versatility: We give you three different options—rich chocolate, bright white, and sweet caramel—so you can match any party theme or craving.
- Totally Stress-Free Execution: If you can microwave chocolate, you can do this entire decoration process. It sounds scary, but I promise it isn’t!
- Adaptable to Any Event: Whether it’s a low-key birthday or a big holiday gathering, this recipe provides the perfect framework for your cake ideas dessert party flair.
Beginner Friendly Frosting Layer Cake Foundation
Okay, here’s the one non-negotiable truth I need you to know: the drip stage only works beautifully if your base cake frosting is perfectly flat and, this is key, very cold. If your frosting is warm or lopsided, the ganache will slide right off into a puddle!
This guide focuses only on the drips because we assume you have your base cake ready. We need a solid, chilled foundation for this party magic to happen, which is why we call this a beginner friendly frosting layer cake technique once you master the basics of leveling and chilling your buttercream.
Essential Components for Your Chocolate Drip Cake Party Ready
Alright, the secret sauce to this entire process isn’t just one drip, it’s having options! We’re setting you up with three incredibly easy-to-make coatings here. You can decorate your cake with just chocolate, or go wild with all three flowing layers for maximum drama. Each combination creates a different visual pop on that flat-iced wonder you’ve got chilling in the fridge.
Ingredients for the Flat-Iced Cake Base
Remember, this recipe assumes the hard work is done! For the perfect size—either a 6-inch or 8-inch cake—you’ll need exactly one batch of your favorite flat-iced cake. If you’re using one of my recommended recipes, make sure it’s extra-moist because a dry cake just doesn’t hold up to the weight of that gorgeous drip!
Mixing the Perfect Chocolate Drip for Your Chocolate Drip Cake Party Ready
For that classic, glossy dark finish, you’ll need 172 grams (or about a half cup) of semi-sweet chocolate chips—I’m partial to Nestle, they melt like butter—combined with a half cup of heavy cream. Don’t skimp on the quality here; the higher the real chocolate content, the better the shine on your Chocolate Drip Cake Party Ready.
Creating the White Drip for a Stunning Contrast
Contrast is everything! For a stark white look, mix 42 grams (about a quarter cup) of white chocolate chips with 42 grams of those specialized candy melts, specifically the ‘Bright White’ ones if you want true white. If you use regular white chocolate, you’ll get a lovely, soft ivory color instead. We only use two tablespoons of heavy cream here to keep this mix nice and thick.
Preparing the Rich Caramel Drip
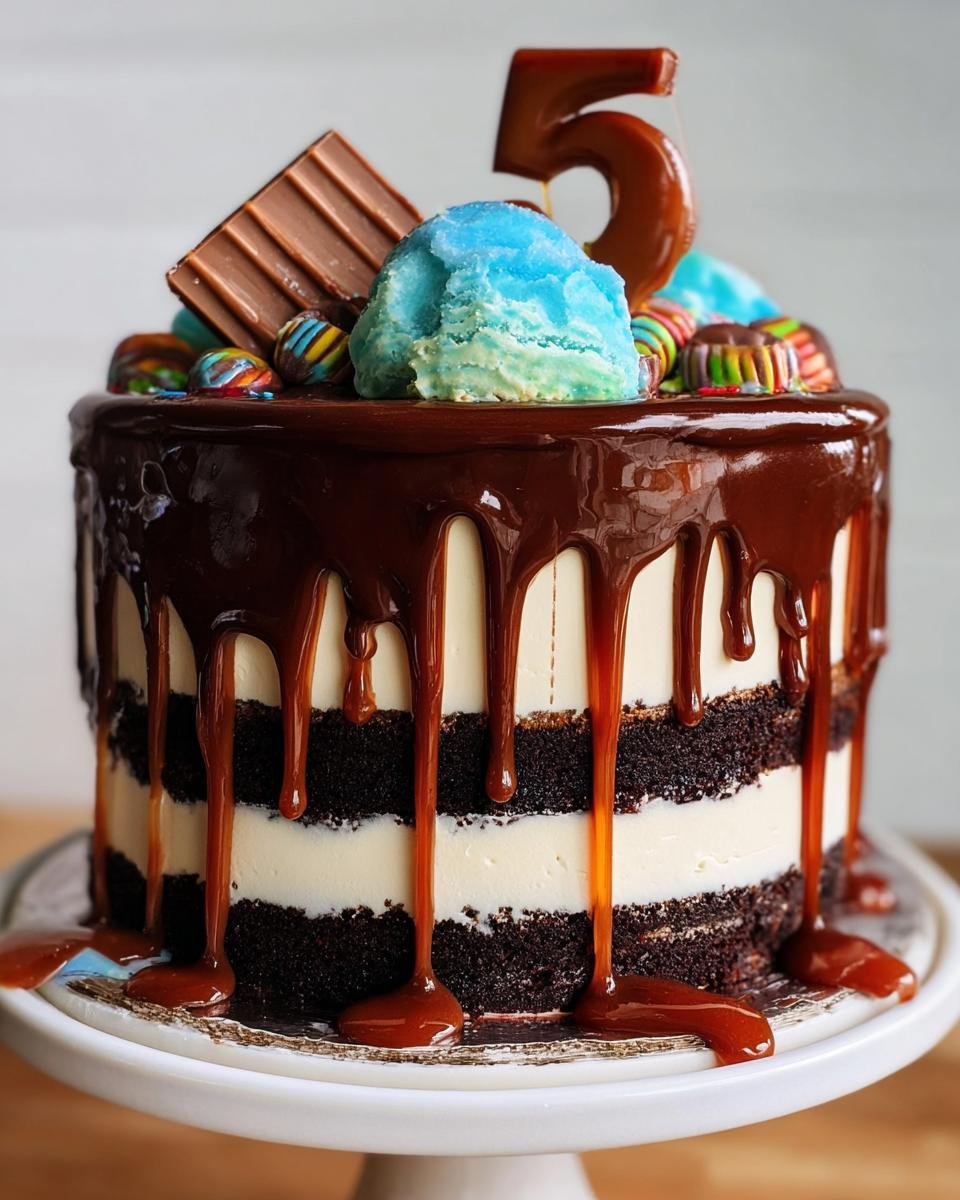
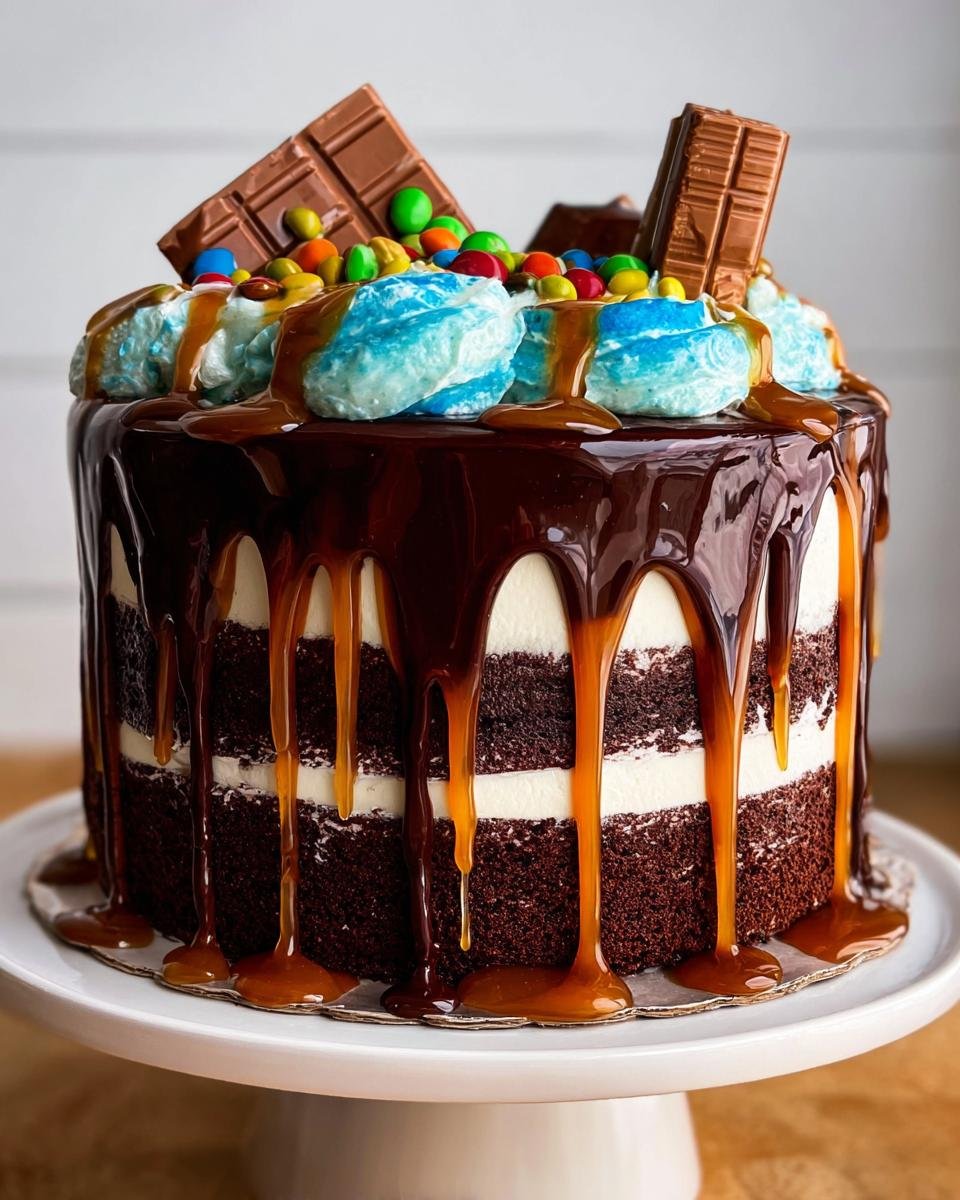
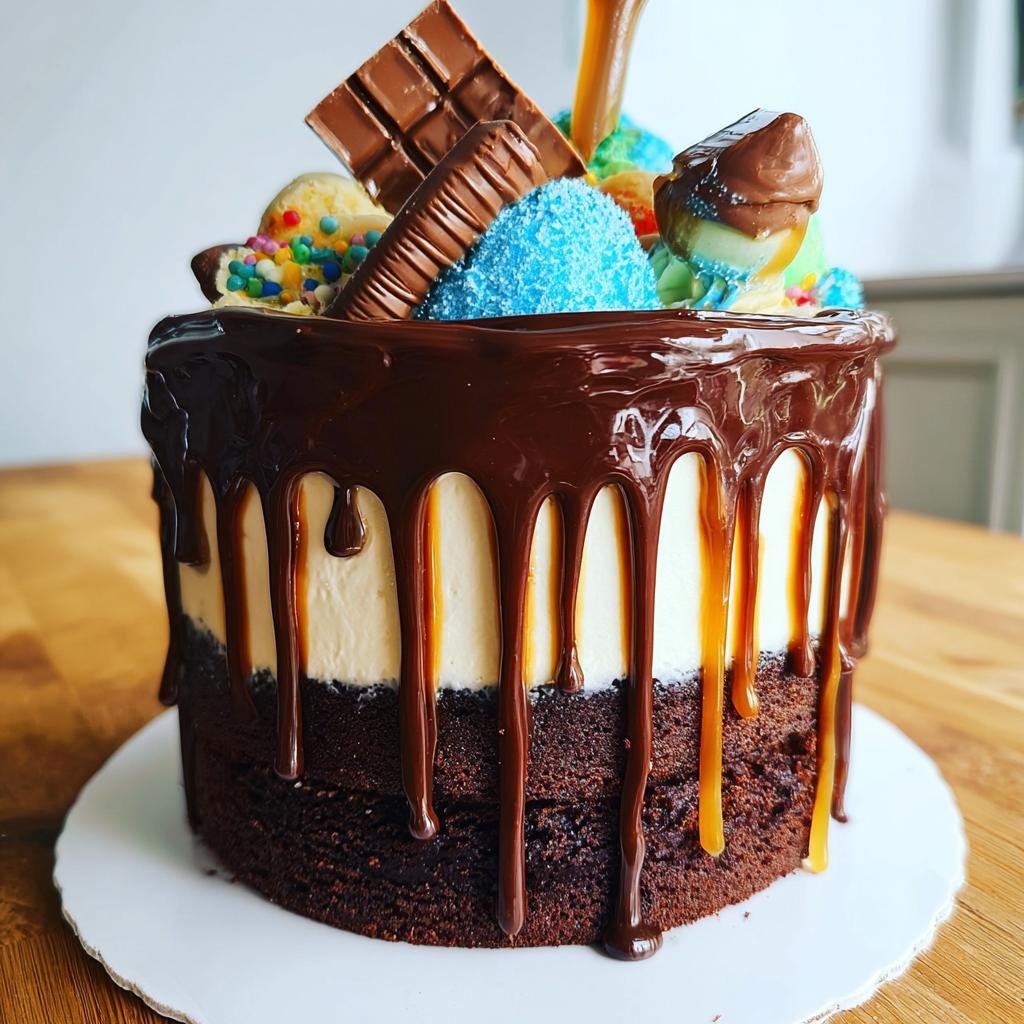
Caramel is my personal favorite for an autumnal or super decadent look. You’re going to combine 116 grams (around 2/3 cup) of Kraft caramel bits—they melt the smoothest, trust me—with a quarter cup of heavy cream. Because these are bits, they behave a little differently than the chips, but give it time, and it blends beautifully!

Toppings and Cake Ideas Dessert Party Flair
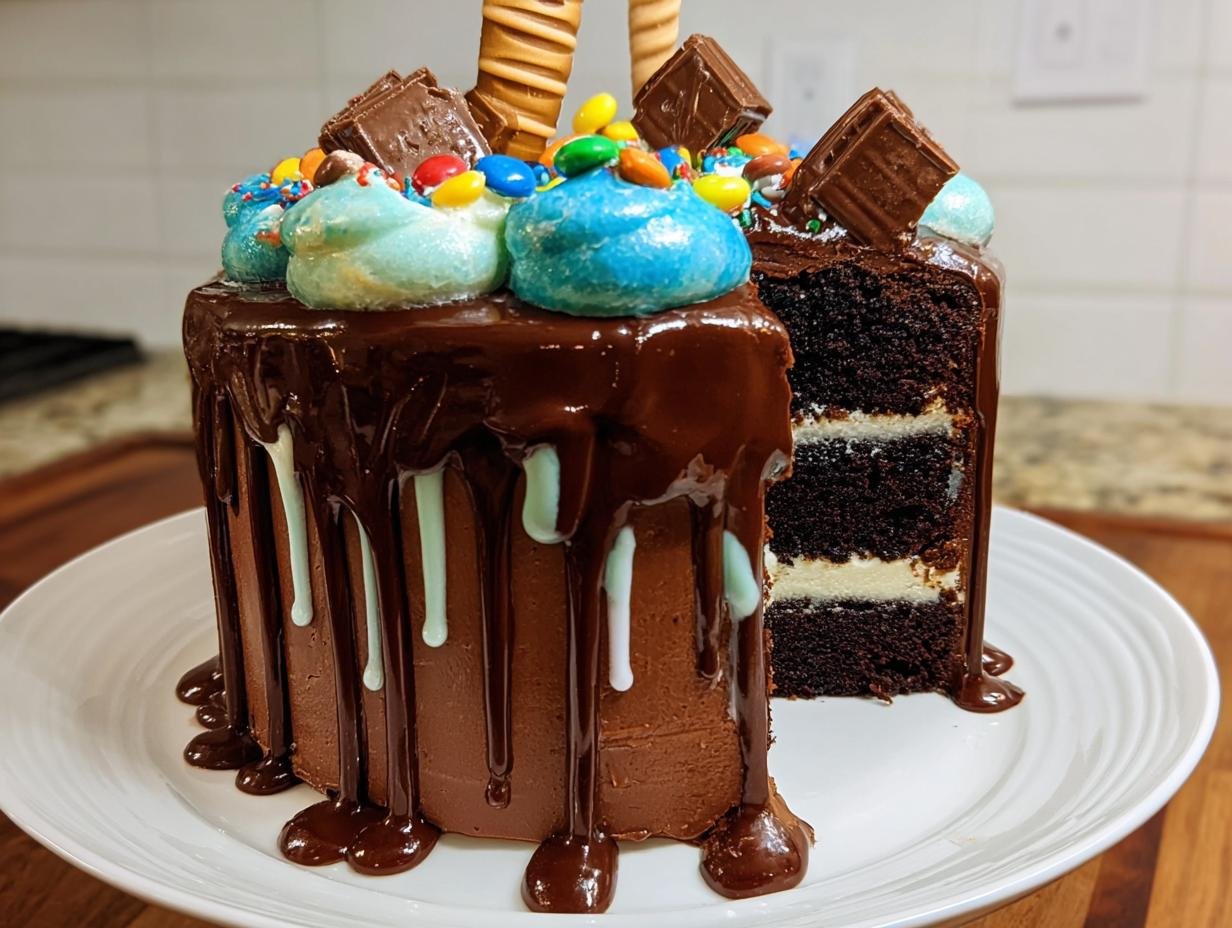
Once your drips are set, you need the jewelry for your cake! Don’t be shy! You can load up the top with prepared cake truffles or chocolate-covered strawberries. Macarons look fantastic clustered together, and you can always add some beautiful chocolate bark or theme-specific cake toppers to really finish off your Cake Ideas dessert party.
Step-by-Step Guide to Your Chocolate Drip Cake Party Ready
Time to put theory into practice! This is where we turn those gorgeous ingredients into flowing decoration. Just follow these steps in order, and you’ll see why I say this is truly beginner friendly. Remember that first time I mentioned with the shaking hands? That was because I rushed the melting!
Melting Each Drip Component Correctly
You must treat the drips differently. For your Chocolate Drip or your Caramel Drip, you can combine everything in a microwave-safe bowl and heat it on full power. However, the White Drip is very sensitive!
For the white mixture, you absolutely must heat it at 50% power only. This keeps the white chocolate from seizing up on you. Heat everything in 20 to 30-second increments. After *every* short burst, take it out and stir it around for a full minute before putting it back in. This constant agitation is your best defense against scorching!
Achieving the Right Drip Consistency with a Whisk
Once the chocolate chips or caramel bits are mostly melted down—and I mean mostly, with just a few stubborn little lumps remaining—switch gears immediately! Put that microwave away and grab your whisk.
Whisking takes over where stirring leaves off. It whips the residual heat through the mixture much faster and more evenly than just stirring, which helps the last bits melt right into a smooth pool. This ensures you don’t accidentally overcook your gorgeous drip while waiting for those last few pieces to dissolve.
Applying the Drip for a Professional Chocolate Drip Cake Party Ready Look
Before you even touch the mixture to the cake, check the base. That flat-iced surface needs to be firm and cold—like, refrigerator cold! If the frosting squishes when you tap it, wait longer!
Now, pour your beautiful, smooth drip into a clean squeeze bottle. Hold the bottle just over the edge of the cake and gently squeeze, letting the mixture fall over the edge naturally. You control the length of the drip by how long you hold the squeeze. It’s surprisingly relaxing once you get that perfect Chocolate Drip Cake Party Ready flow going down the sides!
Expert Tips for a Flawless Chocolate Drip Cake Party Ready
Okay, now that we have the melting process down, let’s talk about the real magic—or maybe the place where the magic turns into a mess if you aren’t watching closely! This part is where I wish I’d had a cheat sheet the first time I did this for my cousin’s graduation. Remember I mentioned my hands were shaking? The drip was running too fast, and I thought the whole cake was ruined! But I calmed down, waited for it to set slightly, and it ended up looking beautifully rustic. You won’t have to rely on luck, though, because I’m sharing my top troubleshooting secrets right here. A perfect Chocolate Drip Cake Party Ready is all about controlling what the temperature lets you control!
Troubleshooting: Drip Too Thick or Too Thin
No matter how careful you are, sometimes the consistency just isn’t cooperating. Don’t panic! We can fix this right in the squeeze bottle.
- If it’s too thick: Maybe your cream was a little cold, or your chocolate seized up slightly. The fix is simple, but slow: add maybe one teaspoon of heavy cream at a time, stirring vigorously after each addition until it flows just how you want it to.
- If it’s too thin/runny: This is the more common issue, especially with caramel. If it runs straight down to the plate without a nice ripple, you need more solids. Whisk in some more melted chocolate chips or candy melts (whichever drip you are working on) until it thickens up. Do *not* add more cream, or it will just get runnier!
Temperature Control for the Perfect Drip Flow
Temperature is everything in this process, I can’t stress that enough. You need the drip melted enough to flow, but not so hot that it melts your cold, flat-iced base underneath. Work quickly, but deliberately!
If you pace yourself too much while drizzling around the entire cake, the drips on the first side you decorated will start to cool and stiffen while you are working on the last side. Nobody wants a drip that stops halfway down the side because it got cold! If you feel the consistency change while you’re working, just give the squeeze bottle a quick shake or pop it back into the microwave for a five-second burst to refresh the heat.
Storing and Reheating Your Chocolate Drip Cake Party Ready Leftovers
I know, I know, a cake this good rarely looks threatening when it comes to leftovers, but life happens! If you somehow have any leftover cake, or maybe you made too much perfect drip mixture for your Chocolate Drip Cake Party Ready decoration, you absolutely should save that drip. It’s liquid gold!
Don’t just toss the extra ganache or caramel! You can store any leftover drip right in the container you used to melt it—just cover it tightly. The best place for it is the refrigerator, where it will keep nicely for up to two weeks. That means you can have leftover drizzle ready for a future batch of cookies or another cake project!
When you’re ready to use that chilled drip again (maybe as a simple drizzle over some ice cream?), just pop it back into the microwave. Heat it up gently, just like you did the first time, until it reaches that smooth, pourable consistency again. It reheats beautifully, making cleanup and storage for your next party decorating session totally painless.
Equipment Checklist for Success
You don’t need dozens of specialty tools to make this happen, which is another reason this method is so great for beginners! We are sticking to the absolute essentials that help you melt and control your drips perfectly. Grab these three things, and you are ready to go!
First up, you absolutely need a microwave-safe bowl. This is where all the magic starts. Whether you’re melting down those chocolate chips or blending the caramel bits, you need something that can handle short bursts of heat without a fuss.
Next, and this is crucial for the application, grab a clean squeeze bottle. This lets you control exactly where the drip starts and stops, which is how we get those nice, even lines down the side of the cake, rather than just dumping the chocolate on top!
Finally, make sure you have a small whisk handy. This doesn’t just help mix; it’s your fail-safe against scorching the white chocolate or seeds getting stuck! As soon as most of your chips are melted, you switch to the whisk for that final, crucial smoothing step.

That’s it! Bowl, bottle, and whisk. Simple tools for a stunning result.
Frequently Asked Questions About Making a Layer Cake
It’s totally normal to have questions when you’re aiming for that polished look for the first time! Drip cakes seem intimidating, but once you get the hang of the temperature and the flow for your layer cake, you’ll realize how truly beginner friendly the decorating part actually is. Here are a few things folks ask me most often!
Can I use only one type of drip instead of three?
Absolutely, and if you want to keep things super simple for your first try, I wholeheartedly recommend it! Focusing on just the semi-sweet Chocolate Drip is a great place to start. If you decide to stick with just chocolate, you might want to double the chocolate chip and cream amounts listed for that single flavor, just to make sure you have enough volume to go all the way around a standard 8-inch cake without running out mid-drip.
What is the best way to chill the cake before dripping?
This is a make-or-break step, so listen close! You want the frosting on that flat-iced cake to be firm, almost hard, to the touch. I usually pop my cake into the refrigerator for at least 30 minutes. If it’s warm or soft, the heat from your beautiful, freshly melted drip will instantly melt the buttercream, and instead of a nice cascade, you’ll just get a runny mess sliding down the sides!
Can I make the drips ahead of time?
Yes, I actually encourage this if you are hosting a big party and need the least amount of stress right before serving time! You can whip up all three drips (or just the one you plan to use) and store them exactly as I mentioned in the storage section—covered tightly in the fridge for up to two weeks. This is a great time-saver for quick recipes!
Just remember, they stiffen up solid when cold. When you are ready to decorate, reheat them gently in the microwave until they are smooth and pourable again, checking the texture frequently so you don’t overheat them!
Serving Suggestions for Your Chocolate Drip Cake Party Ready
Now that your amazing cake is decorated, what should you serve alongside it? Since this Chocolate Drip Cake Party Ready is so rich, it pairs beautifully with something bright! I always recommend fresh raspberries or sliced strawberries on the side to cut through that sweetness.
For drinks, you can never go wrong with strong, hot black coffee or a chilled glass of milk. It makes that leftover drip even better!
Share Your Perfect Chocolate Drip Cake Party Ready Creation
Whew! We did it! You took a flat-iced cake and turned it into a showstopper. I am so incredibly proud of you and your beautiful Chocolate Drip Cake Party Ready. Now comes my favorite part—seeing your masterpieces!
I really, truly want to see what you came up with. Did you go all chocolate? Did you mix in some of those macarons I suggested? Head down to the comments section right now and tell me how it went. I love hearing about the colors you chose!
If you snapped a photo of your finished creation, please share it on social media and tag me! Seeing your successful drips makes my day and inspires me to keep sharing these fun, beginner friendly dessert party ideas. Don’t forget to rate this recipe too, based on how easy it was to get that perfect flow!
Chocolate Drip Cake Party Ready
Ingredients
Equipment
Method
- Choose the drip flavor you want to make and combine all ingredients for that drip in a microwave-safe bowl. Heat the Caramel Drip or Chocolate Drip at full power. Heat the White Chocolate Drip at 50% power only.
- Heat the mixture in the microwave in 20 to 30-second increments. After each heating, stir for at least 30 seconds to one minute.
- Switch to a whisk once the chips or bits are mostly melted. Whisking thoroughly helps the dip melt faster and prevents overcooking.
- Drizzle the melted ganache or caramel drip down the sides of your cake using a squeeze bottle. Make sure the cake’s frosting is set and cold before drizzling.
- Store any leftover drip in the refrigerator for up to 2 weeks. Reheat the leftover drip in the microwave to use again as a drizzle.