
Sometimes, you just need a dessert that feels like a warm hug, right? Those nostalgic, slightly messy treats that taste like pure comfort are my weakness. If you’re looking for something truly special but don’t want to spend all day in the kitchen, let me introduce you to my go-to recipe: the easiest, most incredible Banoffee Pie with Whipped Cream you’ll ever make from scratch.
The first time I made this dessert was during one of those slow, rainy afternoons when I desperately needed something uplifting and cozy. I remember carefully layering the bananas and that thick, gooey dulce de leche, and then topping everything with a cloud of homemade whipped cream. It truly felt like building a little moment of joy right there in my kitchen! Sharing this perfect Banoffee Pie with Whipped Cream with friends later that evening reminded me just how powerful those simple, heartfelt desserts can be.
Why This Banoffee Pie with Whipped Cream Recipe Works for Everyone
I swear, this dessert is magic because it hits all the right notes without being fussy. It’s the perfect make-ahead treat, which is a lifesaver when the holidays roll around and your oven space is limited. Plus, it’s completely family friendly—kids adore the layers, and honestly, who doesn’t love bananas and toffee?
- It’s a true showstopper but uses mostly pantry staples.
- The chilling time means you can finish baking and focus on dinner.
- It delivers massive dessert impact with minimum fuss.
If you’re looking for another easy, comforting treat, you might want to check out my thoughts on oatmeal apple cake sometime!
Simple Steps for a Delicious Banoffee Pie with Whipped Cream
Seriously, the structure here is foolproof. That graham cracker crust comes together in five minutes—crush, melt butter, mix, press. You can even skip the short bake time if you’re truly in a rush! The real joy comes in the layering where we alternate that rich dulce de leche, fresh banana slices, and a sprinkle of toffee. It’s just so easy to assemble, which is why I often whip this up when I need a crowd-pleaser fast.
Essential Equipment for Your Banoffee Pie with Whipped Cream
Before you even think about melting butter, let’s make sure you have the right tools ready! Trust me, having everything pulled out beforehand makes the assembly process go at warp speed. For this pie, we aren’t dealing with super complicated techniques, but a few specific items really make a difference in getting that perfect presentation.
Since we are focusing on building those beautiful, distinct layers, a deep dish is non-negotiable. You definitely don’t want a standard shallow pie plate here; we need room for that thick caramel, all those bananas, and a generous crowning of cream!
Here’s what you’ll absolutely need on your counter:
- A sturdy 9-inch deep-dish pie plate. This gives us the necessary volume!
- My favorite tool for the topping—a stand mixer or a reliable hand mixer. Whipping cream by hand is great cardio, but not when you’re racing against time.
- A simple medium bowl for mixing up that cozy graham cracker crust base.
That’s really it! No fancy springform pans or complicated whisks needed. This is simple, straightforward baking equipment, which contributes to why this recipe is so easy to pull off.
Gathering Ingredients for Your From Scratch Banoffee Pie with Whipped Cream
Okay, let’s talk ingredients! This is where the magic begins for a truly authentic, from-scratch experience. Because we aren’t using store-bought caramel—we’re using the good stuff, the dulce de leche—the final texture is just miles better. Don’t skip the detail notes here; they are my little tricks to ensure everything layers beautifully.
Pulling everything out before you start is the key to keeping this assembly fast. If you want another great recipe that uses rich caramel flavors, peek at my caramel apple cheesecake bars!
We divide our list into two essential teams: the sturdy base and the luxurious crown!
For the No-Bake Graham Cracker Crust
This part is super straightforward, requiring just four things to make our base:
- Graham Cracker Crumbs: You’ll need 2 full cups. If you use whole crackers, crush them up fresh!
- Unsalted Butter: 10 tablespoons, and they must be melted down completely.
- Brown Sugar: A quarter cup gives it that lovely hint of molasses flavor. Even in the crust!
- Kosher Salt: Just a tiny pinch to balance out all that sweetness—don’t leave it out!
For the Filling and Whipped Cream Topping
This category holds the stars of the show. Pay close attention to how we divide the dulce de leche!
- Dulce de Leche: This is critical! You need 1.5 cups total for the base layer. Then, save an extra 1/4 cup specifically for drizzling later.
- Bananas: 3 bananas that you’ll slice fresh. Plus a few extra for topping once it’s done!
- Toffee Bits: Grab half a cup for sprinkling throughout, with more saved for garnish.
- Heavy Whipping Cream: One full pint, it needs to be cold!
- Granulated Sugar: 3 tablespoons to sweeten up that cream.
- Vanilla Extract: Just half a teaspoon for flavor depth in the topping.
Step-by-Step Guide to Make Banoffee Pie with Whipped Cream
Putting this pie together is honestly one of the most satisfying things you can do in the kitchen! We break this down into four simple stages, and honestly, the hardest part is waiting for that chill time at the end. If you’re looking for other simple fruit desserts, my recipe for apple cake with cream cheese delights is another keeper!
Preparing and Baking the Crust
We start by getting the oven warm—preheat it to 350°F (175°C). In a bowl, just combine all those crust ingredients: the crumbs, the melted butter, brown sugar, and salt. Mix it well until it looks like wet sand. Now, press that mixture firmly into the bottom and all the way up the sides of your deep-dish pie plate. Don’t be shy; press it down good! We’re baking this just until it sets lightly, which only takes about 8 minutes. Once that’s done, pull it out and let it cool completely. If you put the filling on a warm crust, things get messy fast!
Layering the Filling for the Banoffee Pie with Whipped Cream
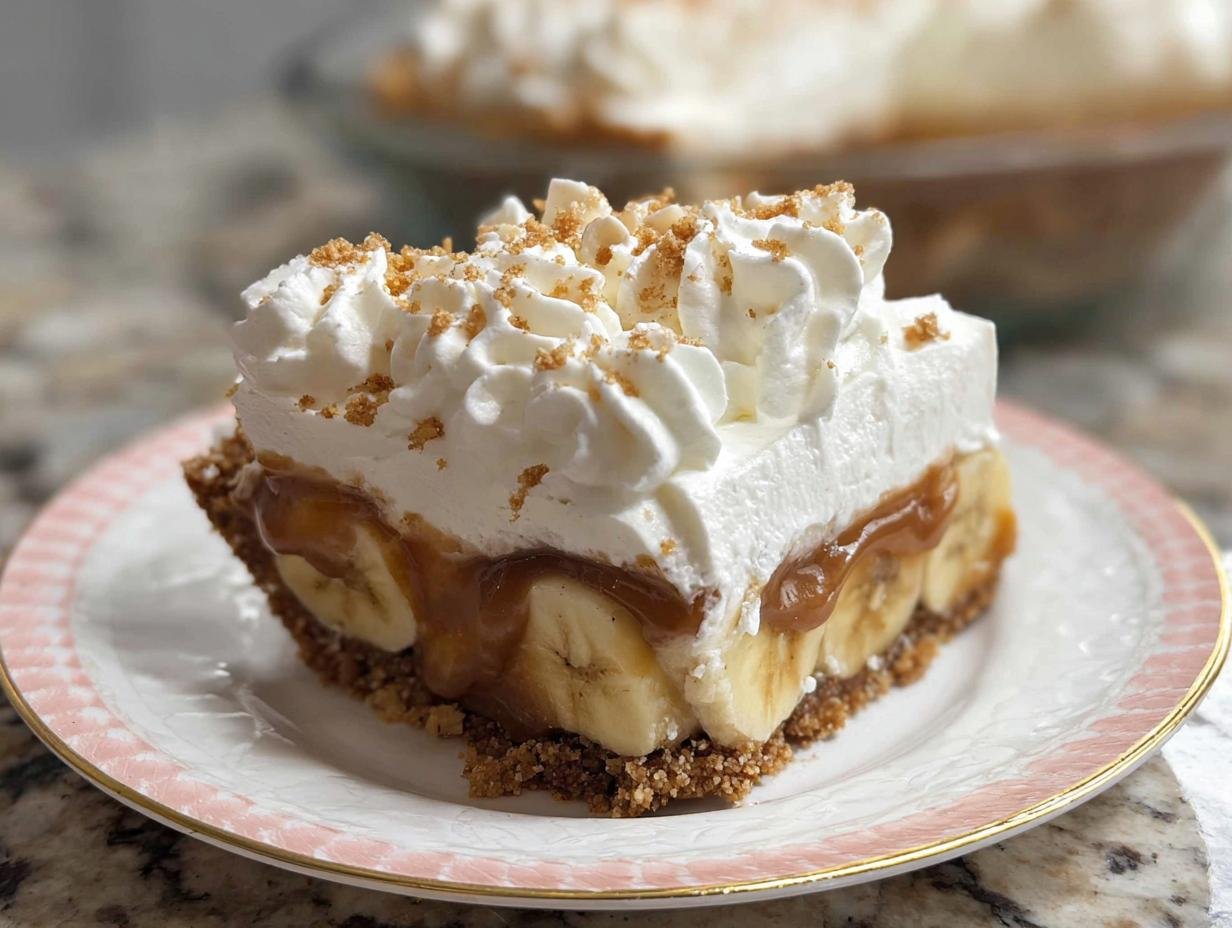
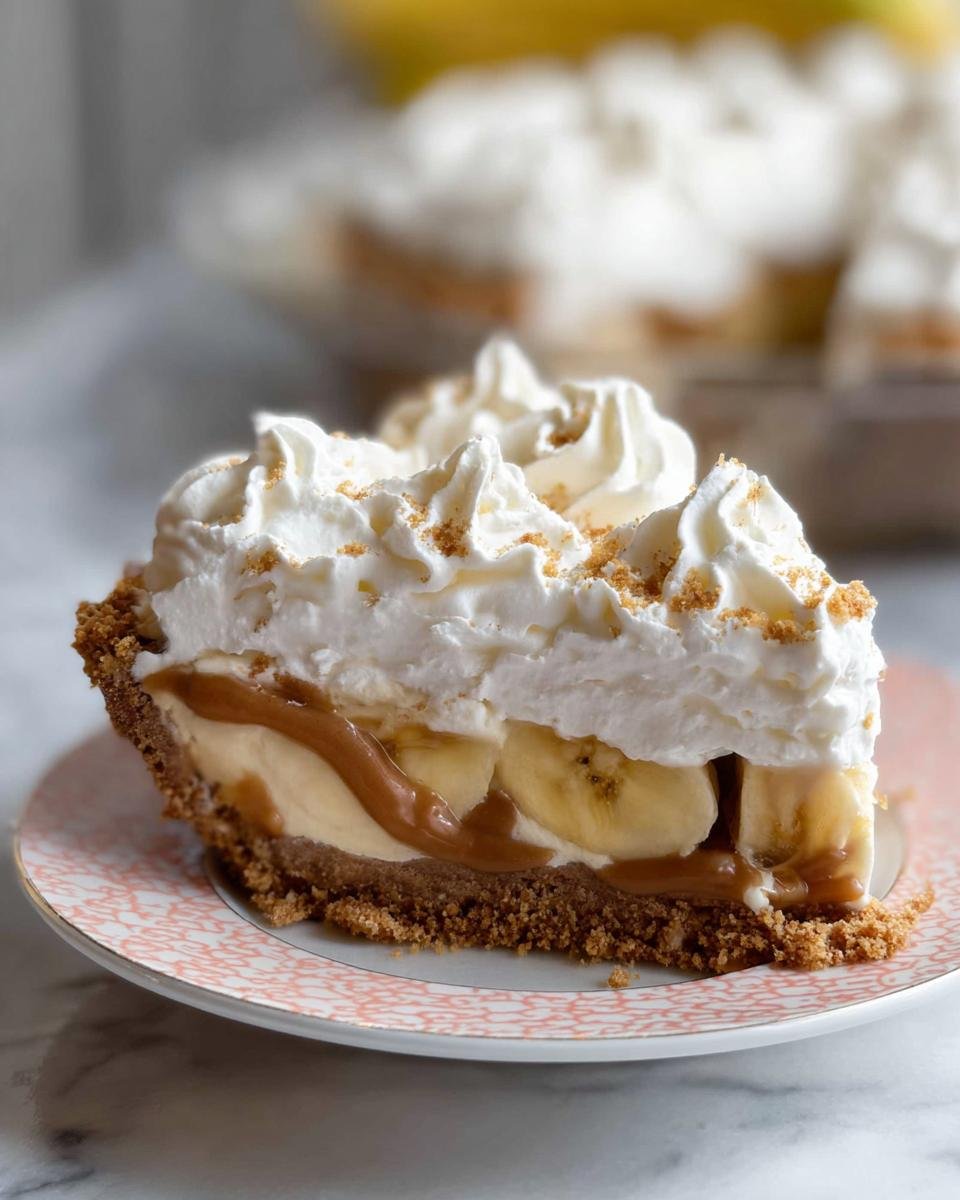
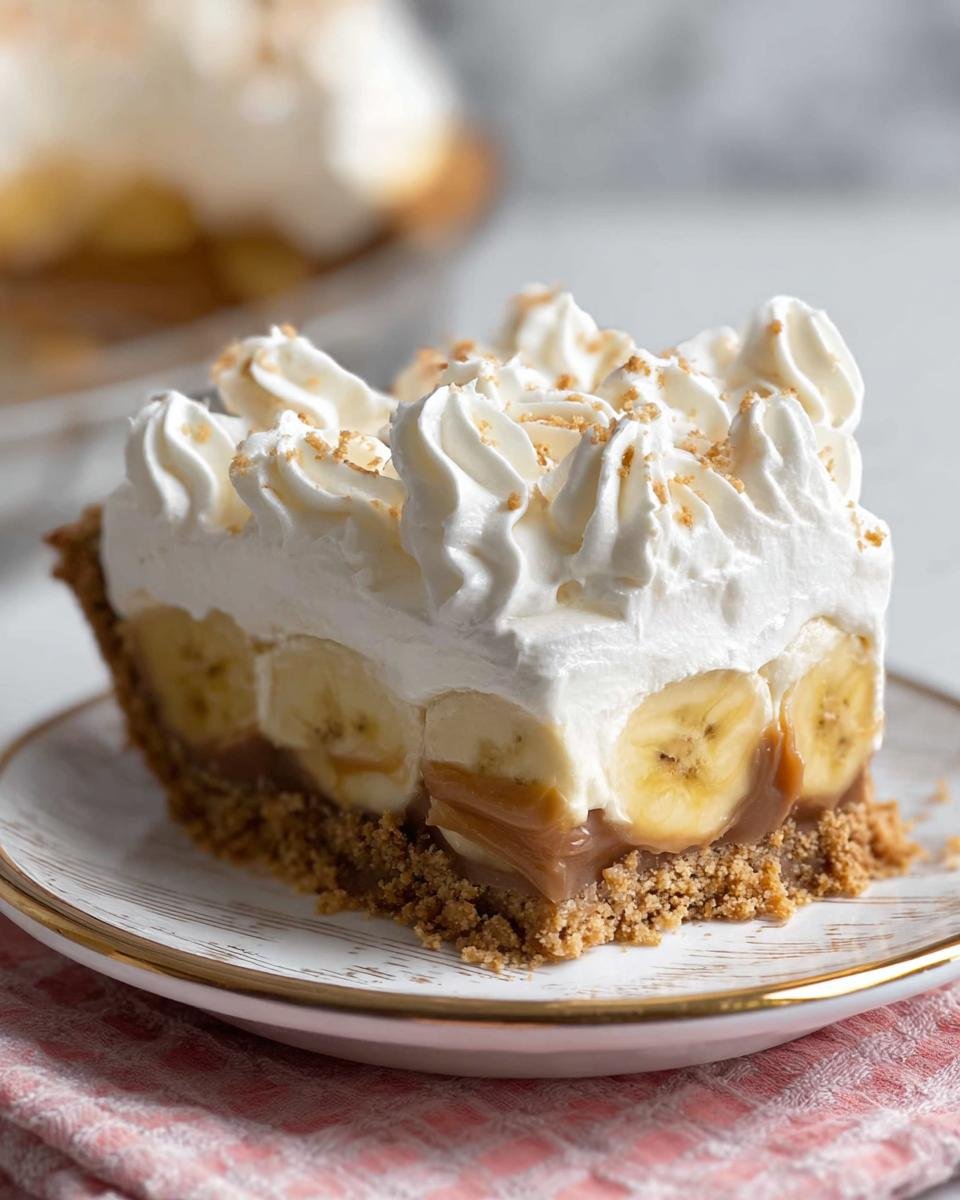
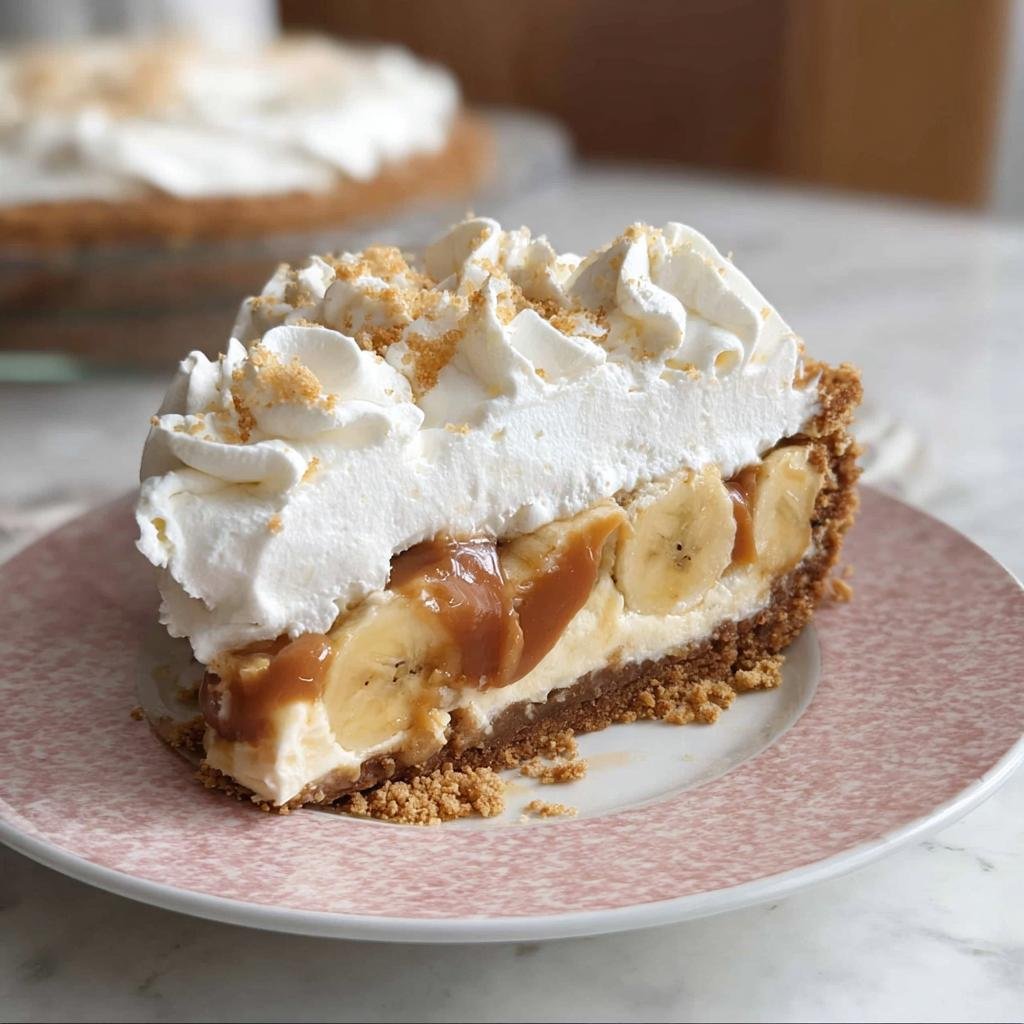
Once your crust is totally cool, it’s time for the goo! Pour the main portion (1 1/2 cups) of that glorious dulce de leche right over the bottom and spread it evenly. Next, grab those sliced bananas and arrange them lovingly over the caramel. You want them covering everything so no caramel peeks through later—that’s my pro tip to keep them looking fresh! Sprinkle half a cup of those toffee bits over the bananas. Finally, take that reserved 1/4 cup of dulce de leche and drizzle it artfully across the top. Seriously soothing work!

Creating the Perfect Whipped Cream
Time for the cloud! Make sure your heavy whipping cream is super cold. Pour it into your mixer bowl along with the granulated sugar and the vanilla extract. Beat this on medium-high speed until you start seeing soft peaks form—you know, when the peaks look floppy and gentle, not stiff mountains. Don’t overbeat it, or hello, butter! Now, take the back of a spoon and gently drop dollops of the remaining dulce de leche over this fresh cream. Use the back of the spoon to create soft swirls; we want visual interest, not a perfectly blended mess.
Chilling and Final Garnish
We’re almost there! We need the pie to firm up so it actually slices beautifully. Cover the pie loosely and pop it into the fridge for at least 30 minutes, but up to 3 hours is even better if you can wait. Just before you bring it out to serve your adoring fans, give it one last beautiful touch. Garnish with any extra banana slices you saved and a final shower of toffee bits. That’s it—instantly impressive!
Expert Tips for the Best Banoffee Pie with Whipped Cream
You know, even though this is technically an easy recipe, those little details can elevate it from “good” to “I need the recipe immediately!” My notes section is full of little secrets I learned the hard way, so pay attention to making superior ingredient choices!
First up: that caramel situation. You absolutely must use proper dulce de leche here for this banoffee pie. Do not swap it out for standard caramel sauce unless you want your pie to weep all over the plate! Caramel sauce usually has too much moisture and won’t set up properly when it chills. Dulce de leche is thicker and gives you that perfect, fudge-like layer that holds up under the banana weight.
When you mash those graham crackers, you can use your food processor if you have one, but I still love the old-school method sometimes. Throw them in a heavy Ziploc bag and just beat them down with a rolling pin until they’re fine crumbs. It’s very therapeutic!
And about slicing! Because we are dealing with soft fruit and a rich filling, this pie is never going to cut like a stiff cheesecake. That’s okay! That soft cut is part of the charm. To help it along, always make sure your pie is chilled for that full 30 minutes minimum. Run your knife under hot water, dry it off quickly, and then slice. Wipe the knife clean between cuts, and you’ll get much neater pieces!
If you’re worried about the bananas looking dull while the pie chills, try adding just a tiny, tiny spritz of lemon juice over them before you add the whipped cream. Just a tiny bit—enough to keep them bright, but not so much that you actually taste the sourness!
If you want to try another dessert that’s great for setting up ahead of time, my opinion on the blackberry pretzel salad recipe might give you some inspiration for your next party!
Make-Ahead and Storage for Your Banoffee Pie with Whipped Cream
One of the biggest wins for this recipe is how well it handles being prepped early, which is a huge bonus when you’re getting ready for a big holiday meal or hosting friends. You can absolutely make the crust ahead of time. Just bake it for those 8 minutes, let it cool completely, and then wrap it up tight. It stays perfectly crisp in an airtight container at room temperature for a couple of days, or you can freeze the empty crust for up to three months! Isn’t that handy for emergency dessert needs?
Now, once we get to the banana and cream part, things change a bit. Because bananas brown so quickly—even when we try to cover them well—I strongly suggest assembling the entire Banoffee Pie with Whipped Cream no more than 3 to 4 hours before you plan to serve it. If you assemble it too early, those bananas under the cream start turning an unappetizing shade of brown.
The general rule for keeping the finished pie is refrigeration. It needs to stay chilled for at least 30 minutes before slicing, but it’s generally good to eat for 2 to 3 days if you have leftovers. I always store it covered loosely in the fridge. And here’s the big warning: Do not, I repeat, *do not* try to freeze the fully assembled pie! The whipped cream turns grainy, and the dulce de leche gets rock hard. Freeze the crust only; everything else needs to be enjoyed fresh.
If you are looking for other make-ahead friendly desserts that you can prep the night before, you absolutely have to check out my notes on pumpkin overnight oats—it sets the standard for early prep!
Historical Background of Banoffee Pie
You know, sometimes the best desserts are the ones that pop up completely by accident! This wonderful concoction isn’t some fancy French pastry that took centuries to perfect; it’s actually quite modern, which I think is fun for such a classic dessert.
The original recipe was dreamed up back in the 1970s by a couple of brilliant people named Nigel Mackenzie and Ian Dowding. They owned this little restaurant called The Hungry Monk in East Sussex, England. They were constantly kicking around ideas for a new dessert they could put on the menu.
They started messing around with an American recipe for “Blum’s Coffee Toffee Pie,” which sounds pretty good on its own, but they decided to swap out the coffee elements for bananas. Can you imagine? What an inspired choice that was!
They tried a few variations, including one with mandarin oranges (yikes!), but when they settled on the combination of bananas and toffee—using the famous canned caramel, dulce de leche—they knew they had struck gold. They named it “Banoffee,” a cute little contraction of “banana” and “toffee.” It was an instant sensation and quickly jumped from their little restaurant menu into kitchens all over the UK, becoming a true staple dessert almost overnight!

It always blows my mind that something so beloved and seemingly timeless only really popped up about 50 years ago. It proves that culinary history is still being made every time we decide to put bananas and caramel together!
Frequently Asked Questions About Banoffee Pie with Whipped Cream
I know you might have a few little questions swirling around, especially if you’re making this for the first time! Don’t stress; these are the most common things people ask me about this amazing dessert. I tried to keep the answers short and sweet—just like the pie itself!
Can I make this Banoffee Pie with Whipped Cream ahead of time?
Yes, that’s one of the best things about this dessert! It’s naturally make-ahead friendly. You can comfortably prepare the graham cracker crust and bake it up to two days early. However, for the best flavor and appearance, I highly recommend layering the dulce de leche and bananas no more than 4 hours before serving, and then adding the freshly whipped cream right before you plan to eat it. This keeps the bananas looking bright!
What is the best substitute for dulce de leche in this easy recipe?
This is super important: there isn’t a great substitute if you want that true banoffee flavor and texture! You really need to use true dulce de leche, not standard caramel sauce or butterscotch. Dulce de leche is cooked milk, which is thicker and sets firmly when chilled, holding up the bananas perfectly. Other sauces won’t firm up the way we need them to for clean slices.
If you’re exploring other simple desserts perfect for preparing early, check out my thoughts on the pumpkin pie yogurt bowl—it’s fantastic for grab-and-go breakfasts!
Nutritional Information Estimate for Banoffee Pie with Whipped Cream
Now, I know we don’t make this dessert for its health benefits, right? It’s pure indulgence! But because so many of you ask, I pulled the estimated nutritional information based on 8 standard slices. Keep in mind this is just an estimate, as the final numbers swing wildly based on the exact brand of dulce de leche or the amount of butter you press into that crust!
Overall, expect these slices to pack a punch of energy, mostly coming from the fats in the cream and butter, and the sugars from the toffee layers. For another delicious but slightly different take on dessert fuel, you should check out my high-protein triple berry bake recipe!
Here’s the breakdown per slice:
- Calories: About 596
- Fat: Roughly 44g
- Carbohydrates: Around 50g
- Protein: A light 3g
Share Your Family Friendly Banoffee Pie Creations
Well, this is it—the end of the road for this delicious journey! I truly hope you loved walking through these steps to make your very own Banoffee Pie with Whipped Cream. It’s just such an easy dessert to love, isn’t it? I always feel like I’m breaking out the good china when I serve this one up.
I absolutely live for seeing your creations! If you make this pie, snap a picture and tag me on social media—I want to see those gorgeous swirls of cream and toffee drizzle! Don’t forget to come back here and leave a rating below; it really helps other bakers feel confident about tackling this recipe next time they need an easy, family friendly treat.
If you’re looking for another fun baking project that uses simple ingredients, perhaps you’ll want to explore my recipe for cottage cheese cookie dough—it’s surprisingly good!
By Emily Santiago – Wellness Writer & Content Editor
Banoffee Pie with Whipped Cream
Ingredients
Equipment
Method
- Preheat your oven to 350°F (175°C).
- In a medium bowl, stir together graham cracker crumbs, melted butter, brown sugar, and salt.
- Firmly press the mixture into the bottom and up the sides of a 9-inch deep-dish pie plate.
- Bake until lightly set, about 8 minutes. Set the crust aside to cool.
- Pour 1½ cups dulce de leche into the bottom of the cooled crust.
- Top with sliced bananas, arranging them in concentric circles, overlapping slightly.
- Sprinkle with ½ cup toffee bits; drizzle with the remaining ¼ cup dulce de leche.
- Using a stand mixer or hand mixer, beat the heavy whipping cream and 3 Tbsp. granulated sugar at medium-high speed until soft peaks form. Stir in the vanilla extract.
- Spoon the whipped cream over the banana layer.
- Drop teaspoons of the remaining dulce de leche over the whipped cream layer; swirl using the back of a spoon.
- Refrigerate the pie for 30 minutes up to 3 hours to firm up.
- Garnish with extra toffee bits and banana slices before serving.